
Canon PIXMA MX360 Support Question
Canon PIXMA MX360 Support Question
Find answers below for this question about Canon PIXMA MX360.Need a Canon PIXMA MX360 manual? We have 5 online manuals for this item!
Question posted by SKeBod on December 19th, 2013
Directions On How To Scan On Canon Mx360 Printer
The person who posted this question about this Canon product did not include a detailed explanation. Please use the "Request More Information" button to the right if more details would help you to answer this question.
Current Answers
Related Canon PIXMA MX360 Manual Pages
MX360 series Getting Started - Page 31
... install Easy-WebPrint EX. General Specifications
Copy Specifications
Scan Specifications
Specifications
Printing resolution (dpi)
4800* (horizontal...may be changed . Interface
USB Port: Hi-Speed USB *1
Direct Print Port: PictBridge Bluetooth v2.0 (Option) *2*3*4 USB flash...; Windows: Uninstall software bundled with the Canon inkjet printer before upgrading from Windows Vista to change ...
Selecting Best Receive Mode - Page 6

...Priority Mode")
To receive a fax when you must either pick up the handset. • The MX360 will take over the call .
Click here for fax tones. • When the tones stop ... the handset on the phone connected to the MX360. • Listen for "Tel Priority Mode" Setup Directions
Click Here to receive a fax, you are heard by the MX360 it will receive the fax document.
IMPORTANT:...
Selecting Best Receive Mode - Page 7
The only way the MX360 can use the MX360 in the default mode ("Tel Priority" Mode) and receive faxes while you are home. Another option is ...are not home. You can receive faxes when you are not home is not connected to the MX360. Click here for Default Mode ("Tel Priority Mode") Setup Directions
Click here for "Distinctive Ring" & "DRPD Mode" information
Click here if the options above do...
Selecting Best Receive Mode - Page 9
... from your needs
Click Here to "DRPD Mode".
Click here for Default Mode ("Tel Priority Mode") Setup Directions
Click here for Voice Mail users
You can use the MX360 in the default mode (Tel Priority" Mode) and receive faxes while you are not home. This option ...Ring" & "DRPD Mode" information
Click here if the options above do not meet your phone provider and set the MX360 to Restart
Selecting Best Receive Mode - Page 10
...receive faxes when you are not home.
Click here for Default Mode ("Tel Priority Mode") Setup Directions
Click here for persons who do not meet your needs
Click Here to "DRPD Mode".
Recommended ...here if the options above do not have voice mail or an answering machine
You can use the MX360 in the default mode (Tel Priority" Mode) and receive faxes while you are home. Another option...
Setting Default Mode - Page 4
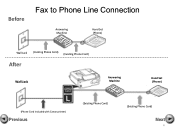
Before
Fax to Phone Line Connection
Answering Machine
Hand Set (Phone)
Wall Jack (Existing Phone Cord) (Existing Phone Cord)
After
Wall Jack
Answering Machine
Hand Set (Phone)
(Phone Cord included with Canon printer)
Previous
(Existing Phone Cord)
(Existing Phone Cord)
Next
4
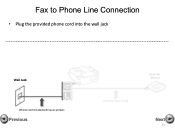
Setting Default Mode - Page 5

Fax to Phone Line Connection
• Plug the provided phone cord into the wall jack
Wall Jack
Answering Machine
Hand Set (Phone)
(Phone Cord included with Canon printer)
Previous
(Existing Phone Cord)
(Existing Phone Cord)
Next
5
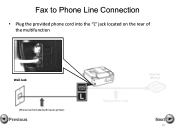
Setting Default Mode - Page 6
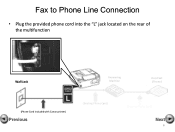
Fax to Phone Line Connection
• Plug the provided phone cord into the "L" jack located on the rear of the multifunction
Wall Jack
Answering Machine
Hand Set (Phone)
(Phone Cord included with Canon printer)
Previous
(Existing Phone Cord)
(Existing Phone Cord)
Next
6
Setting Default Mode - Page 7
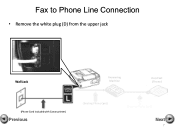
Fax to Phone Line Connection
• Remove the white plug (D) from the upper jack
Wall Jack
Answering Machine
Hand Set (Phone)
(Phone Cord included with Canon printer)
Previous
(Existing Phone Cord)
(Existing Phone Cord)
Next
7
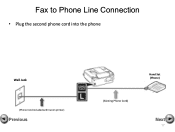
Setting Default Mode - Page 8
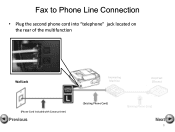
Fax to Phone Line Connection
• Plug the second phone cord into "telephone" jack located on the rear of the multifunction
Wall Jack
Answering Machine
Hand Set (Phone)
(Phone Cord included with Canon printer)
Previous
(Existing Phone Cord)
(Existing Phone Cord)
Next
8
Setting Default Mode - Page 9
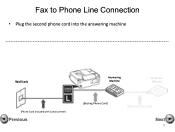
Fax to Phone Line Connection
• Plug the second phone cord into the answering machine
Wall Jack
Answering Machine
Hand Set (Phone)
(Phone Cord included with Canon printer)
Previous
(Existing Phone Cord)
(Existing Phone Cord)
Next
9
Setting Default Mode - Page 10
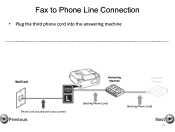
Fax to Phone Line Connection
• Plug the third phone cord into the answering machine
Wall Jack
Answering Machine
Hand Set (Phone)
(Phone Cord included with Canon printer)
Previous
(Existing Phone Cord)
(Existing Phone Cord)
Next
10
Setting Default Mode - Page 11
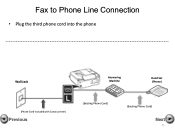
Fax to Phone Line Connection
• Plug the third phone cord into the phone
Wall Jack
Answering Machine
Hand Set (Phone)
(Phone Cord included with Canon printer)
Previous
(Existing Phone Cord)
(Existing Phone Cord)
Next
11
Setting Default Mode - Page 12
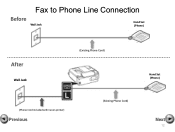
Fax to Phone Line Connection
Before
Wall Jack
Hand Set (Phone)
After
Wall Jack
(Existing Phone Cord)
(Phone Cord included with Canon printer)
Previous
(Existing Phone Cord)
Hand Set (Phone)
Next
12
Setting Default Mode - Page 13
Fax to Phone Line Connection
• Plug the provided phone cord into the wall jack
Wall Jack
(Phone Cord included with Canon printer)
Previous
(Existing Phone Cord)
Hand Set (Phone)
Next
13
Setting Default Mode - Page 14
Fax to Phone Line Connection
• Plug the provided phone cord into the "L" jack located on the rear of the multifunction
Wall Jack
(Phone Cord included with Canon printer)
Previous
(Existing Phone Cord)
Hand Set (Phone)
Next
14
Setting Default Mode - Page 15

Wall Jack
(Phone Cord included with Canon printer)
Previous
(Existing Phone Cord)
Hand Set (Phone)
Next
15 Fax to Phone Line Connection
• Remove the white plug (D) from the upper jack.
Setting Default Mode - Page 16

Fax to Phone Line Connection
• Plug the second phone cord into the "telephone" jack located on the rear of the multifunction
Wall Jack
(Phone Cord included with Canon printer)
Previous
(Existing Phone Cord)
Hand Set (Phone)
Next
16
Setting Default Mode - Page 17
Fax to Phone Line Connection
• Plug the second phone cord into the phone
Wall Jack
(Phone Cord included with Canon printer)
Previous
(Existing Phone Cord)
Hand Set (Phone)
Next
17
Fax Setup Guide - Page 7
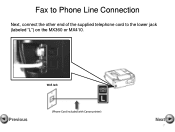
Fax to Phone Line Connection
Next, connect the other end of the supplied telephone cord to the lower jack (labeled "L") on the MX360 or MX410. Wall Jack
Previous
(Phone Cord included with Canon printer)
Next
7
Similar Questions

Troubleshooting For Scanning And Printer Machine Canon Pixma 500
i was unable to connect the printer with scanner.please help
i was unable to connect the printer with scanner.please help
(Posted by vengshine15 9 years ago)

Where Do I Find My Model Serial Number On Canon Printer Pixma Mx360
(Posted by brainsteven 10 years ago)


My Canon Pixma Mx360 Printer Is Not Responding
my printer will not respond to my laptop OS windows 7
my printer will not respond to my laptop OS windows 7
(Posted by deeriggins1985 11 years ago)