
Canon PC940 Support Question
Canon PC940 Support Question
Find answers below for this question about Canon PC940.Need a Canon PC940 manual? We have 1 online manual for this item!
Question posted by jennygraham on September 9th, 2013
When New Cannon Cartridge Is Replaces'wheels Rubbing'
very loud sound. when I put in prior cannon cartridge..it sounds fine.
Current Answers
Related Canon PC940 Manual Pages
Service Manual - Page 3
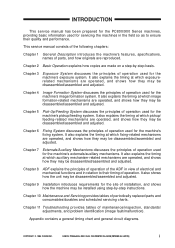
...'s features, specifications, names of maintenance/inspection, standards/ adjustments, and problem identification (image fault/malfunction). Chapter 4
Image Formation System discusses the principles of periodically replaced parts and consumables/durables and scheduled servicing charts. It also explains the timing at which exposurerelated mechanisms are operated, and shows how they may be...
Service Manual - Page 8
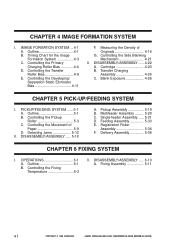
Timing Chart for the Image Formation System 4-3 C. DISASSEMBLY/ASSEMBLY ..... 4-22 A. Cartridge 4-23 B. PICKUP/FEEDING SYSTEM.......5-1 A. Detecting Jams 5-12
II. Single-feeder Assembly ..... 5-31 D. Outline 4-1 B. Controlling the Transfer Roller Bias 4-8 E. Measuring the Density of Paper 5-9 D. Pickup Assembly 5-...
Service Manual - Page 9
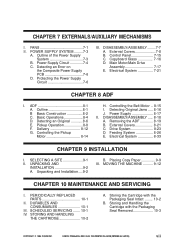
Main Motor/Main Drive Assembly 7-17 E. Basic Operations 8-4 D. Controlling the Pickup Motor 8-14
H. Drive System 8-23 D. PERIODICALLY REPLACED PARTS 10-1
II. DURABLES AND CONSUMABLES 10-1
III. Storing the Cartridge with the Packaging Seal Removed 10-3
COPYRIGHT © 1999 CANON INC. CANON PC800s/900s REV.0 AUG. 1999 PRINTED IN JAPAN (IMPRIME AU JAPON)
vii...
Service Manual - Page 13
...make jam removal easy.
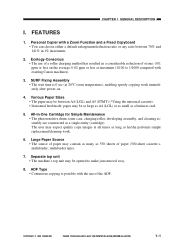
8. Personal Copier with existing Canon machines).
3. Various Paper Sizes • The paper may be between 70% and 141% in -One Cartridge for Simple Maintenance • The... photosensitive drum, toner case, charging roller, developing assembly, and cleaning assembly are constructed as he/she performs simple replacement/cleaning...
Service Manual - Page 93
... SYSTEM ...4-1 A. Controlling the Primary Charging Roller Bias 4-4 D. Controlling the Transfer Roller Bias 4-8 E. Controlling the Side Blanking Mechanism 4-21
II. DISASSEMBLY/ASSEMBLY ..... 4-22 A.
Outline 4-1 B. Cartridge 4-23 B. Transfer Charging Assembly 4-25 C. Measuring the Density of how images are operated, and shows how they may be disassembled/assembled and adjusted...
Service Manual - Page 96

... AU JAPON) CHAPTER 4 IMAGE FORMATION SYSTEM
Copyboard glass Scanning lamp
AE sensor
Side blanking lamp
Lens
Primary charging roller
Developing cylinder
Photosensitive
drum
Drum cartridge
Static eliminator
Transfer roller
Q101 Microprocessor
DC controller PCB
Lamp regulator block
High-voltage circuit block
Q900 Microprocessor
Composite power supply PCB
Figure 4-101
4-2
COPYRIGHT...
Service Manual - Page 112
...4-116
4-18
COPYRIGHT © 1999 CANON INC.
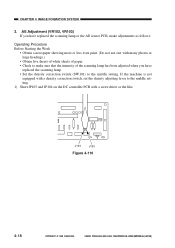
AE Adjustment (VR102, VR103) If you have
replaced the scanning lamp. • Set the density correction switch (SW101) to make sure that the ...intensity of the scanning lamp has been adjusted when you have replaced the scanning lamp or the AE sensor PCB, make adjustments as follows:
Operating Procedure Before Starting...
Service Manual - Page 117
...AUG. 1999 PRINTED IN JAPAN (IMPRIME AU JAPON)
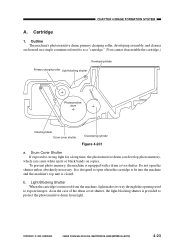
4-23 Light-Blocking Shutter When the cartridge is equipped with a drum cover shutter. As in a single container referred to expose images..., light makes its way through the opening used
to as a "cartridge." (You cannot disassemble the cartridge.)
Developing blade Primary charging roller Light-blocking shutter
Photosensitive drum
Cleaning blade...
Service Manual - Page 118
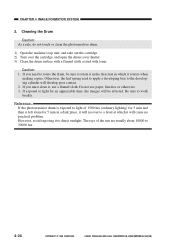
...) Cleaning the Drum
Caution: As a rule, do not touch or clean the photosensitive drum.
1) Open the machine's top unit, and take out the cartridge. 2) Turn over the cartridge, and open the drum cover shutter 3) Clean the drum surface with a flannel cloth coated with toner. If you need to a level at which it...
Service Manual - Page 257
... the Packaging Seal Removed 10-3
COPYRIGHT © 1999 CANON INC. Storing and Handling the Cartridge with the Packaging Seal Intact ........ 10-2
B. PERIODICALLY REPLACED PARTS 10-1
II. DURABLES AND CONSUMABLES 10-1
III. CANON PC800s/900s REV.0 AUG. 1999 PRINTED IN JAPAN (IMPRIME AU JAPON) SCHEDULED SERVICING ....... 10-1 IV. CHAPTER ...
Service Manual - Page 262
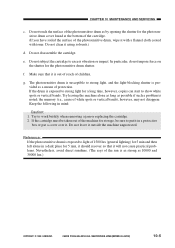
...a problem is exposed to strong light for the photosensitive drum cover found at the bottom of the cartridge. (If you have soiled the surface of children. Do not clean it with a flannel cloth coated...a means of the sun is susceptible to work briskly when removing a jam or replacing the cartridge. 2. Keep the following in a dark place for 5 min and then left alone in mind:
Caution: 1....
Service Manual - Page 307
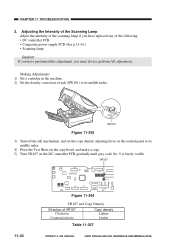
...11-41.) • Scanning lamp
Caution: If you have performed this adjustment, you have replaced any of VR107 Clockwise
Counterclockwise
Copy density Lighter Darker
Table 11-207
11-42
COPYRIGHT ©... 1999 CANON INC. CHAPTER 11 TROUBLESHOOTING
2.
Making Adjustments 1) Set a cartridge in the machine. 2) Set the density correction switch (SW101) to its middle index....
Service Manual - Page 314
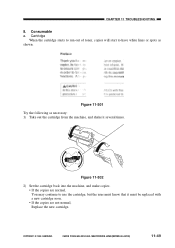
... the copies are normal, You may continue to have white lines or spots as necessary: 1) Take out the cartridge from the machine, and shake it must be replaced with a new cartridge soon. • If the copies are not normal, Replace the new cartridge.
Cartridge
When the cartridge starts to run out of toner, copies will start to use the...
Service Manual - Page 318
... (composite power supply PCB, DC controller PCB). Turn off the power in contact with a metal part (side plate).
2.
Replace the cartridge. YES/NO YES NO
NO YES
YES
NO
YES NO
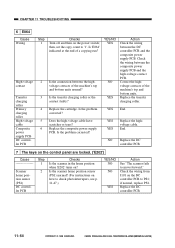
Action End. Replace the transfer charging roller.
1. Inform the user that using non-recommended paper may be in the middle of storage...
Service Manual - Page 319
...toner image on the photosensitive drum before transfer more or less uneven? Set the cartridge in the middle of the drum and the machine's top unit?
YES/NO
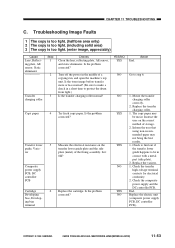
...(lighter at front)
Cause Scanner
Cartridge, Scanning lamp
Transfer charging roller
Step 1
2
Checks Clean the scanning lamp, reflecting plate, lens, and mirror. Is the problem corrected?
Replace the cartridge.
2. If the image is...
Service Manual - Page 320
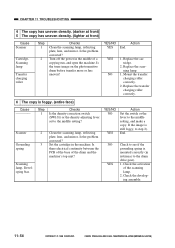
.... (vertical, fuzzy, thick) 9 The copy has black lines. (vertical, fine)
Cause Scanner
Transfer guide assembly Cartridge
Step 1
2
Checks Clean the scanning lamp, reflecting plate, lens, and mirror. COPYRIGHT © 1999 CANON INC. Is the problem corrected? YES End. NO Replace the cartridge. Shake the cartridge several times. Is the problem corrected?
Is the problem corrected...
Service Manual - Page 323

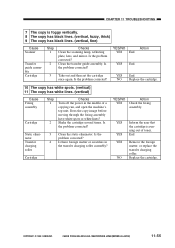
...paper spring up or stop around the transfer assembly? Check the feeding assembly for burrs. Replace the cartridge.
19 The copy has horizontal fogging.
Then, apply lubricant. (CK-0551) See "...(IMPRIME AU JAPON) Is the problem corrected? Is the problem found at different positions? Replace the cartridge. End.
Route the cable
correctly. 2. Move the No. 1 mirror mount slowly by ...
Service Manual - Page 324
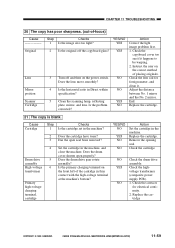
... YES/NO YES YES
NO NO YES NO
Action Correct the light image problem first. 1. Replace the cartridge. Check the cartridge. Check the contacts for foreign matter, and clean it happens to be warping. 2. Does the cartridge have toner?
Replace the cartridge
COPYRIGHT © 1999 CANON INC. Is the problem corrected? Does the drum drive gear...
Service Manual - Page 329
...DC controller PCB
Step 1
2 3 4 5 6
Checks Turn off and then on ?
Replace the transfer charging roller.
Check the wiring from J101 on how to check photointerrupers, see p....? Replace the composite power supply PCB. YES Replace the highvoltage cable. Check the wiring between the DC controller PCB and the composite power supply PCB. Replace the cartridge.
NO Replace the...
Service Manual - Page 331
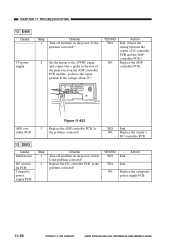
... power supply
2 Set the matter to the 20VDC range, and connect the + probe to the copier ground. YES/NO YES
NO
Action End. (Check the wiring between the copier's DC controller PCB and the ADF controller PCB.) Replace the ADF controller PCB.
345
ON 12
BCD
EF 0 1 2
6 7 8 9A
Figure 11-402
ADF controller...
Similar Questions

I Have A Canon Pc940 Copier Which Is Making A Noise Like Gears Slipping And The
The copies are coming out blurred and unreadable. What could be the cause of this ?
The copies are coming out blurred and unreadable. What could be the cause of this ?
(Posted by donsauto1 3 years ago)

My Copier Cannot Copy. I Changed The Toner Cartridge And It's Still Not Working
I thought the copier needs a new cartridge. So, I replace it with a new E20 cartridge bought from St...
I thought the copier needs a new cartridge. So, I replace it with a new E20 cartridge bought from St...
(Posted by simonfsyen 7 years ago)

Canon Pc940 Copier
The right door for paper feeding doesn't stay closed.
The right door for paper feeding doesn't stay closed.
(Posted by swoulf 8 years ago)


I Put In A New Toner Cartridge But The Toner Light Will Not Go Off.
(Posted by OOBeckster 11 years ago)