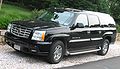
2004 Cadillac Escalade Support Question
2004 Cadillac Escalade Support Question
Find answers below for this question about 2004 Cadillac Escalade.Need a 2004 Cadillac Escalade manual? We have 1 online manual for this item!
Question posted by ojrmike on May 22nd, 2014
What Are The Steps To Remove The Grill Assembly?
The person who posted this question about this Cadillac automobile did not include a detailed explanation. Please use the "Request More Information" button to the right if more details would help you to answer this question.
Current Answers
Answer #1: Posted by sabrie on May 22nd, 2014 1:45 PM
sabrie
Member since:
May 23rd, 2013 Points: 3,306,778

Member since:
May 23rd, 2013 Points: 3,306,778
See the thread here
http://www.justanswer.com/cadillac/53u1t-cadillac-escalade-trying-remove-front-grille.html
www.techboss.co.za
Related Manual Pages
Owner's Manual - Page 105

...horn will chirp twice, and a 30-second timer will begin. You can repeat the procedure beginning with Step 1 to change the automatic door unlock mode. Choose one , two, three, or four chimes. To... enter the program mode, do this occurs, you which unlock mode is removed from the ignition. You will chirp twice to program the automatic door unlock feature. 3. See your ...
Owner's Manual - Page 235

... advance quickly through a track. Perform one of the amber blinking buttons to select the location of the following steps:
1. To eject a single CD, perform the following : • With the radio on the radio. ... (Reverse): Press and hold this pushbutton to eject. Press one of the CD you do not remove the CD from the player within five seconds, the current or last played CD will be...
Owner's Manual - Page 322
...5-10 for more information. To inspect the air cleaner/filter, remove the engine air cleaner/filter from the vehicle using the steps following to replace the engine air cleaner/filter and to release loose... air cleaner/filter needs to .
See the steps following . How to Inspect
Vehicles with a restriction indicator, you have the engine air cleaner/filter...
Owner's Manual - Page 323

Remove the engine air cleaner/filter from the housing. Loosen the screws on the passenger's side of the housing and lift up the cover. 4. Locate the air cleaner/filter assembly on the front corner of the engine compartment on the cover of the vehicle. 2. Clean the engine air cleaner/filter...
Owner's Manual - Page 347
... Notice: Ignoring these things can burn you may want to use the following steps to do not follow these steps exactly, some jumper cables to start your vehicle by your vehicle for tips on...another vehicle and some or all of these steps could damage your audio system, see Theft-Deterrent Feature on page 5-41 for 25 days or more, remove the black, negative (−) cable from running...
Owner's Manual - Page 351

... not near engine parts that the cables do not touch each other or other metal. 5-45 Remove the jumper cables in the wrong order, electrical shorting may occur and damage the vehicle. Connect ...doesn't go to the battery is marked GND.
9. The other end touch anything until the next step. Now start the vehicle that had the dead battery. It goes to a heavy, unpainted metal engine...
Owner's Manual - Page 361

This will give you the needed clearance for removing the headlamp assembly.
5-55 2. Lift off the radiator cover.
4. Pry up the eight fastener plugs on the radiator cover and pull the fasteners out. 3. Pull the top left or right corner of the grill out so the clips release.
Owner's Manual - Page 362

... turning the end of the vehicle.
6. Disconnect the electrical connector from the front of the headlamp assembly. This will give you until it unsnaps and then pulling it upward. 7. Remove the horizontal pin from the headlamp assembly by lifting the end of the pin upward until it unsnaps and then pulling it toward...
Owner's Manual - Page 363

... bulb from the old bulb. 12. Place the connector with the old bulb from the headlamp assembly. 11. Reinstall the grille and radiator cover by reversing the removal procedure described previously.
5-57 Turn the bulb connector counterclockwise and remove it is tight. 14. Install the two pins and snap the ends into position. 17...
Owner's Manual - Page 364

... is no lock for the affected bulb from the headlamp assembly. 3. A. High-Beam Headlamp E. Daytime Running Lamp C. Front Turn Signal, Sidemarker and Daytime Running Lamps
1. Remove the headlamp assembly as described previously. 2. Put the new bulb into the vehicle by reversing the previous mentioned steps. Put the bulb socket into the turn signal housing...
Owner's Manual - Page 365

... the release tab and turn the bulb socket counterclockwise to remove the two screws from the taillamp housing. (The sidemarker lamp does not have a release tab.)
5-59 D. Remove the lamp assembly. 3. B. Turn Signal-Taillamp Stop-Taillamp Back-up Lamp Sidemarker Lamp 2.
Center High-Mounted Stoplamp (CHMSL)
It is recommended that this component be...
Owner's Manual - Page 367
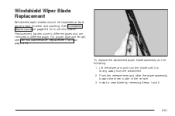
... by reversing Steps 1 and 2.
5-61 See Scheduled Maintenance on page 6-14. For proper type and length, see Normal Maintenance Replacement Parts on page 6-4 for wear and cracking. Push the release lever and slide the wiper assembly toward the driver's side of the vehicle. 3. Replacement blades come in different types and are removed in...
Owner's Manual - Page 377
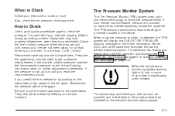
... a receiver located in flated. Check the tire's in the center of the spare tire. Remove the valve cap from the tire valve stem. If you reach the recommended amount.
Also, check the...DIC Operation and Displays on page 3-47 and DIC Warnings and Messages on each tire and wheel assembly, except the spare tire. The TPM sensors transmit tire pressure readings to the proper pressure as ...
Owner's Manual - Page 379
...cation/Tire label or the Tire and Loading Information label. 11. Remove the valve cap from "Off" to start over with step number one of the road tires with the left (driver's ...throughout the matching procedure. Proceed to the right (passenger's side) rear tire, and repeat the procedure in step 5. 7. Put the valve caps back on the Driver Information Center (DIC). 4. Set all four tires...
Owner's Manual - Page 388
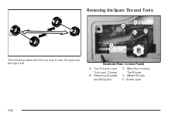
Removing the Spare Tire and Tools
The following steps will tell you how to use the jack and change a tire. Bottle Jack and Wing Nut
5-82
Wheel Blocks B. Tool Kit with Jack Tire Blocks Tools and Gloves D. Retaining Bracket E. Wing Nut Holding A. Escalade (Rear Access Panel) C.
Owner's Manual - Page 389

Skip the first step and follow the last three.
Unlatch the release lever to remove the underbody-mounted spare tire. For Escalade ESV, the equipment you'll need is located behind the left trim panel. 1. Tool Kit with Jack Tire Blocks Tools and Gloves Mounting Bracket Removable Tray You'll use the jack...
Owner's Manual - Page 390

... I ) as shown. If your vehicle is equipped with a hoist lock (J), open the spare tire lock cover on the bumper and use the ignition key to remove the lock.
2. Tire Retainer E. Hoist Cable D. Jack Handle Extensions J. A. Hoist End of Extension Tool G. 1. Hoist Assembly C. Hoist Shaft Access Hole H.
Owner's Manual - Page 402

... off your vehicle. Read and follow the instructions could damage the hoist assembly and you hear two clicks or feel it is visible. 2. For the secondary latch to Step 6. Secondary Latch System
Your vehicle has an underbody mounted tire hoist assembly equipped with the valve stem pointing down. It's designed to read all...
Owner's Manual - Page 403

... edge of the jack on their shortest ends, with Step 5 of cable is balanced securely.
5-97 Stand the wheel blocks on the wheel blocks, separating them so that the jack is exposed. 6. 4. Turn the wrench counterclockwise until approximately six inches (15 cm) of "Removing the Spare Tire and Tools" earlier in this...
Owner's Manual - Page 405

...tire out from under the vehicle, turn the wheel wrench clockwise to remove, install or store a spare tire, see "Removing the Flat Tire and Installing the Spare Tire" earlier in flation...size spare tire than the road tires - those originally installed on your vehicle. Have the hoist assembly inspected as soon as possible and make sure the spare is hanging under the vehicle. You ...
Similar Questions

Is There A Fuse On My 6 Disk Cd Changer On My Escalade
(Posted by 22Hale 9 years ago)

How To Disconnect Headlight Assembly On Cadillac Escalade 2004
(Posted by rosr8NANNY 10 years ago)

How To Remove A Faded Cadillac Escalade Emblem On Grille
(Posted by alTh 10 years ago)

Remove Grille
how to remove aftermarket chrome grille from 2000 cadillac escalade?
how to remove aftermarket chrome grille from 2000 cadillac escalade?
(Posted by sjones4 11 years ago)

How Do You Remove The Windshield Washer Tank From A 2000 Esclade
(Posted by tjbranson 11 years ago)