Brother International XR6060 Support Question
Brother International XR6060 Support Question
Find answers below for this question about Brother International XR6060.Need a Brother International XR6060 manual? We have 3 online manuals for this item!
Question posted by afreenadil786 on July 11th, 2017
Find Out Difference
Hi there, I would like to know what's the difference between brother xr6060 and cs6000i. Looking forward to hear from you soon.
Current Answers
Answer #1: Posted by Odin on July 12th, 2017 4:47 PM
Odin

Member since:
April 10th, 2010 Points: 41,236,710

Member since:
April 10th, 2010 Points: 41,236,710
A side-by-side comparison is at http://www.brother-usa.com/HomeSewing/ModelComparison.aspx?ModelList=CS6000i,XR6060.
Hope this is useful. Please don't forget to click the Accept This Answer button if you do accept it. My aim is to provide reliable helpful answers, not just a lot of them. See https://www.helpowl.com/profile/Odin.
Related Brother International XR6060 Manual Pages
Users Manual - English - Page 1

Computerized Sewing Machine
Operation Manual
Product Code:885-V60/V61/V62/V63/V64/V65
KNOWING YOUR SEWING MACHINE
SEWING BASICS
UTILITY STITCHES
APPENDIX
Please visit us at http://solutions.brother.com where you can get product support and answers to frequently asked questions (FAQs).
Users Manual - English - Page 6

...KNOWING YOUR SEWING MACHINE 6
ACCESSORIES ...6
Included accessories ...6 Optional accessories ...7 Accessory compartment ...7
NAMES OF MACHINE PARTS AND THEIR FUNCTIONS 8
The main parts ...8 Needle and presser foot section ...9 Operation buttons ...9 Operation panel ...10 Spool pin ...10
USING YOUR SEWING MACHINE 12
Power supply precautions ...12 Power supply ...12 Foot controller ...13 Sewing...
Users Manual - English - Page 8

... through your dealer.
Part Code
No. Note
● Foot controller: Model T This foot controller can be fed, for thick seams to be used on the machine with product code 885-V60/V61/V62. KNOWING YOUR SEWING MACHINE
1 KNOWING YOUR SEWING MACHINE
ACCESSORIES
Included accessories
After opening the box, check that the following accessories are included.
Users Manual - English - Page 10

... buttons differ depending on the power supply cord into the jack/ socket connector. j Handwheel This is used to circulate.
m Jack/socket connector (page 12) Insert the plug on the sewing machine model...the bobbin thread and threading the machine. q Presser foot lever (page 22) This is used to cut them. KNOWING YOUR SEWING MACHINE
NAMES OF MACHINE PARTS AND THEIR FUNCTIONS
The illustrations...
Users Manual - English - Page 11
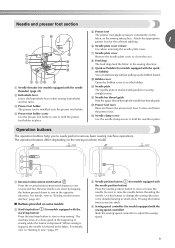
... applies pressure consistently on the sewing machine model. i Quick-set bobbin (for models equipped with the start/stop button) Press the start or stop sewing. Pressing the button twice sews one stitch.
c Presser foot holder The presser foot is depressed. The operation buttons differ depending on the
fabric as the sewing takes place.
m Presser foot lever...
Users Manual - English - Page 12

...the number of the sewing machine, allows you wish to select a stitch and specify how the stitch will be sewn. The display location (2) of the presser foot type differs
depending on the ... (2), the stitch length (mm) (3), and the stitch width (mm) (4) are displayed here.
KNOWING YOUR SEWING MACHINE
Operation panel
The operation panel, located on the model. Spool pin
As shown, press down on...
Users Manual - English - Page 14

...
If the plug does not fit fully in any way.
12 KNOWING YOUR SEWING MACHINE
USING YOUR SEWING MACHINE
Power supply precautions
Be sure to observe the following circumstances:
•... power switch b Jack/socket connector
Set the main power switch to them. X The sewing lamp goes off the sewing machine and unplug the power supply cord. only) ● This appliance has a polarized plug...
Users Manual - English - Page 16
... properly. Actual size
11.5 mm (7/16 inch)
This model
Other models
As shown, press down on the fast bobbin winding, see page 17.
KNOWING YOUR SEWING MACHINE
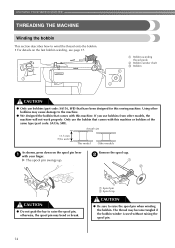
THREADING THE MACHINE
Winding the bobbin
This section describes how to raise the spool pin when winding the bobbin. a Bobbin-winding
thread guide b Bobbin winder shaft c Bobbin...
Users Manual - English - Page 18

... it in as far as possible. Then stop button cannot be wound cleanly. a Spring on the sewing machine.
CAUTION
● Pull the thread taut and hold the end of the thread straight up.
Turn ...that the thread is wound around the bobbin and cause the needle to the right.
KNOWING YOUR SEWING MACHINE
Pull the thread to
3-15/16 inches) of thread from the hole on the bobbin...
Users Manual - English - Page 20

... position (for models equipped with
the sewing speed controller).
Note
● If the sewing machine is to be used to start sewing (only for models equipped with the start/stop button).
Slide the sewing speed controller back to the left, and then remove the bobbin from
the shaft.
KNOWING YOUR SEWING MACHINE
Pull the thread to the right...
Users Manual - English - Page 22

...
1
2
1
a Tension-adjusting spring
Replace the bobbin cover. KNOWING YOUR SEWING MACHINE
Hold the end of the thread, push the bobbin e down with...; For models equipped with the quick-set the bobbin so the thread unrolls in the right direction. Turn off the sewing machine.
a Tab
CAUTION
● Make sure you (counterclockwise) or
press (needle position button) (for feeding the bobbin...
Users Manual - English - Page 24

... needle. For details on the handwheel
CAUTION
● When threading the upper thread, carefully follow the instructions. KNOWING YOUR SEWING MACHINE
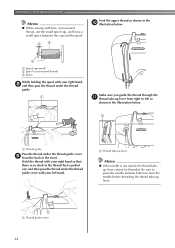
Upper threading
Set the upper thread and thread the needle. • For details on the sewing machine. a Spool pin b Mark on the correct combination of 20 or lower. ● Use the needle and the...
Users Manual - English - Page 26
... front. cb
Feed the upper thread as
shown in the illustration below . a Thread guide
Pass the thread under the thread
guide.
a Thread guide cover
24 KNOWING YOUR SEWING MACHINE
Memo
● When sewing with fine, cross-wound thread, use the small spool cap, and leave a small space between the cap and the spool.
Users Manual - English - Page 28

... 5 cm (2 inches)
of thread toward the rear of thread
CAUTION
● Be careful not to pull on the hook as shown below. e
a Loop of the
machine.
KNOWING YOUR SEWING MACHINE
Fully lower the needle threader lever.
Catch the thread on the thread with force or it may cause...
Users Manual - English - Page 30

... may cause malfunctions.
Needle precautions
Be sure to read and carefully follow the instructions below. Failure to sew. Use of the needle.
and the larger the needle number, the thicker the needle.
28 KNOWING YOUR SEWING MACHINE
REPLACING THE NEEDLE
This section provides information on the fabric and thread thickness. Be sure to observe...
Users Manual - English - Page 32

... when loosening or tightening the needle clamp screw, otherwise certain parts of the machine, insert the needle until it clockwise. KNOWING YOUR SEWING MACHINE
Lower the presser foot lever. c
With the flat side of the needle toward the e rear of the sewing machine may be removed by turning it touches the needle stopper and securely tighten...
Users Manual - English - Page 34

... needle by hand, from the front to the back.
Otherwise the needle may break or the machine may be damaged.
● Do not try turning the fabric with the twin needle left side was threaded. KNOWING YOUR SEWING MACHINE
Thread the upper thread for the right side in f the same way that the upper...
Users Manual - English - Page 35

... foot holder b Shank c Pin
Note
● The presser foot to turn off the sewing machine, otherwise injuries may be read. To select a stitch, refer to release the presser foot. a Presser foot lever
33
a Black button b Presser foot holder
Place a different presser foot below . Raise the presser foot lever. If you use presser feet...
Users Manual - English - Page 36
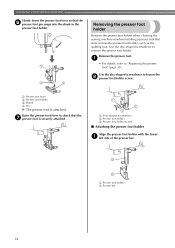
... foot" (page 33). Removing the presser foot holder
Remove the presser foot holder when cleaning the sewing machine or when installing a presser foot that the g presser foot is attached. a Disc-shaped screwdriver ... does not use the presser foot holder, such as the quilting foot. KNOWING YOUR SEWING MACHINE
Slowly lower the presser foot lever so that the f presser foot pin snaps into the ...
Users Manual - English - Page 39

When the sewing machine is turned on, the straight stitch ( left .
Memo
● The presser foot to increase or
reduce the number ...to be used is selected. Turn on the model. Press the "+" or "-" side of the presser foot type
differs depending on the sewing machine.
Selecting stitching
Using the stitch selection keys, select the desired stitch. a
2
Press
(stitch selection keys).
Similar Questions

What Are The Different Diles On This Sewing Machine? I Just Found A Sewing Machi
(Posted by Sherlevy2014 9 months ago)

Where Is The Start Button For A Brother Sewing Machine Xr6060
(Posted by elmosal 9 years ago)

How To Thread A Brother Sewing Machine Xr6060
(Posted by pimik 10 years ago)

Brother Ls 2000 Sewing Machine Price
I Want To Know Above Sewing Machine Price In Indian Rupees,please Anser Me Imediately
I Want To Know Above Sewing Machine Price In Indian Rupees,please Anser Me Imediately
(Posted by iladave84503 10 years ago)
Is There An Extension Arm Available For The Xr6060 Seweing Machine?
I am looking for a extension arm for the XR6060 seweing machine from Brother.
I am looking for a extension arm for the XR6060 seweing machine from Brother.
(Posted by jankay3 11 years ago)