Brother International XL 5130 Support Question
Brother International XL 5130 Support Question
Find answers below for this question about Brother International XL 5130 - Free Arm Sewing Machine.Need a Brother International XL 5130 manual? We have 1 online manual for this item!
Question posted by herrobcra on June 26th, 2014
How To Replace Brother Xl 5130 Needle Clamp
The person who posted this question about this Brother International product did not include a detailed explanation. Please use the "Request More Information" button to the right if more details would help you to answer this question.
Current Answers
Related Brother International XL 5130 Manual Pages
Users Manual - English - Page 2

... push the fabric while stitching. Always unplug the sewing machine from outlet. 9. "IMPORTANT SAFETY INSTRUCTIONS"
When using the sewing machine, basic safety precautions should always be left unattended when plugged in. Replace bulb with any adjustments in the needle area, such as a toy. Do not allow this machine to be supervised to ensure that they do not...
Users Manual - English - Page 5
... fuse cover removed.
When leaving the sewing machine unattended, the main switch of replacing the plug fuse, use plugs with the following .
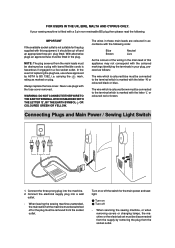
Connecting Plugs and Main Power / Sewing Light Switch
1 2
1. Connect the electrical supply plug into the machine. 2.
When servicing the sewing machine, or when removing covers or changing lamps, the machine or the electrical set must be...
Users Manual - English - Page 6

... AND ZIGZAG STITCHING
BUILT-IN STITCHES
KNOWING YOUR SEWING MACHINE
PRINCIPAL PARTS 1
ACCESSORIES 3
OPERATING YOUR SEWING MACHINE 5
Connecting Plugs 5 Main Power and Sewing Light Switches 6 Foot Controller 6 Inserting the Needle 7 Checking the Needle 7 Changing the Presser Foot 8 Converting to Free-Arm Style 9 Steadying the Machine 9 VARIOUS CONTROLS 10 Pattern Selection Dial 10...
Users Manual - English - Page 9

...9 Stitch length dial Controls the length of the upper thread. CONTENTS
KNOWING YOUR SEWING MACHINE
STRAIGHT AND ZIGZAG STITCHING
BUILT-IN STITCHES
PRINCIPAL PARTS
34
62
1
1 Bobbin...Handle
D Balance wheel Turn toward you (counterclockwise) to control sewing speed start and stop. H Foot controller Used to raise and lower the needle. B
0
7 Stitch width dial
Controls the stitch width....
Users Manual - English - Page 13

... AND ZIGZAG STITCHING
BUILT-IN STITCHES
OPERATING YOUR SEWING MACHINE
Connecting Plugs
1. When changing the needle, bobbin or light bulb or when the sew- ing machine is not in the outlet, reverse the plug. To reduce the risk of electric shock, this plug is recommended that the power supply plug be ...
Users Manual - English - Page 14
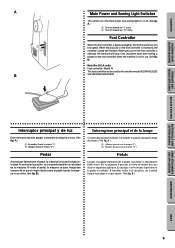
... la marca "O")
Cet interrupteur permet d'allumer et d'éteindre la machine ainsi que la lampe de couture. (Voir fig. CONTENTS
KNOWING YOUR SEWING MACHINE
STRAIGHT AND ZIGZAG STITCHING
BUILT-IN STITCHES
A
1 2
B
Main Power and Sewing Light Switches
This switch turns the main power and sewing light on appuie légèrement sur la pédale...
Users Manual - English - Page 19
... YOUR SEWING MACHINE
STRAIGHT AND ZIGZAG STITCHING
BUILT-IN STITCHES
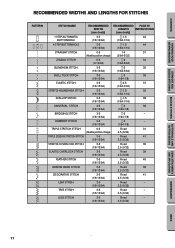
RECOMMENDED WIDTHS AND LENGTHS FOR STITCHES
PATTERN
C A
STITCH NAME
RECOMMENDED WIDTH
[mm (inch)]
RECOMMENDED PAGE IN LENGTH INSTRUCTIONS
[mm (inch)]
1 STEP AUTOMATIC BUTTONHOLE
3-5
-1.5
42
(1/8-13/64)
(1/64-1/16)
4 STEP BUTTONHOLE
3-5
-1.5
44
(1/8-13/64)
(1/64-1/16)
STRAIGHT STITCH
0-5
1-4
31
(Needle...
Users Manual - English - Page 28

...thread down and pass it toward you and into the eyelet. 6. Thread the needle from front to back and pull out about 5 cm (2") of thread as shown...4. D). CONTENTS
KNOWING YOUR SEWING MACHINE
STRAIGHT AND ZIGZAG STITCHING
BUILT-IN STITCHES
1 2
4 3
BUTTONHOLE AND BUTTON SEWING
USING ATTACHMENTS AND APPLICATIONS
A
4
23
1
C
B
D
4 4
E
5
Upper (Needle) Threading
Turn power switch to...
Users Manual - English - Page 30

... lever and pull out about 5 cm (2") of thread through the needle toward the back of the sewing machine.
• Only use needles of the machine (toward the back of the needle in front of the machine (away from you ). Make sure that the hook passes through the needle. 6 Hook 7 Thread
6. Otherwise, the hook may be sure to make...
Users Manual - English - Page 33

...et les placer vers l'arrière de la machine, juste derrière le pied-de-biche....needle to its highest position. 3. Le fil supérieur doit alors former une boucle avec le fil inférieur. The upper thread should pass between the toes of the upper thread. Pull the upper thread toward the back of the machine straight behind the presser foot. CONTENTS
KNOWING YOUR SEWING MACHINE...
Users Manual - English - Page 35

CONTENTS
KNOWING YOUR SEWING MACHINE
STRAIGHT AND ZIGZAG STITCHING
BUILT-IN STITCHES
A
2
1
2
1
B
2
1
2
1
A-1
654
B-1
654
C
2 1
2 1
Thread Tension
Thread tension will weaken your seams or cause puckers in your project. It may need to its original setting before sewing on a fabric scrap before starting your stitches. Possible Problems and How To Correct Them
A Upper ...
Users Manual - English - Page 37

CONTENTS
KNOWING YOUR SEWING MACHINE
STRAIGHT AND ZIGZAG STITCHING
BUILT-IN STITCHES
CHART OF SEWING FABRICS, NEEDLES AND THREAD COMBINATIONS
VERY THIN LIGHTWEIGHT MEDIUM WEIGHT HEAVYWEIGHT
SEWING FABRICS
Fine tricot, Fine lace, Thin linen, Silk, Organza, Chiffon
Voile, Taffeta, Synthetics, Silk, Batiste
Cotton, Gingham, Poplin, Percale, Pique, Satin, Velvet, Lightweight wool, Fine ...
Users Manual - English - Page 42
... bourdon (point zigzag très serré) qui peut servir à faire des boutonnières ou comme point fantaisie décoratif. CONTENTS
KNOWING YOUR SEWING MACHINE
STRAIGHT AND ZIGZAG STITCHING
BUILT-IN STITCHES
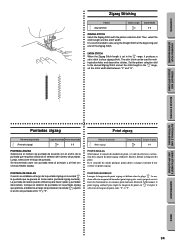
Zigzag Stitching
Pattern (Zigzag Stitch)
Stitch Length -4
Stitch Width 0-5
ZIGZAG STITCH Select the Zigzag Stitch with the pattern...
Users Manual - English - Page 43
... des tissus élastiques.
35
MAINTENANCE
INDEX Ambas bobinas de hilo, superior e inferior, deben ser del mismo color que el tejido.
2. C. 5.
CONTENTS
KNOWING YOUR SEWING MACHINE
STRAIGHT AND ZIGZAG STITCHING
BUILT-IN STITCHES
A
B
C
D
Blindhem Stitching
Pattern (Blindhem Stitch) (Stretch Blindhem Stitch)
Stitch Length -2 -1.5
Stitch Width Fixed 5 Fixed 3.5
The Blindhem...
Users Manual - English - Page 57

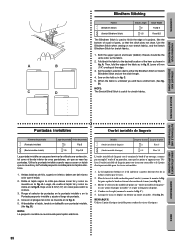
... make sure that the needle enters the holes without hitting the button. At a slow speed, sew approximately 10 stitches.
6. Place a button between the holes is equipped with the stitch width dial. BUTTONHOLE AND BUTTON SEWING
USING ATTACHMENTS AND APPLICATIONS
MAINTENANCE
INDEX
49 Attach the button sewing foot.
3. CONTENTS
KNOWING YOUR SEWING MACHINE
STRAIGHT AND ZIGZAG STITCHING...
Users Manual - English - Page 59

... the presser foot, move the zipper foot to the left side of the zipper 3 Left pin for sewing the right side of the needle.
Lower the needle into the notch on both sides. CONTENTS
KNOWING YOUR SEWING MACHINE
STRAIGHT AND ZIGZAG STITCHING
BUILT-IN STITCHES
A
1
2
3
B
Zipper Inserting
Pattern (Straight Stitch)
Stitch Length 2-3
Stitch Width
2.5 (Center...
Users Manual - English - Page 65
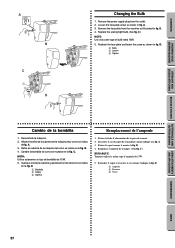
... la lampe. (Voir fig. Remove the power supply plug from the machine as shown in fig. B. 4.
C.)
REMARQUE: Toujours utiliser le même type d'ampoule de 15W.
5. CONTENTS
KNOWING YOUR SEWING MACHINE
STRAIGHT AND ZIGZAG STITCHING
BUILT-IN STITCHES
A
B
C
1 2
3
D
Changing the Bulb
1. Replace the sewing light bulb. (See fig. Cambie la bombilla tal como se muestra...
Users Manual - English - Page 68

... 19
w
No
Page 59
No
w
Threading is too
tight.
Needle is too tight. Thread tension is incorrectly inserted. w Page 20
No w
Needle is tangled. w Page 29
No w
Lint is used .
CONTENTS
KNOWING YOUR SEWING MACHINE
STRAIGHT AND ZIGZAG STITCHING
BUILT-IN STITCHES
Performance Checklist
Whenever sewing difficulties are encountered, review the section in the shuttle...
Users Manual - English - Page 69
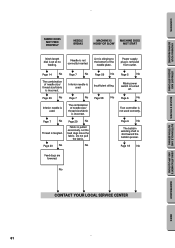
... w
Insufficient oiling.
Power supply plug is not used .
w Page 6
No w
Foot controller is removed
from outlet. CONTENTS
KNOWING YOUR SEWING MACHINE
STRAIGHT AND ZIGZAG STITCHING
BUILT-IN STITCHES
FABRIC DOES NOT FEED PROPERLY
NEEDLE BREAKS
MACHINE IS NOISY OR SLOW
MACHINE DOES NOT START
Stitch length dial is incorrect.
w Page 14
No w
The combination of...
Users Manual - English - Page 75

... 55
F
Feed Dog Cleaning 59 Lever 17
Finishing a Seam 32-33 Foot Controller
Connecting 5 Operating 6 Free-Arm Sewing 9
G
Gathering 51
L
Legs Stitch 11 Light Bulb Replacement 57 Lower Threading 19
M
Main Power Switch 6 Monogramming 55
N
Needle Inspection 7 Replacement 7 Threading 20 Threader 22
Page
O
Oiling 58 Overedge Stitching 39
P
Pattern Lengths 11 Pattern Selection Dial...
Similar Questions

How To Put A Needle Clamp Screw On Sewing Machine
(Posted by patAc 9 years ago)

Brother 17-stitch Free-arm Sewing Machine Lx2500 How To Set Tension
(Posted by laptoprustar 10 years ago)

How To Thread Needle On Brother Xl-5130
(Posted by rkaccush 10 years ago)

Where Should The Machine Be Set For Regular Stitching? Brothers Xl-5130
Where should the machine be set for regular stitches? Brothers XL-5130
Where should the machine be set for regular stitches? Brothers XL-5130
(Posted by cengle640 10 years ago)
Im Trying To Get A Manuel For This Brother Xl 5130 Sewing Machine..
where can I find a manuel for a Brother XL 5130 sewing machine
where can I find a manuel for a Brother XL 5130 sewing machine
(Posted by karlatrains 11 years ago)