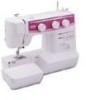
Brother International XL 5130 Support Question
Brother International XL 5130 Support Question
Find answers below for this question about Brother International XL 5130 - Free Arm Sewing Machine.Need a Brother International XL 5130 manual? We have 1 online manual for this item!
Question posted by sannie1968 on April 9th, 2013
Need Brother Xl5130 Parts
Mother Is In Need Of A Needle Clamp Kit
Current Answers
Related Brother International XL 5130 Manual Pages
Users Manual - English - Page 2

...sewing machine and foot controller free from the electrical outlet when removing covers, lubricating, or when making any adjustments in the needle area, such as described in . Always use ." It may deflect the needle... and loose cloth. 5. The sewing machine should be followed, including the following:
"Read all moving parts. Do not allow this machine where aerosol (spray) products are...
Users Manual - English - Page 5
... the plug supplied with this appliance may not correspond with the coloured markings identifying the terminals in the main lead of the wiring in your sewing machine is marked with the fuse cover removed. If your plug, proceed as a plug with the following . With alternative plugs an approved fuse must be fitted...
Users Manual - English - Page 6

... AND ZIGZAG STITCHING
BUILT-IN STITCHES
KNOWING YOUR SEWING MACHINE
PRINCIPAL PARTS 1
ACCESSORIES 3
OPERATING YOUR SEWING MACHINE 5
Connecting Plugs 5 Main Power and Sewing Light Switches 6 Foot Controller 6 Inserting the Needle 7 Checking the Needle 7 Changing the Presser Foot 8 Converting to Free-Arm Style 9 Steadying the Machine 9 VARIOUS CONTROLS 10 Pattern Selection Dial 10...
Users Manual - English - Page 9

...
7
6 Upper tension control dial Controls the tension of the stitches.
0 Reverse sewing lever Push for operation.
CONTENTS
KNOWING YOUR SEWING MACHINE
STRAIGHT AND ZIGZAG STITCHING
BUILT-IN STITCHES
PRINCIPAL PARTS
34
62
1
1 Bobbin winding assembly Winds the thread onto the bobbin to control sewing speed start and stop.
G Presser foot lever Raises and lowers the...
Users Manual - English - Page 13

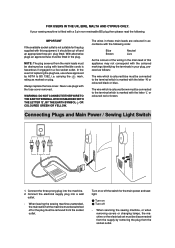
When changing the needle, bobbin or light bulb or when the sew- Brancher la fiche qui se trouve sur le cordon d'alimentation entre la pédale et la fiche d'alimentation dans la machine.
2. Brancher la fiche d'alimentation à une prise secteur.
ing machine is not in any way. only This appliance has a polarized plug (one...
Users Manual - English - Page 14
... couture. (Voir fig. B.)
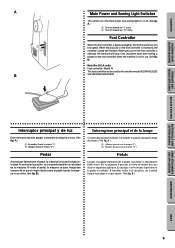
Lorsque l'on the foot controller is increased, the machine's speed will run at a low speed. CONTENTS
KNOWING YOUR SEWING MACHINE
STRAIGHT AND ZIGZAG STITCHING
BUILT-IN STITCHES
A
1 2
B
Main Power and Sewing Light Switches
This switch turns the main power and sewing light on or off (toward the "I" mark) 2 Turn off . (See fig...
Users Manual - English - Page 19
... YOUR SEWING MACHINE
STRAIGHT AND ZIGZAG STITCHING
BUILT-IN STITCHES
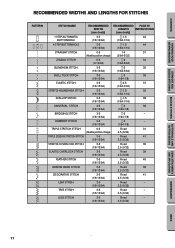
RECOMMENDED WIDTHS AND LENGTHS FOR STITCHES
PATTERN
C A
STITCH NAME
RECOMMENDED WIDTH
[mm (inch)]
RECOMMENDED PAGE IN LENGTH INSTRUCTIONS
[mm (inch)]
1 STEP AUTOMATIC BUTTONHOLE
3-5
-1.5
42
(1/8-13/64)
(1/64-1/16)
4 STEP BUTTONHOLE
3-5
-1.5
44
(1/8-13/64)
(1/64-1/16)
STRAIGHT STITCH
0-5
1-4
31
(Needle...
Users Manual - English - Page 28

... 4 Thread take -up lever to "O". 1. While holding the thread as shown in fig. CONTENTS
KNOWING YOUR SEWING MACHINE
STRAIGHT AND ZIGZAG STITCHING
BUILT-IN STITCHES
1 2
4 3
BUTTONHOLE AND BUTTON SEWING
USING ATTACHMENTS AND APPLICATIONS
A
4
23
1
C
B
D
4 4
E
5
Upper (Needle) Threading
Turn power switch to its highest position. 2. Raise the presser foot lever and turn the...
Users Manual - English - Page 30

...) until the
bottom of the needlethreading-hook holder.
1 Needle holder 2 Needle threader lever
NOTE: When using the needle threader, be damaged.
3. CONTENTS
KNOWING YOUR SEWING MACHINE
STRAIGHT AND ZIGZAG STITCHING
BUILT-IN STITCHES
1 2
3
1
2
4
5
7
6
6
Using the Needle Threader (when the machine is equipped with a
needle threader)
Turn power switch to #100. Turn the balance...
Users Manual - English - Page 33

... threads and place them toward you (counterclockwise) until the needle moves down and back up from the bobbin in a ... 15 cm (6") de ambos hilos y colóquelos hacia la parte posterior de la máquina, justo detrás del prensatelas. Levante...l'arrière de la machine, juste derrière le pied-de-biche. CONTENTS
KNOWING YOUR SEWING MACHINE
STRAIGHT AND ZIGZAG STITCHING
BUILT...
Users Manual - English - Page 35

...more than one full turn. D Correct tension Correct tension is needed. It may need to be adjusted according to the procedure described below. NOTE: It... Reverse 2 Surface
NOTE: The lower thread tension has already been adjusted at the factory for general use. CONTENTS
KNOWING YOUR SEWING MACHINE
STRAIGHT AND ZIGZAG STITCHING
BUILT-IN STITCHES
A
2
1
2
1
B
2
1
2
1
A-1
654
B-1
654
C...
Users Manual - English - Page 37

... above chart. 2.
Elija la aguja y el hilo correctos en la tabla de arriba. 2. CONTENTS
KNOWING YOUR SEWING MACHINE
STRAIGHT AND ZIGZAG STITCHING
BUILT-IN STITCHES
CHART OF SEWING FABRICS, NEEDLES AND THREAD COMBINATIONS
VERY THIN LIGHTWEIGHT MEDIUM WEIGHT HEAVYWEIGHT
SEWING FABRICS
Fine tricot, Fine lace, Thin linen, Silk, Organza, Chiffon
Voile, Taffeta, Synthetics, Silk, Batiste...
Users Manual - English - Page 42
... BOURDON Lorsque la longueur du point zigzag est définie dans la plage " ", la machine effectue un point de bourdon (point zigzag très serré) qui peut servir à... la puntada que se genera es la de realce (puntada zigzag cerrada). CONTENTS
KNOWING YOUR SEWING MACHINE
STRAIGHT AND ZIGZAG STITCHING
BUILT-IN STITCHES
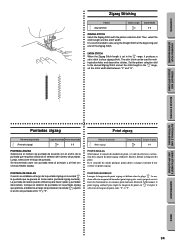
Zigzag Stitching
Pattern (Zigzag Stitch)
Stitch Length -4
...
Users Manual - English - Page 43
... que desee coser tal y como se muestra en la fig. C. 5. D.)
NOTA: La pespunto invisible se recomienda para tejidos elásticos. B.)
3. CONTENTS
KNOWING YOUR SEWING MACHINE
STRAIGHT AND ZIGZAG STITCHING
BUILT-IN STITCHES
A
B
C
D
Blindhem Stitching
Pattern (Blindhem Stitch) (Stretch Blindhem Stitch)
Stitch Length -2 -1.5
Stitch Width Fixed 5 Fixed 3.5
The Blindhem Stitch...
Users Manual - English - Page 50

...position of the buttonhole foot, then bring the two gimp thread ends to remove any slack, then trim off the excess. CONTENTS
KNOWING YOUR SEWING MACHINE
STRAIGHT AND ZIGZAG STITCHING
BUILT-IN STITCHES
A
B
1
2
-
3
C
PUSH
D
3
2
4
1
E
PUSH
Making a Buttonhole (1 Step Automatic Buttonhole)
4
Pattern
Stitch Length Stitch Width
Foot
(1 Step Automatic
-1.5
Buttonhole)
Fixed...
Users Manual - English - Page 55
...on a scrap
of the material with the enclosed screwdriver in the -
CONTENTS
KNOWING YOUR SEWING MACHINE
STRAIGHT AND ZIGZAG STITCHING
BUILT-IN STITCHES
1
2
4
3
10
432
-
If ... 8
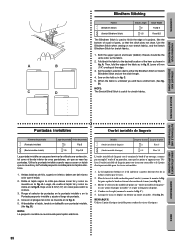
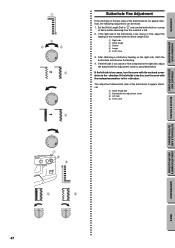
Buttonhole Fine Adjustment
If the stitching on the two sides of the buttonhole to " " and sew the buttonhole on the right side, stitch the buttonhole and observe the feeding.
4. SS
10
5
...
Users Manual - English - Page 57

... 1.
5. Place the darning plate on the needle plate. (When the machine is 1.5 mm (1/16"), set the appropriate stitch width with a drop feed lever, lower the feed dogs by setting the drop feed lever to "1.5".
2. CONTENTS
KNOWING YOUR SEWING MACHINE
STRAIGHT AND ZIGZAG STITCHING
BUILT-IN STITCHES
Button Sewing
Pattern (Zigzag Stitch)
Stitch Length
Stitch Width...
Users Manual - English - Page 59

... presser foot, move the zipper foot to the Straight Stitch. The needle should be positioned on the zipper foot.
CONTENTS
KNOWING YOUR SEWING MACHINE
STRAIGHT AND ZIGZAG STITCHING
BUILT-IN STITCHES
A
1
2
3
B
Zipper Inserting
Pattern (Straight Stitch)
Stitch Length 2-3
Stitch Width
2.5 (Center needle
position)
Foot Zipper Foot
NOTE: After selecting the pattern, set the...
Users Manual - English - Page 65
CONTENTS
KNOWING YOUR SEWING MACHINE
STRAIGHT AND ZIGZAG STITCHING
BUILT-IN STITCHES
A
B
C
1 2
3
D
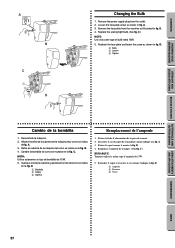
Changing the Bulb
1. Loosen the face...REMARQUE: Toujours utiliser le même type d'ampoule de 15W.
5. Remove the power supply plug from the machine as shown in fig. A. 3. B. 4. Replace the sewing light bulb. (See fig. C.)
NOTE: Use only same type of bulb rated 15W.
5. Reattach the...
Users Manual - English - Page 75

...Operating 6 Free-Arm Sewing 9
G
Gathering 51
L
Legs Stitch 11 Light Bulb Replacement 57 Lower Threading 19
M
Main Power Switch 6 Monogramming 55
N
Needle Inspection 7 Replacement 7 Threading 20 Threader 22
Page
O
Oiling 58 Overedge Stitching 39
P
Pattern Lengths 11 Pattern Selection Dial 10 Pattern Widths 11 Performance Checklist 60-61 Presser Foot Replacement 8 Principal Parts...
Similar Questions

How Can I Get The Part That The Sewing Finger Goes Into For Brother 929d?
how can I get the part that the sewing finger goes into for Brother 929D?
how can I get the part that the sewing finger goes into for Brother 929D?
(Posted by lvassele 9 years ago)

Brother 17-stitch Free-arm Sewing Machine Lx2500 How To Set Tension
(Posted by laptoprustar 10 years ago)

How To Thread The Needle On A Brother Xl5130 Sewing Machine
(Posted by eenkejan 10 years ago)
Where Can I Find A Needle Clamp Assembly For Xl5130?
The needle clamp assembly fell off while I was sewing and i need to replace it. Do you guys sell tha...
The needle clamp assembly fell off while I was sewing and i need to replace it. Do you guys sell tha...
(Posted by rosalynbenson 11 years ago)

Need Part # For My Brother Xl5130 For Botton Hole Maker
(Posted by jandsrunyanr 11 years ago)