
Brother International ULT-2003D Support Question
Brother International ULT-2003D Support Question
Find answers below for this question about Brother International ULT-2003D.Need a Brother International ULT-2003D manual? We have 4 online manuals for this item!
Question posted by Dotsandcrafts on December 29th, 2015
Can I Change The Stitch The Machine Defaults To Every Time It Is Turned On?
every time I turn the machine on, the stitch it defaults to has the needle in the left position and not the center. So if I forget to select a different stitch EVERY time I turn on the machine then I break a needle because I almost always have a 1/4 inch piecing foot on the machine and the foot only has a single center hole.Thank you
Current Answers
Related Brother International ULT-2003D Manual Pages
Accessory Catalog - Page 4

Sew. Check the needle does not hit the presser foot, and then tighten the clamp screw with just right pressure.
1. Requires Low Shank Adapter for ULT series, PC-6500, PC-8200 and PC-8500 sewing machines.
Screw on either left ). 2. Position the presser foot over the long feed dogs on the presser foot and select a straight stitch (left or right. 3. Its...
Accessory Catalog - Page 14

... the presser foot and select a center straight stitch. 2. Snap on the presser foot and select a center straight stitch. 2. Adjust the guide to the desired width of the foot narrows to expand the presser foot area that has
already been sewn. 4. Select the center needle position for your sewing machine and the single hole matches perfectly to the needle drop position and helps to the...
Users Manual - English - Page 2
... for examination, repair, electrical or mechanical adjustment.
4. Never operate the machine with same type rated 12V 5 watts. To disconnect, turn the main switch to the nearest authorized dealer or service center for use bent needles. 13.Do not pull or push fabric while stitching.
DANGER - Replace bulb with any other user servicing adjustments mentioned in...
Users Manual - English - Page 10
...POSITION 5-26
Changing the Pattern Position 5-26 Checking the Pattern's Position 5-27 Previewing the Completed Pattern ...... 5-28
SEWING AN EMBROIDERY PATTERN 5-29
Sewing Attractive Finishes 5-29 I Needle... of Thread .......... 5-35 The Thread Breaks During Sewing ...... 5-36 Sewing Again from the Beginning ....... 5-38 Continuing Embroidery After Turning off the Power 5-39
MAKING EMBROIDERY ...
Users Manual - English - Page 15
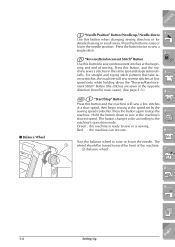
... the needle position. Press the button again to sew or is sewing. Green : the machine is ready to stop the
machine. Red : the machine can not sew.
5 - 6 - Hold the button down the "Reverse/Reinforcement Stitch" button (the stitches are sewn in the opposite direction from the main seam). (See page 2-3.)
3 - 4 - The button changes color according to raise or lower the needle.
Turn...
Users Manual - English - Page 25
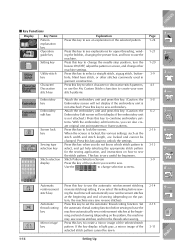
... lock the screen. Press this key to change the needle stop position, turn the buzzer ON/OFF, adjust the pattern or screen, and change selection screens.
Press this setting before sewing to have the
key
machine automatically sew reinforcement stitches at the beginning and end of sewing (depending on the pattern, the machine
may sew reverse stitches). When the screen is not attached...
Users Manual - English - Page 30
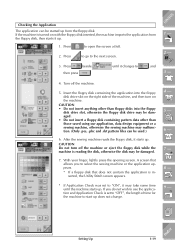
... or a sewing machine, otherwise the sewing machine may malfunction. (Only .pes, .phc and .dst pattern files can be started up does not change.
4 - 5 - 6 - 7 - 8 - 9 -
?! If the machine is inserted, the Utility Stitch screen appears.
* If Application Check was set to "OFF", the length of the machine, and then turn off the machine.
5. Press
to go to open the screen at left.
2. CAUTION...
Users Manual - English - Page 31
... down.
1
2 Select whether to use the sewing speed control- tom thread color numbering sets (see page 5-42).
5
6 When embroidery data containing custom thread
6
colors specified with your machine. Using the Machine Settings Key
CONTENTS
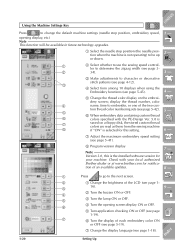
Press
to change the default machine settings (needle stop position, embroidery speed,
opening screen display ON or OFF.
5 Turn application checking...
Users Manual - English - Page 60

... the fabric, and raise the presser foot. When you change direction at the start sewing as you pull the basting thread toward the back.
1 5 mm (3/16 inch)
6 - 7 - 8 - Stop the machine. On the screen if the automatic reinforcement stitch key is selected, reverse stitches (or reinforcement stitches) will be sewn automatically at the corner, start of the fabric...
Users Manual - English - Page 65
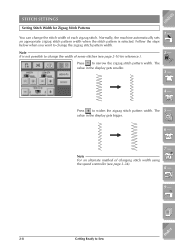
...Note It is selected. Note For an alternate method of changing stitch width using the speed controller (see page 2-10 for Zigzag Stitch Patterns
You can change the width of some stitches (see page 3-34).
8 -
9 - ?!
2-8
Getting Ready to narrow the zigzag stitch pattern width.
Press to Sew
Index
The 5 - Press to change the zigzag stitch pattern width. STITCH SETTINGS
Setting...
Users Manual - English - Page 70
... the fabric.
CONTENTS
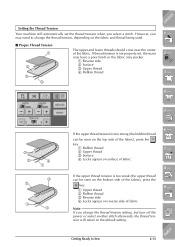
Setting the Thread Tension
Your machine will return to Sew
2-13 Index
Getting Ready to the default setting.
6 -
7 -
8 -
9 - ?! If thread tension is not properly set the thread tension when you may need to change the thread tension setting, but turn off the power or select another stitch afterwards, the thread tension will automatically set...
Users Manual - English - Page 85
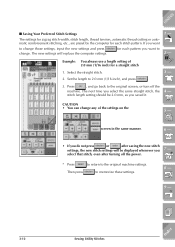
...you do not press
or
after turning off the
machine. If you 7 - The next time you saved it. select that stitch, even after saving the new stitch
settings, the new stitch settings will replace the computer settings.
stitch length setting should be displayed whenever you want to memorize these settings.
8 -
9 - ?!
3-12
Sewing Utility Stitches
Index screen in the same manner...
Users Manual - English - Page 95
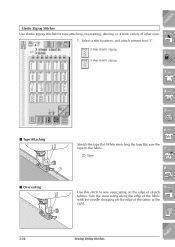
... of the fabric with the needle dropping off the edge of other uses. I Tape Attaching
5
6
1
6 - I Overcasting
5
6
Use this stitch to the fabric.
7 -
1 Tape
8 - Stretch the tape flat. Select a stitch pattern, and attach presser foot "J".
2 step elastic zigzag 3 step elastic zigzag
2 -
3 -
4 -
5 -
While stretching the tape flat, sew the
tape to sew overcasting on the edge of...
Users Manual - English - Page 106
... in the stitch width during sewing.
1. Index
Sewing Utility Stitches
3-33 CONTENTS
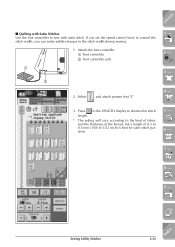
I Quilting with Satin Stitches Use the foot controller to 1/32 inch) is best for satin stitch patterns.
5 - 6 -
7 -
8 -
9 - ?! Attach the foot controller. 1 Foot controller 2 Foot controller jack
1
2
2. If you set the speed control lever to control the stitch width, you can make subtle changes in the...
Users Manual - English - Page 157
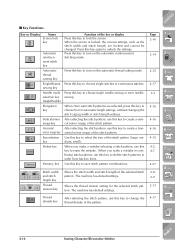
... key to create a horizontal mirror image of the stitch pattern.
The machine has default settings.
Use this key to lock the screen. The machine has default settings. I Key Functions
Key or Display
Name
Screen lock
key
Automatic reinforcement stitch key Automatic thread cutting key Single/Repeat sewing key Needle mode selection key (Single/Double) Elongation key
Vertical mirror image...
Users Manual - English - Page 187
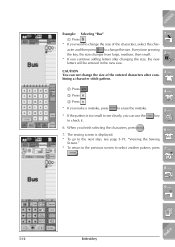
... after com-
key
6.
Every time pressing the key, the size changes from large, medium, then small. * If you finish selecting the characters, press .
7. acter and then press to change the size of the entered characters after changing the size, the new letters will be entered in the new size.
1 - 2 - The sewing screen is too small to...
Users Manual - English - Page 194
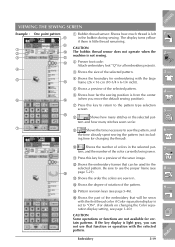
... the default sewing position).
7 Press this key for a preview of the color currently being sewn.
B Shows the embroidery frames that will be used for the
selected pattern. E Pattern revision keys (see
F
page 5-21). E 8
Shows how many stitches sewn so far.
7
9
Shows the time necessary to the pattern type selection screen.
If the key display is left in the selected...
Users Manual - English - Page 212

ward the number of stitches shown on the key without sewing.
* Press
,
, or
to move to the beginning position
of the
next color (character) without sewing.
* Press
to move to the beginning position of the selected color, then use
,
, or
to move the needle back 2-3 stitches be-
If you can not move back to the spot where the thread...
Users Manual - English - Page 226
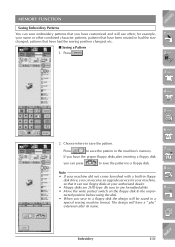
... the design will have the proper floppy disks,after its name.
7 -
8 -
9 - ?! The design will be saved in the machine's memory.
Choose where to save the pattern.
CONTENTS
MEMORY FUNCTION
Saving Embroidery Patterns
You can save embroidery patterns that you have had the sewing position changed , patterns that have been rotated or had the size...
Users Manual - English - Page 294
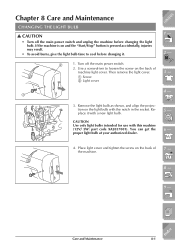
... the socket. If the machine is pressed accidentally, injuries may result.
• To avoid burns, give the light bulb time to cool before changing the light bulb.
CAUTION Use... only light bulbs intended for use with a new light bulb. CONTENTS
Chapter 8 Care and Maintenance
CHANGING THE LIGHT BULB
CAUTION
• Turn ...
Similar Questions

Machine Turns Off
Machine turns off after few seconds and resets to welcome screen on ult2003d Disney brother sewing m...
Machine turns off after few seconds and resets to welcome screen on ult2003d Disney brother sewing m...
(Posted by Anonymous-173203 1 year ago)

My Brother Ce8080prw Giving E8 When I Try To Change Stitches
My Brother CE8080PRW Project Runway Limited Edition is giving code E8 when I try to change stitches....
My Brother CE8080PRW Project Runway Limited Edition is giving code E8 when I try to change stitches....
(Posted by lillymae20047420 1 year ago)

Looking For An Embroidery Pressure Foot For A 2003ult D Embroidery Machine.
(Posted by gail4456 1 year ago)

What Is The Part # For Bobbins For Brothers Sewing Machine Ult-2003d
(Posted by MaddieCout 2 years ago)
How To Change Stitch On Brother Ls 590 Sewing Machine
(Posted by dasstd 9 years ago)