
Brother International PE770 Support Question
Brother International PE770 Support Question
Find answers below for this question about Brother International PE770 - Computerized Embroidery Machine.Need a Brother International PE770 manual? We have 3 online manuals for this item!
Question posted by april2forever on November 12th, 2013
Machine Unplugged On Last Step- Can I Skip To That Step Again?
HELP! I accidentally unplugged my machine (*(#*&^@$!!) on the very last step of a major applique. Can I skip ahead to that step or do I seriously have to start everything over? Thank you!
Current Answers
Related Brother International PE770 Manual Pages
Users Manual - English - Page 1
GETTING READY EMBROIDERY APPENDIX
Computerized Embroidery Machine
Operation Manual
Users Manual - English - Page 2
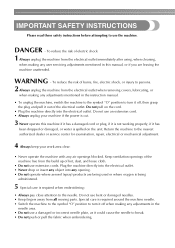
... of burns, fire, electric shock, or injury to persons.
2 Always unplug the machine from the electrical outlet immediately after using, when cleaning,
when making any adjustments mentioned in the instruction... manual.
• To unplug the machine, switch the machine to the symbol "O" position to turn it off, then grasp the plug and...
Users Manual - English - Page 5

... buttons ...10
Operation panel ...11
GETTING READY
13
Embroidery Step by Step 14 Attaching the Embroidery Unit 15
Embroidery unit precautions ...15 Attaching the embroidery unit ...15 Removing the embroidery unit ...16
Turning the Machine On/Off 18
Power supply precautions ...18
Turning on the machine ...19 Turning off the machine ...19
LCD (Liquid Crystal Display) Operation 20
Viewing...
Users Manual - English - Page 6

Using an embroidery card (sold separately) ...55
Embroidering ...56
Embroidering attractive finishes...56
Embroidering a pattern ...57 Appliquéing ...59
Editing ... ...68
APPENDIX
69
Care and Maintenance ...70
Cleaning the machine surface ...70 Cleaning the race ...70
Attaching the Embroidery Foot 72
Attaching the embroidery Foot "Q" ...72
Troubleshooting ...74
Error messages ...78
Adjusting...
Users Manual - English - Page 7

... reference. Introduction
Thank you have finished reading this embroidery machine.
Before using the machine, carefully read ...Embroidery You can be wound with thread (page 24). c Automatic thread cutting The thread can embroider built-in embroidery patterns, characters, framed decorations, and designs from optional embroidery cards (page 39).
5 b Quick-set bobbin You can start embroiderying...
Users Manual - English - Page 8
....
14.
15.
16.
17.
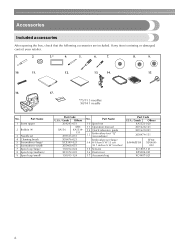
*75/11 3 needles 90/14 1 needle
No. Part Name
10 Spool net
11 Operation manual
12 Quick reference guide
13
Embroidery foot "Q" (on machine)
Embroidery set
4 Cleaning brush 5 Screwdriver (large) 6 Screwdriver (small) 7 Spool cap (large) 8 Spool cap (medium) 9 Spool cap (small)
Part Code
U.S.A. / Canada Others
X54243-051
SA156
SFB...
Users Manual - English - Page 9
...
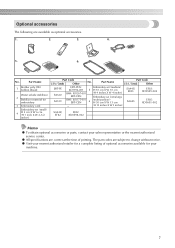
The following are subject to change without notice.
Part Name
Part Code
U.S.A. / Canada
Other
EBT-PE SA520 SA519
EBT-PEN:
Embroidery set (medium)
XC5996-001 5 H 10 cm X W 10 cm
BM4: X81267-001
(H 4 inches X W 4 inches)
EBT-CEN
Embroidery set (small)
4
H 2 cm X W 6 cm (H 1 inch X W 2-1/2
inches)
Part Code
U.S.A. / Canada
Other
No. z Visit your nearest authorized...
Users Manual - English - Page 10

... panel From the operation panel, patterns can be selected and edited, and operations for the embroidery unit. m Needle threader lever Use the needle threader lever to the machine, and then attach the embroidery frame.
k Embroidery unit Attach the embroidery unit to thread the needle.
d Bobbin winding thread guide Pass the thread around the thread guide...
Users Manual - English - Page 11

... supply jack Insert the plug on and off.
a Handle Carry the machine by its handle when transporting the machine.
c Embroidery card slot Insert the embroidery card.
e Bobbin cover/bobbin case Remove the bobbin cover, and then insert the bobbin into the power supply jack. f Embroidery foot "Q" This presser foot is lowered, it enters the hole...
Users Manual - English - Page 13
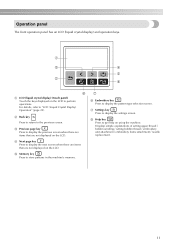
... / setting bobbin thread / embroidery unit attachment / embroidery frame attachment / needle replacement.
11
g
f Embroidery key Press to display the settings screen.
c Previous page key Press to display the previous screen when there are items that are not displayed on using the machine. g Settings key Press to display the pattern type selection screen. h Help key Press to...
Users Manual - English - Page 15

Embroidery Step by Step 14 Attaching the Embroidery Unit 15
Embroidery unit precautions 15 Attaching the embroidery unit 15 Removing the embroidery unit 16 Turning the Machine On/Off 18 Power supply precautions 18 Turning on the machine 19 Turning off the machine 19 LCD (Liquid Crystal Display) Operation 20 Viewing the LCD 20 Changing the machine settings 21 Checking machine ...
Users Manual - English - Page 16

... frame.
For details, refer to the fabric. GETTING READY
Embroidery Step by Step
The basic steps for embroidery are as follows.
1
Attaching the embroidery unit
Attach the embroidery unit. (If the embroidery unit is not attached, the machine does not operate.) For details, refer to "Attaching the embroidery unit" (page 15).
↓
2 Checking the needle
Use a needle matched to...
Users Manual - English - Page 21
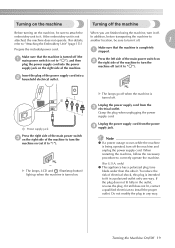
...the machine is turned on. X The lamps, LCD and (Start/stop button) light up when the machine is completely a stopped.
If the plug does not fit fully in any way. Turning the Machine On/...If it . Turning on the machine
Turning off the machine
Before turning on the machine, be sure to turn it off . If the embroidery unit is turned off the machine and unplug the power supply cord.
Insert ...
Users Manual - English - Page 35
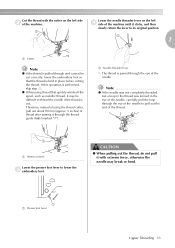
... be difficult to thread the needle if the thread is cut correctly, lower the embroidery foot so that the thread is performed, skip step c. a Needle threader lever
X The thread is passed through the thread guide disks....
1
a 80mm or more
Lower the presser foot lever to pull out the end of the machine until it may break or bend.
1
a Presser foot lever
Upper Threading 33 Cut the thread with...
Users Manual - English - Page 58

...used. This section describes the steps for use with this machine. See the explanation of the embroidery frame.
Use embroidery bobbin thread intended for use ...
Use embroidery thread, or country embroidery thread intended for embroidering and appliquéing.
Embroidering attractive finishes
There are done, you use with this machine.
Otherwise, the embroidery unit ...
Users Manual - English - Page 60
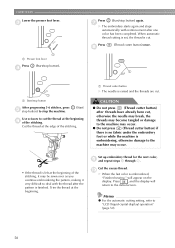
...Lower the presser foot lever. Press (Start/stop button). Set up embroidery thread for the next color, i and repeat steps a through h. When automatic thread cutting is set, the thread is embroidered,
"Finished sewing." Press
h
(Thread cutter button) once.
1
1
a Start/stop button
After progressing 5-6 stitches, press e stop button) to stop the machine.
(Start/
Use scissors to "LCD (liquid...
Users Manual - English - Page 72
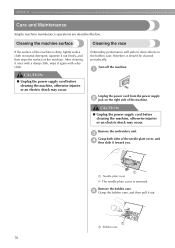
... then pull it again with a damp cloth, wipe it out.
1
a Bobbin case
70 Embroidery performance will suffer if dust collects in neutral detergent, squeeze it should be cleaned periodically.
CAUTION
● Unplug the power supply cord before cleaning the machine, otherwise injuries or an electric shock may occur. APPENDIX
Care and Maintenance
Simple...
Users Manual - English - Page 78
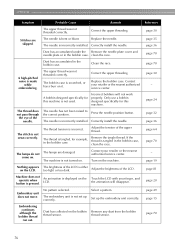
...sewn correctly.
The stitch is incorrectly installed. The machine is pressed.
Machine does not operate when
button is not turned on it. No pattern selected. The embroidery unit is either too light or too dark. ...the tension of the LCD is not set up the embroidery unit correctly. The lamps are skipped. A bobbin designed specifically for example, in the bobbin case, clean the race...
USB GUIDE - Multi - Page 5
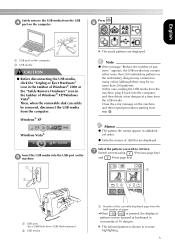
...step e. Press
.
Close the error message on the machine, and then repeat procedures starting from the USB d port on the computer. g Switch screens using
(Previous page key)
and
(Next page key). Note
z If the message "Reduce the number of .dst files are displayed. appears, the USB media may contain either more than 200 embroidery...computer. In this case, unplug the USB media from the...
USB GUIDE - Multi - Page 7
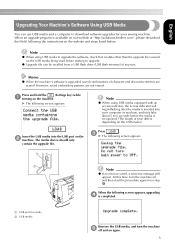
... However, saved embroidery patterns are erased.
Remove the USB media, and turn the machine off and on the website and steps listed below.
...sewing machine. X The following screen appears, upgrading d is saved on the machine.
The media device should only
contain the upgrade file. Press
. a USB port for your computer or machine, and may take about 5 to 6 seconds before starting...
Similar Questions

Brother Pe 770 Embroidery Machine
Can you provide the touch screen panel part number for the brother pe770 embroidery machine?
Can you provide the touch screen panel part number for the brother pe770 embroidery machine?
(Posted by sandymichelle144 1 year ago)

How To Fix Brother Pe 770 Embroidery Machine
(Posted by noondwlu 10 years ago)

How To Reset Brother Se400 Embroidery And Sewing Machine
(Posted by tomcdmd 10 years ago)


You Tube Videos On Threading The Bobbin On My Pe-770 Embroidery Machine
(Posted by Mlitweak 10 years ago)