Get support for Brother International PC 420 - PRW Limited Edition Project Runway Sewing Machine

Brother International PC 420 Support Question

Brother International PC 420 Support Question

Find answers below for this question about Brother International PC 420 - PRW Limited Edition Project Runway Sewing Machine.
Need a Brother International PC 420 manual? We have 1 online manual for this item!
Question posted by Anonymous-142963 on September 6th, 2014

My Sewing Machine Keeps Jamming And Gives Me An Error Code E6. Can Not Find My

Error 6 code. Jamming in bobbining area.

Current Answers

There are currently no answers that have been posted for this question.
Be the first to post an answer!

Remember that you can earn up to 1,100 points for every answer you submit. The better the quality of your answer, the better chance it has to be accepted.

Related Brother International PC 420 Manual Pages

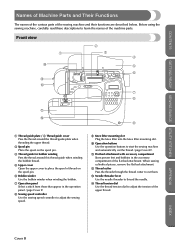
Users Manual - English - Page 3

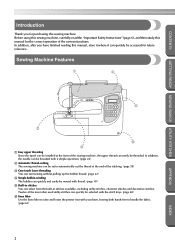
... cover to place the spool of thread on the spool pin. 6 Bobbin winder Use the bobbin winder when winding the bobbin. 7 Operation panel Select a stitch from those that appear in the accessory compartment of the sewing machine and their functions are described below. When sewing cylindrical pieces, remove the flat bed attachment. B Thread cutter Pass the...
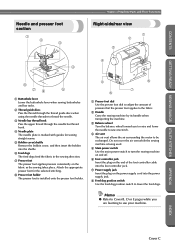
Users Manual - English - Page 4

.... 2 Handle Carry the sewing machine by its handle when transporting the machine. 3 Balance wheel Turn the balance wheel toward you are learning to use your machine. Do not cover the air vent while the sewing machine is marked with guides for sewing straight seams. 5 Bobbin cover/shuttle Remove the bobbin cover, and then insert the bobbin into the shuttle. 6 Feed...
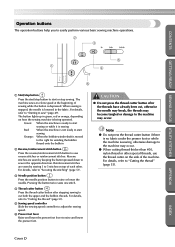
Users Manual - English - Page 5

... various basic sewing machine operations. 2 3 5 1 4 6 1 Start/stop button Press the start/stop sewing. For details, refer to "Starting to "Cutting the thread" (page 53). Green: When the machine is ready to start sewing or while it is sewing Red: When the machine is not ready to start or stop button to start sewing Orange: When the bobbin winder shaft...
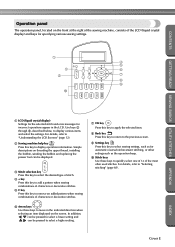
Users Manual - English - Page 6

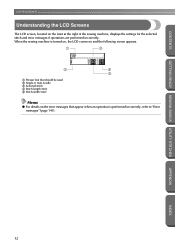
... panel, located on the front at the right of the sewing machine, consists of the LCD (liquid crystal display) and keys for specifying various sewing settings. 1 4 5 2 6 3 7 8 9 0 GETTING READY SEWING BASICS UTILITY STITCHES APPENDIX 1 LCD (liquid crystal display) Settings for the selected stitch and error messages for automatic reverse/reinforcement stitching, or other settings such...
Users Manual - English - Page 8

... reading this sewing machine. Sewing Machine Features 1 4 5 2 6 3 1 Easy upper threading Since the spool can be installed at the end of the various functions. In addition, after you for the correct operation of the stitching. (page 58) 3 One-touch lower threading You can start sewing without pulling up the bobbin thread. (page 22) 4 Simple bobbin-winding The bobbin can...
Users Manual - English - Page 12

... machine to ensure that they do not play with any adjustments in the needle area, such as described in this machine... servicing adjustments mentioned in the instruction manual. 16. This sewing machine is damaged, it to break. 12. Use only accessories... The machine should always be replaced by pulling on cord. Do not use as threading needle, changing needle, threading bobbin, or ...
Users Manual - English - Page 14

...while sewing. Do not use • Maintaining the machine • Leaving the machine unattended 3. Use only neutral soaps or detergents to keep your local authorized Brother dealer. Plug the machine directly... follow the troubleshooting table in the back of the most advanced computerized household sewing machines. If the problem persists, please consult your eye on the foot controller....
Users Manual - English - Page 16

.... Pulling on the cord may result. ● Do not touch the plug with many other power sources may result. ● When unplugging the machine, always turn the sewing machine on and off the main power first. Otherwise a fire may damage the cord and cause fire or electric shock. Always grasp the plug to...
Users Manual - English - Page 17

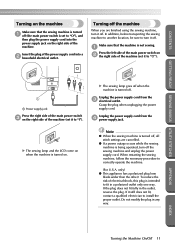
... fit fully in any way. If it off . X The sewing lamp goes off when the machine is being operated, turn off the sewing machine and unplug the power supply cord. Note ● When the sewing machine is turned off, all stitch settings are finished using the sewing machine, turn it still does not fit, contact a qualified electrician to...
Users Manual - English - Page 18

... used 2 Single or twin needle 3 Selected stitch 4 Stitch length (mm) 5 Stitch width (mm) Memo ● For details on the front at the right of the sewing machine, displays the settings for the selected stitch and error messages if operations are performed incorrectly. APPENDIX INDEX 12
Users Manual - English - Page 19

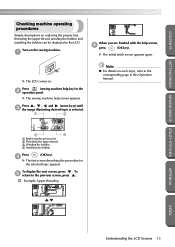
...in this Operation Manual. 3 4 1 Replacing the presser foot 2 Threading the upper thread 3 Winding the bobbin 4 Installing the bobbin Press (OK key). 4 X The first screen describing the procedure for the selected topic appears. CONTENTS GETTING READY SEWING BASICS UTILITY STITCHES Checking machine operating procedures Simple descriptions on . X The initial stitch screen appears again.
Users Manual - English - Page 20

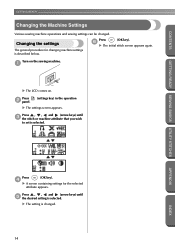
... settings The general procedure for the selected attribute appears. Press 2 panel. (settings key) in the operation X The settings screen appears. GETTING READY SEWING BASICS UTILITY STITCHES GETTING READY CONTENTS Changing the Machine Settings Various sewing machine operations and sewing settings can be changed . 14 Press (OK key). 6 X The initial stitch screen appears again.
Users Manual - English - Page 24

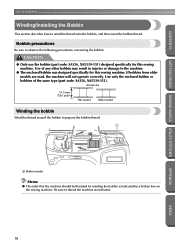
...; Only use the bobbin (part code: SA156, XA5539-151) designed specifically for winding the bobbin is indicated by a broken line on the sewing machine. Be sure to wind the thread onto the bobbin, and then insert the bobbin thread. Bobbin precautions Be sure to the machine. ● The enclosed bobbin was designed specifically for this sewing machine. If bobbins from older models are...
Users Manual - English - Page 25

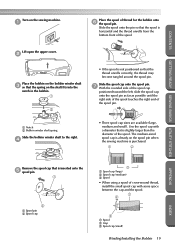
... is horizontal and the thread unrolls from the bottom front of the spool. CONTENTS GETTING READY SEWING BASICS UTILITY STITCHES Turn on the sewing machine. 1 Place the spool of the spool pin. 1 Notch 2 Bobbin winder shaft spring Slide the bobbin winder shaft to the right. 4 • Three spool cap sizes are available (large, medium and...
Users Manual - English - Page 28

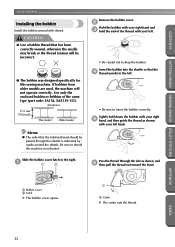
... same type (part code: SA156, XA5539-151). CAUTION ● Use a bobbin thread that has been correctly wound, otherwise the needle may break or the thread tension will not operate correctly. Insert the bobbin into the shuttle so that the bobbin thread should be incorrect. ● The bobbin was designed specifically for this sewing machine. Be sure to...
Users Manual - English - Page 52

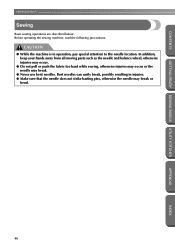
Before operating the sewing machine, read the following precautions. Bent needles can easily break, possibly resulting in operation, pay special attention to the needle location. In addition, keep your hands away from all moving parts such as the needle and balance wheel, otherwise injuries may occur. ● Do not pull or push the ...
Users Manual - English - Page 67

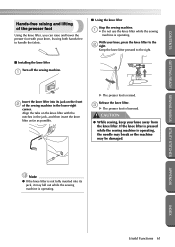
... is operating. If the knee lifter is pressed while the sewing machine is lowered. CAUTION ● While sewing, keep your knee, press the knee lifter to handle the fabric. ■ Using the knee lifter Stop the sewing machine. 1 • Do not use the knee lifter while the sewing machine is operating. Align the tabs on the front 2 of...
Users Manual - English - Page 113

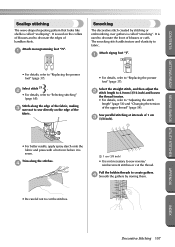
...(3/16 inch) and loosen the thread tension. • For details, refer to fabric. Sew parallel stitching at intervals of handkerchiefs. APPENDIX INDEX Decorative Stitching 107 Attach zigzag foot "J". 1 ...along the stitches. 4 1 1 cm (3/8 inch) • It is sewn. Pull the bobbin threads to create gathers. 4 Smooth the gathers by stitching or embroidering over gathers is called "...
Users Manual - English - Page 147

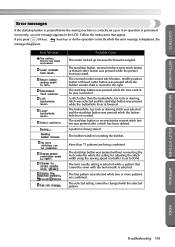
... shaft is moved to [ON]. The bobbin winder is displayed, the message disappears. The selected setting cannot be sewn with the selected pattern. CONTENTS GETTING READY SEWING BASICS UTILITY STITCHES Error messages If the start/stop button is pressed before the sewing machine is correctly set to the right. Error Message Probable Cause The motor locked...
Users Manual - English - Page 148

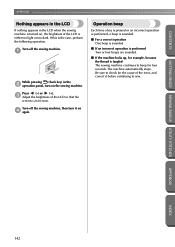
... Press (-) or (+). 3 Adjust the brightness of the LCD is either too light or too dark. If this is tangled The sewing machine continues to sew. Turn off the sewing machine. 1 While pressing (back key) in the LCD when the sewing machine is turned on, the brightness of the LCD so that the screens can be seen. The...

Similar Questions

Ask a New Question
Use the box below to post a new question about this Brother International product .
Points & Prizes
  • You can earn points for nearly everything you do on HelpOwl.com
  • You can trade in those points for gift cards at leading retailers such as Amazon.com and Walmart
  • It's that simple!
See How it Works
Create a Free Account

Brother International Manuals

Find free Brother International PC 420 - PRW Limited Edition Project Runway Sewing Machine manuals and user guides available at ManualOwl.com. Try out our unique manual viewer allowing you to interact with manuals from directly within your browser!

Brother International Reviews

View thousands of Brother International user reviews and customer ratings available at ReviewOwl.com.

Contact Information

Complete Brother International customer service contact information including steps to reach representatives, hours of operation, customer support links and more from ContactHelp.com.

Scoreboard Ratings

See detailed Brother International customer service rankings, employee comments and much more from our sister site.