
Brother International Laura Ashley Innov-is NX800 Support Question
Brother International Laura Ashley Innov-is NX800 Support Question
Find answers below for this question about Brother International Laura Ashley Innov-is NX800.Need a Brother International Laura Ashley Innov-is NX800 manual? We have 2 online manuals for this item!
Question posted by gsdavis79 on February 17th, 2013
Trouble Threading Needle
Can't get automatic needle threader to work. I've reviewed each step in manual. This should not be that hard! I need help!
Current Answers
Related Brother International Laura Ashley Innov-is NX800 Manual Pages
Users Manual - English - Page 6
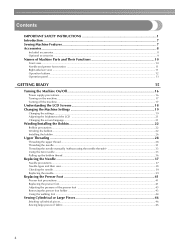
...Changing the Machine Settings 19
Changing the settings ...19 Adjusting the brightness of the LCD ...21 Changing the screen language...21
Winding/Installing the Bobbin 22
Bobbin precautions ...22 Winding the bobbin ...22 Installing the bobbin ...26
Upper Threading ...28
Threading the upper thread ...28 Threading the needle ...31 Threading the needle manually (without using the needle threader 33...
Users Manual - English - Page 9
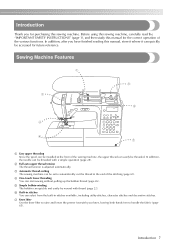
... for purchasing this manual, store it where it can quickly be accessed for future reference. c Automatic thread-cutting The sewing machine can easily be threaded with your knee, leaving both hands free to automatically cut the thread at the front of the various functions. d One-touch lower threading You can be threaded.
In addition, the needle can start sewing without pulling up...
Users Manual - English - Page 12
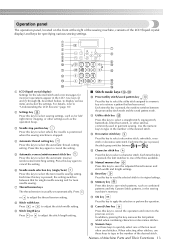
... Insert the knee lifter into the knee lifter mounting slot.
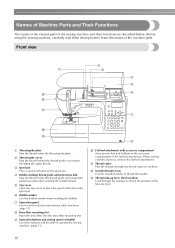
l Needle threader lever Use the needle threader to operate the sewing machine. (page 12)
8
j Flat bed attachment with accessory compartment Store presser feet and bobbins in the accessory compartment of thread on the spool pin. Names of Machine Parts and Their Functions
The names of the various parts...
Users Manual - English - Page 13
c Needle bar thread guide Pass the upper thread through 12 while you are learning to create buttonholes. f Bobbin cover Open the bobbin cover to turn the sewing machine ON and OFF. i Presser foot holder The presser foot is marked with the one-step buttonhole foot to use your machine. c Handwheel Turn the handwheel toward you (counterclockwise). Do not...
Users Manual - English - Page 14
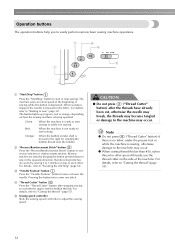
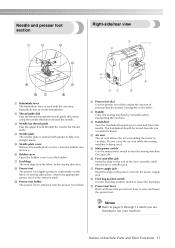
... buttons
The operation buttons help you to raise or lower the needle. Reverse stitches are sewn by keeping the button pressed down to the machine may occur. c "Needle Position" button
Press the "Needle Position" button to easily perform various basic sewing machine operations. z When cutting thread thicker than #30, nylon thread or other special threads, use the thread cutter on the...
Users Manual - English - Page 15
... the operation. i Stitch length keys
Press or to select where the needle is positioned when the sewing machine is usually set automatically. Each time this key to adjust the stitch length setting.
7
9...twin needle sewing setting. In addition, pressing this key to select a decorative stitch, satin stitch, crossstitch or decorative satin stitch.
g Thread tension keys
The thread tension...
Users Manual - English - Page 17
... 18 Changing the Machine Settings 19
Changing the settings 19 Adjusting the brightness of the LCD 21 Changing the screen language 21 Winding/Installing the Bobbin 22 Bobbin precautions 22 Winding the bobbin 22 Installing the bobbin 26 Upper Threading ...28 Threading the upper thread 28 Threading the needle 31 Threading the needle manually (without using the needle threader 33 Using...
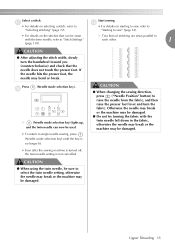
Users Manual - English - Page 25

... that best fits the size of thread for the spool being used , the thread may catch on the slit in the spool and the needle may break.
• ("Start/Stop" button) lights up in the direction of the d arrow until it snaps into place. Press down on the sewing machine.
Slide the spool cap onto...
Users Manual - English - Page 27

... six times with built-in the bobbin and the needle may be damaged. While holding the thread with your right hand. Slide the sewing speed controller to the right m to increase the ...end of the thread through the guide l slit in the bobbin winder seat, and then pull
the thread to the right to stop the machine, otherwise the sewing machine may bend or break when the bobbin thread starts to ...
Users Manual - English - Page 28
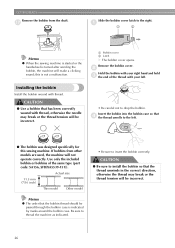
...sewing machine.
a Bobbin cover b Latch
X The bobbin cover opens. Use only the included bobbin or bobbins of the thread with thread. Be sure to thread the machine...machine will not operate correctly. Remove the bobbin cover.
Actual size
11.5 mm (7/16 inch)
This model
Other model
Memo
z The order that has been correctly wound with thread, otherwise the needle may break or the thread...
Users Manual - English - Page 30
Threading the upper thread
Set the spool of thread on the sewing machine.
a
Memo
z The order that the machine should be threaded is not correct, the thread may become tangled and the needle may bend or break.
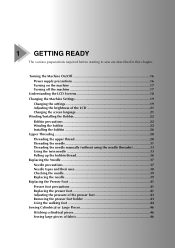
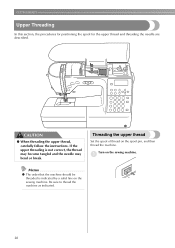
GETTING READY
Upper Threading
In this section, the procedures for positioning the spool for the upper thread and threading the needle are described. If the upper threading is...
Users Manual - English - Page 31
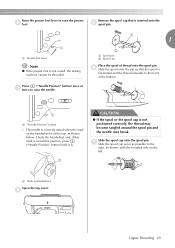
... the spool pin.
Remove the spool cap that the spool is not positioned correctly, the thread may become tangled around the spool pin and the needle may break.
d
Upper Threading 29 a
a Presser foot lever
Note
z If the presser foot is not raised, the sewing machine cannot be threaded.
1
1
2
a Spool pin b Spool cap
Place the spool of...
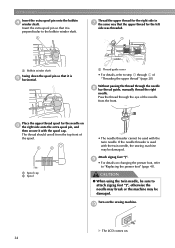
Users Manual - English - Page 33
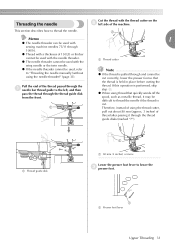
... to thread the needle.
1
Memo
z The needle threader can be used with sewing machine needles 75/11 through the a needle bar thread guide to the left side of the machine.
Pull the end of the thread passed through 100/16.
a Thread guide disk
1
a 80 mm (3 inches) or more
Lower the presser foot lever to thread the needle if the thread is performed, skip step c. z The needle threader...
Users Manual - English - Page 34
... foot, and then pull
out about 5 cm (2 inches) of thread toward the rear of the machine.
Note
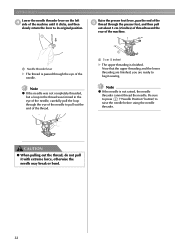
z If the needle is passed through the eye of the needle. Be sure to press ("Needle Position" button) to begin sewing. GETTING READY
Lower the needle threader lever on the left d side of the machine until it with extreme force, otherwise the...
Users Manual - English - Page 35
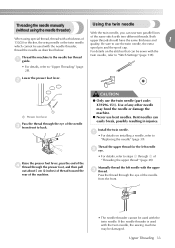
... needle threader cannot be used with the twin needle.
Be sure to use the twin needle (part code: X59296-151).
CAUTION
● Only use the twin needle, the extra
which cannot be used with the twin needle, the sewing machine may bend the needle or damage the machine.
● Never use bent needles. Manually thread the left needle b eye.
• For details, refer to steps...
Users Manual - English - Page 36
... foot, refer to step h through the needle h bar thread guide, manually thread the right
needle. Attach zigzag foot "J".
i
• For details on the sewing machine. CAUTION
● When using the twin needle, be used with the spool cap.
a Thread guide cover
• For details, refer to "Replacing the presser foot" (page 41). If the needle threader is perpendicular to attach...
Users Manual - English - Page 37
... selection key) until the key is no longer lit.
• Even after the sewing machine is turned off, the twin needle setting is not cancelled.
CAUTION
● When using the twin needle, be used.
• To return to "Selecting stitching" (page 72).
Upper Threading 35 X Two lines of stitching are sewn parallel to raise the...
Users Manual - English - Page 40
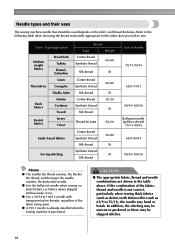
...
Cotton thread Synthetic thread
Silk thread Synthetic thread
Silk thread
50-80 50 30
Size of the fabric, thread and needle is purchased. z Use the ball point needle when sewing on the fabric and thread thickness. CAUTION
● The appropriate fabric, thread and needle combinations are shown in the table above. GETTING READY
Needle types and their uses
The sewing machine needle that...
Users Manual - English - Page 52
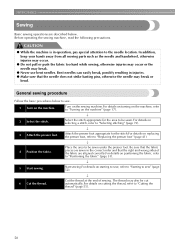
...).
5 Start sewing.
↓
Start sewing.For details on starting to sew, refer to "Starting to "Replacing the presser foot" (page 41).
↓
4 Position the fabric.
The thread may also be cut automatically.For details on cutting the thread, refer to be sewn.For details on selecting a stitch, refer to the needle location. Before operating the sewing machine, read the...
Users Manual - English - Page 53

...the needle.
While holding the end of the thread and the d fabric with your left needle position) is easier and the extra fabric does not get in the way.
Sewing ...the sewing machine. Positioning the fabric
Be sure that the fabric pieces are sewn in a straight line is automatically selected.
e
1
a "Needle Position" button
Place the fabric under the presser foot.
Press ("Needle ...
Similar Questions

Hi I Have An Industrial Sewing Machine Db2-b797 Which Has Served For 30 Years'
have trouble thread bunching on needle, breaking on reverse,only needle plate replacements occasiona...
have trouble thread bunching on needle, breaking on reverse,only needle plate replacements occasiona...
(Posted by bola79344 8 years ago)

Videos On How To Thread A Sewing Machine Lx2500
(Posted by FayKadfgs 9 years ago)

How To Thread Brother Sewing Machine Ls590
(Posted by ao6lde 10 years ago)

How To Thread Brother Sewing Machine 2125i
(Posted by jvicToo 10 years ago)
How To Thread Brother Sewing Machine Ls2125i
(Posted by mcbeam 10 years ago)