
Brother International CE-5500PRW Support Question
Brother International CE-5500PRW Support Question
Find answers below for this question about Brother International CE-5500PRW.Need a Brother International CE-5500PRW manual? We have 3 online manuals for this item!
Question posted by hardoil on July 12th, 2014
What Stitch Settings Do You Use To Machine Baste On The Ce5500prw
The person who posted this question about this Brother International product did not include a detailed explanation. Please use the "Request More Information" button to the right if more details would help you to answer this question.
Current Answers
Related Brother International CE-5500PRW Manual Pages
Users Manual - English - Page 7

...63 Free-motion quilting ...64
REINFORCEMENT STITCHING 66
Triple stretch stitching ...66 Bar tack stitching ...66
DECORATIVE STITCHING 68
Fagoting ...69 Scallop stitching ...70 Smocking ...70 Shell tuck stitching ...71 Joining ...71 Heirloom stitching ...72
4. 3. APPENDIX ...73
STITCH SETTINGS ...73
Utility stitches ...73
MAINTENANCE ...78
Cleaning the machine surface ...78 Cleaning the bobbin...
Users Manual - English - Page 8
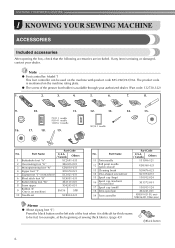
... screwdriver
15 Spool cap (large)
16
Spool cap (medium) (on the left side of the foot when it is difficult for thick seams to be used on machine.)
SA156
SFB
10 Needle set
XC8834-021
No.
Users Manual - English - Page 10
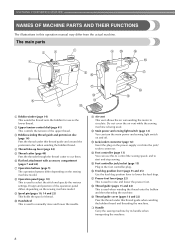
... depending on and off.
Do not cover the air vent while the sewing machine is used to select the stitch and specify the various settings.
m Jack/socket connector (page 12) Insert the plug on the sewing machine model. p Feed dog position lever (page 55 and 65) Use the feed dog position lever to cut them. d Thread take-up...
Users Manual - English - Page 11

... plate is lowered in the sewing direction.
a Reverse/reinforcement stitch button Press the reverse/reinforcement stitch button to easily perform various basic sewing machine operations. Reverse stitches are sewn by keeping the button pressed down to set bobbin)
You can start or stop button (for the selected stitching.
1
f Needle plate cover release Use when removing the needle plate...
Users Manual - English - Page 15

... the "-" side of (stitch selection key). Turn off the sewing machine in the fabric when sewing is set to leave the needle in order to prevent the machine from accidentally being started. Note
● When the foot controller is not in , the start/stop button cannot be used to start sewing (only for models equipped with the start...
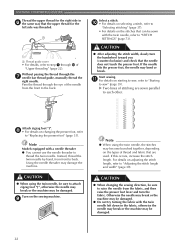
Users Manual - English - Page 29
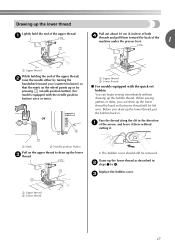
... or by pressing (needle position button) (for models equipped with the quick-set bobbin You can draw up the lower thread by turning the
handwheel toward the back of the machine under the presser foot.
1
a Upper thread
While holding the end of ... both
d threads and pull them toward you (counterclockwise) so that some thread will be removed.
When sewing gathers or darts, you can begin...
Users Manual - English - Page 33
... the c upper thread.
The needle could break, and damage the machine. ● Do not sew with bent needles. a • For details on the stitches that can not use the same
color or two different colors of thread for making decorative stitches. b • For details, refer to "STITCH SETTINGS" (page 73).
1
a Twin needle
b Extra spool pin
CAUTION
●...
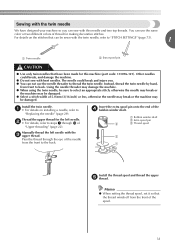
Users Manual - English - Page 34
... the needle may break or the machine may be damaged.
32 Start sewing. Note
Models equipped with the twin needle left down in f the same way that can be sewn
with the twin needle, refer to "STITCH SETTINGS" (page 73).
j • For details on selecting a stitch, refer to
"Selecting stitching" (page 37). • For details on...
Users Manual - English - Page 38
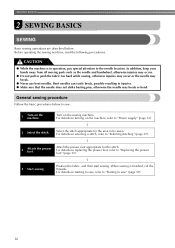
... operation, pay special attention to be sewn. Select the stitch appropriate for the stitch. Position the fabric, and then start sewing. When sewing is in injuries. ● Make sure that the needle does not strike basting pins, otherwise the needle may break.
● Never use bent needles. General sewing procedure
Follow the basic procedures below .
Attach the...
Users Manual - English - Page 42
... button cannot be set to the raised position (page 13).
j
Pull the fabric to the left side of each other than straight or zigzag stitches that are sewn depends on the stitch that is selected. The machine can be used to start sewing (for models equipped with reverse stitching, pressing (reverse/reinforcement stitch button) sews reinforcement stitches, 3 to 5 stitches on top...
Users Manual - English - Page 44
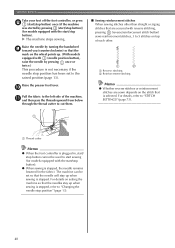
...toward you select a stitch, the machine automatically sets the stitch width and length for the stitch that will be achieved. When the stitching reaches a corner, stop the a sewing machine. Trial sewing
Lower the presser foot lever and continue c sewing.
Turn the fabric using a zigzag stitch, select a shorter stitch length in the fabric).
SEWING BASICS
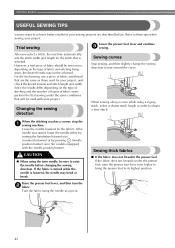
USEFUL SEWING TIPS
Various ways...
Users Manual - English - Page 49
...Attach zigzag foot "J".
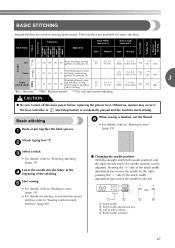
Start sewing. pressing the "-" side of the stitch width adjustment key moves the needle to the right; BASIC STITCHING
Straight stitches are used for sewing plain seams. Three stitches are available for basic stitching. Basic stitching
Baste or pin together the fabric pieces. Pressing the "+" side of the stitching.
a Stitch width b Stitch width adjustment key c Left...
Users Manual - English - Page 59
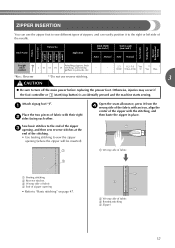
... will be inserted). b Wrong side of fabric with the stitching, and then baste the zipper in place. Attach zigzag foot "J". Otherwise, injuries may occur if the foot controller or (start/stop button) is accidentally pressed and the machine starts sewing. ZIPPER INSERTION
You can use reverse stitching.
3
CAUTION
● Be sure to turn off the main...
Users Manual - English - Page 60
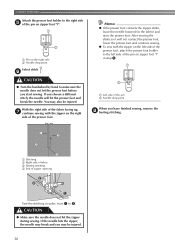
... it will hit the presser foot and break the needle. If the needle hits the zipper, the needle may break and you have finished sewing, remove the h basting stitching. UTILITY STITCHES
Attach the presser foot holder to the left side of the presser foot, attach the presser foot holder to the right side e of...
Users Manual - English - Page 61
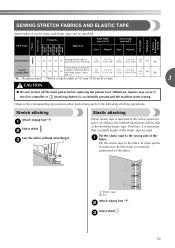
...attaching
When elastic tape is necessary that a suitable length of the elastic tape be used. Therefore, it .
Otherwise, injuries may occur if the foot controller or (start...make sure that the tape is accidentally pressed and the machine starts sewing. Pin the elastic tape to turn off the main power before replacing the presser foot. b
Select stitch . Pattern No.
Pin the elastic tape to the...
Users Manual - English - Page 64
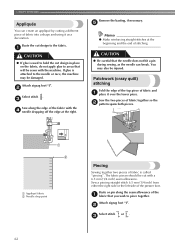
...race, the machine may also be sewn with the machine. The fabric pieces should be damaged.
Baste or pin along the edge of stitching. If glue is attached to piece together.
Sew the two pieces...a 6.5 mm (1/4 inch) seam allowance. Sew a piecing straight stitch 6.5 mm (1/4 inch) from either the right side or the left side of fabric is used to hold the cut with the d needle ...
Users Manual - English - Page 70
...No
No
* Rfc. N
24 24
24
23
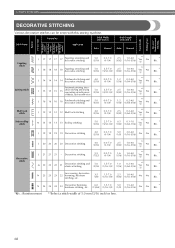
Decorative hemming, heirloom stitching, etc.
6.0 1.5-7.0 (15/64) (1/16-1/4)
3.0 (1/8)
1.5-4.0 (1/16-3/16)
No
No
*Rfc.: Reinforcement **Select a stitch width of fabrics, such as with this sewing machine. UTILITY STITCHES
DECORATIVE STITCHING
Various decorative stitches can be sewn with tricot
2.5-7.0 (3/32-1/4)
2.5 (3/32)
1.0-4.0 (1/16-3/16)
** Yes...
Users Manual - English - Page 71
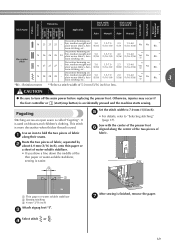
...)
1.5-4.0 (1/16-3/16)
** Yes ( J )
No
* Rfc.
It is used on blouses and children's clothing. Use an iron to "Selecting stitching" (page 37).
d
After sewing is accidentally pressed and the machine starts sewing.
CAUTION
● Be sure to 7.0 mm (1/4 inch). Sew with the center of the presser foot f aligned along their seams.
Baste the two pieces of fabric, separated by...
Users Manual - English - Page 75
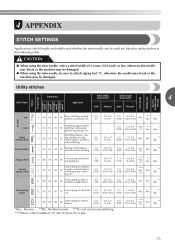
... may be used are listed for utility stitches in the following table.
J
04
04
04
04
Overcasting and attaching appliqués
3.5 (1/8)
0.0-7.0 (0-1/4)
1.4 (1/16)
0.0-4.0 (0-3/16)
**** Yes ( J )
*** Yes
* Rev.
ing, etc.
5.0 (3/16)
1.5-7.0 (1/16-1/4)
1.0 (1/16)
0.2-4.0 (1/64-3/16)
**** Yes ( J )
No
** Rfc.
Attaching sleeves, sew- 4 APPENDIX
STITCH SETTINGS...
Users Manual - English - Page 98
... 63 64
R
reinforcement stitching 40
, reverse/reinforcement stitch button 9 40
S
scallop stitching 70 seam ripper 54 sewing machine needles 28
, sewing speed controller 9 13
sleeve holes 66 smocking 70
spool cap 6 10, 14, 23 spool , pin 10 14, 22 , start/stop button 9 39
stitch length 38 stitch selection key 10 stitch settings 73 stitch width 38 straight stitch 47 stretch fabrics...
Similar Questions

What Is The Baste Stitch Setting?
i have a brother jx2517 and love it, but i need to do a baste stitch and can't find the right settin...
i have a brother jx2517 and love it, but i need to do a baste stitch and can't find the right settin...
(Posted by whitechapelkiller 9 years ago)

How To Thread Bobbin Brother Ce5500prw Sewing Machine
(Posted by mastAES 9 years ago)

Brother Sewing Machine Model Ce5500prw How To Change Light
(Posted by sallccyy0 9 years ago)

How To Make A Baste Stitch On A Brother Project Runway Sewing Machine
(Posted by citrmstr 10 years ago)