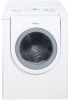
Bosch WTMC3321US Support Question
Bosch WTMC3321US Support Question
Find answers below for this question about Bosch WTMC3321US - Nexxt 500 Series Electric Dryer.Need a Bosch WTMC3321US manual? We have 2 online manuals for this item!
Question posted by bobjan1234 on November 29th, 2014
Clean Lint Sensor & Reset
How do you remove front panel, clean lint trap, and reset sensor?
Current Answers
Answer #1: Posted by TommyKervz on December 18th, 2014 4:14 AM
TommyKervz

Member since:
January 10th, 2013 Points: 17,776,813

Member since:
January 10th, 2013 Points: 17,776,813
Please refer the user manual below
http://www.manualslib.com/manual/19127/Bosch-Wtmc3321cn.html?page=18#manual
Related Bosch WTMC3321US Manual Pages
Use & Care Manual (all languages) - Page 2
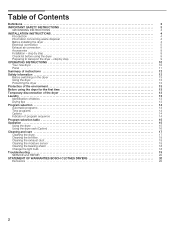
...
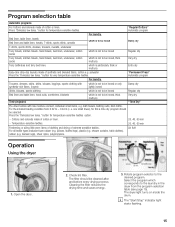
Options 14 Indicator of program sequence 14
Program selection table 15
Operation 15
Using the dryer 15
Using the dryer rack (Option 16
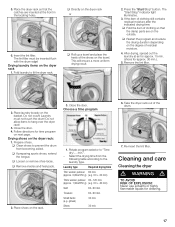
Cleaning and care 17
Cleaning the dryer 17
Cleaning the lint filter 18
Cleaning the exhaust duct 18
Cleaning the moisture sensor 18
Cleaning the bearing shield 18
Change the light bulb 18
Troubleshooting 19
SERVICE and REPAIR...
Use & Care Manual (all languages) - Page 3
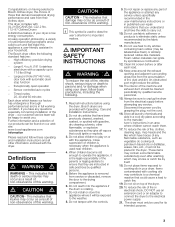
... performance test and is removed from the accumulation of lint, dust and dirt. Bosch dryers are instructed in safe practices by itself.
18. Do not allow children to the drying compartment.
6. Before the appliance is in the dryer. Do not reach into the appliance if the drum is used near children.
4. Clean lint screen before using...
Use & Care Manual (all languages) - Page 4

...Do not operate the dryer if any guards and/or panels have a proper outlet...of malfunction or breakdown, grounding will not fit the outlet, have been removed.
25.
For U.S.A.
4
Your dryer comes without a power supply cord. Five feet long (minimum) For ... main plug, cut off power cord and discard with
the National Electric Code,
ANSI/NFPA70 ć latest edition/State and Municipal codes and/or ...
Use & Care Manual (all languages) - Page 5
....7" (500 mm)/ 143 lbs
angle
170 - 180°
(64 kg)
If installing the dryer in rooms which may prolong the drying times.
Additional distances facilitate installation and service.
- Do not remove ground prong.
Additional distances reduce noise transmission.
- If required, the door hinges can be clean, level and firm. Check the dryer for the dryer cord...
Use & Care Manual (all languages) - Page 6
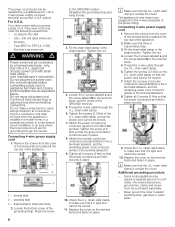
...U.L. Tighten the screw (2.5 Nm) so that the power cord cannot be moved.
7. Check the U.L. Remove the screws from the cover
of the terminal block located at the top rear of the appliance.
1
2...by a licensed electrician only. Use a 4Ćwire power supply cord (see electrical connection U.S.A. below . Your dryer comes without a power supply cord. The power cord must have closed loop or ...
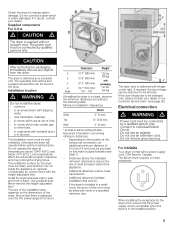
Use & Care Manual (all languages) - Page 7
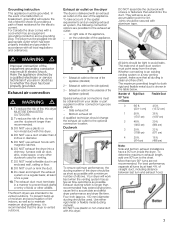
...on the side (optional)
3 ć Exhaust air outlet on the rear of lint. Bottom exhaust kit A qualified technician should be tight to prevent back drafts or...dryer should be as short as an accumulation point for either rigid metal or flexible metal ducting material.
DO NOT use the ductwork longer than recommended may result in electric shock. DO NOT crush or kink the duct. 9. Do clean...
Use & Care Manual (all languages) - Page 8
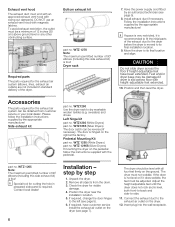
... tool for the exhaust air system (elbows, lines, exhaust air outlets) are not included in
prepared side panel is four! Remove all four feet firmly on the ground. Position the dryer near the
installation location. 5. The dryer should be level with all objects from customer service or your local dealer. Adjust the heightĆ...
Use & Care Manual (all languages) - Page 9
...
5.
Screw the heightĆadjustable feet of the dryer into the housing to the power supply.
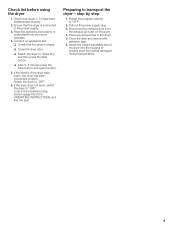
3. Check list before using the dryer
1. q Close the dryer door. q After 3-5 minutes press the Stop button ... q Check that steps 1-12 have been implemented properly.
2. Switch the dryer to transport the dryer ć step by step
1. Preparing to "OFF".
6. Place any accessories in the troubleshooting ...
Use & Care Manual (all languages) - Page 10
Lint filter
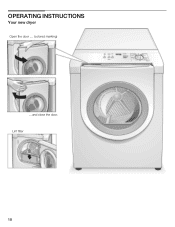
10 OPERATING INSTRUCTIONS
Your new dryer
Open the door .... (colored marking)
....and close the door.
Use & Care Manual (all languages) - Page 11
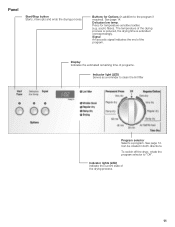
... (LED) Indicate the current state of programs.
Indicator light (LED) Serves as a reminder to clean the lint filter
Program selector Selects a program. See page 14. The temperature of the program. Can be rotated in addition to "Off". Panel
Start/Stop button Starts, interrupts and ends the drying process. Signal An acoustic signal indicates...
Use & Care Manual (all languages) - Page 12
...allow items containing flammable materials, such as gasoline, away from the dryer. Use the dryer only in explosion or fire. Summary of laundry for the household. Do not dry anything that has ever had... must be cleaned before and after washing). To avoid risk of oil on it (including cooking oils). The filter
should be dried on a clothesĆline or by using your dryer read and follow...
Use & Care Manual (all languages) - Page 13
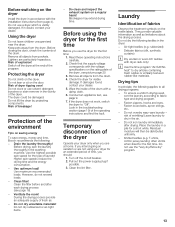
... not leave children unsupervised near the dryer. Do not lean or sit on the dryer. Drain the laundry thoroughly! Clean the filter before and after drying. Do not dry rubberized or airĆtight items.
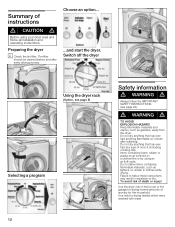
- Blockages may extend drying time. Remove all objects from pockets. Check the dryer for the first time:
1. Conduct an appliance test...
Use & Care Manual (all languages) - Page 14

... temp."
The current degree of automatic programs is indicated via sensors. Program selection
For optimum drying results your dryer offers several program groups and additional options. Automatic programs
There...for 20 minutes.
The temperature of malfunction" is in the laundry. Damp dry or Extra dry). Signal
Your dryer outputs different signals, if the "Signal" button is extended. ...
Use & Care Manual (all languages) - Page 15
... linen, underwear, cotton socks
which is not to the laundry in the dryer from 0.22 lb ć 0.44 lb (i. The dryer light turns on inside the drum. Press Delicates low ... the Delicates low temp." The filter should be cleaned after and before every drying process. Air fluff
Operation
Using the dryer
1. Check lint filter. Cleaning the filter reduces the drying time and saves energy...
Use & Care Manual (all languages) - Page 16
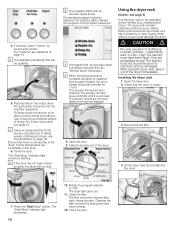
... indicator lights indicate the progress of the dryer immediately. This prevent the laundry from creasing. Open the door. 9. Drying shoes without a rack could jam and be cleaned after each piece of shoes - The laundry must have been spun! Remove the lint filter.
4. Rotate the program selector to matt. The dryer light goes out.
11. Ensure that there...
Use & Care Manual (all languages) - Page 17
... soiled. Small items (e.g. gloves)
30 min. Drying laundry items on the basket. Rotate program selector to fit the dryer rack.
Cleaning and care
Cleaning the dryer
d WARNING d
TO AVOID RISK OF EXPLOSION! Insert the lint filter. Remove the lint filter.
2. Close the door. 4. Prepare shoes. q Remove insoles and heel pads.
2. 5. The lint filter must not touch the drum! Do...
Use & Care Manual (all languages) - Page 18
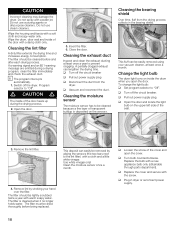
.... q Vacuum and reconnect the duct. Change the light bulb
The dryer light turns on the sensors. The filter should be easily removed using your hand over the filter. q Loosen the screw of the.... Remove the lint filter. Cleaning the moisture sensor
The moisture sensor has to prevent clogging. Do not use steam cleaners.
Remove lint by wiping the sensors (the two bars next to the lint filter...
Use & Care Manual (all languages) - Page 19
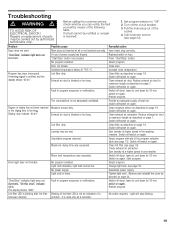
...Lint filter dirty. No power supply. It is loose. Select program.
Switch off dryer, leave to cool down for 30 min, switch on again. Switch off /switch on again. Clean filter as described on page 18. Switch off /switch on again. Spin laundry...Restart program.
Spin laundry at higher speed in program sequence or malfunction. Select program.
Remove and reinstall the ...
Use & Care Manual (all languages) - Page 20
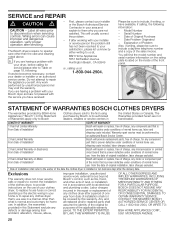
... a problem with local electrical and plumbing codes. Any work , external forces beyond Bosch's control, such as fire, flood, and other than the care and cleaning noted above.
LENGTH OF...944Ć2904. If you are not transferable. Date of the front panel. STATEMENT OF WARRANTIES BOSCH CLOTHES DRYERS
The warranties provided by an authorized Bosch Service Center.
2 Year Limited...
Use & Care Manual (all languages) - Page 21

BE SURE TO PROVIDE YOUR CLOTHES DRYER'S MODEL, SERIAL NUMBER, PURCHASE DATE AND THE SELLER'S NAME, ADDRESS.AND A COPY OF THE SALES INVOICE.
21 HUNTINGTON BEACH CA 92649.
Similar Questions


Bosch Nexxt 500 Series Dryer Humming Wont Run
(Posted by camb1mindyn 9 years ago)

Bosch Nexxt 500 Series Dryer Wtmc3321us/06 How To Clean The Lint
(Posted by Vadddcatbro 9 years ago)

How To Remove Rear Panel On Bosch Nexxt 500 Series Dryer
(Posted by blackendri 10 years ago)

Bosch Nexxt 500 Series Dryer Won't Start
(Posted by Carldelt 10 years ago)