
Bosch SHX7PT55UC Support Question
Bosch SHX7PT55UC Support Question
Find answers below for this question about Bosch SHX7PT55UC.Need a Bosch SHX7PT55UC manual? We have 2 online manuals for this item!
Question posted by guyneyens on November 19th, 2014
E04 Dishwasser How Can I Fix It
The person who posted this question about this Bosch product did not include a detailed explanation. Please use the "Request More Information" button to the right if more details would help you to answer this question.
Current Answers
Answer #1: Posted by aureliamarygrace on November 19th, 2014 3:15 AM
aureliamarygrace

Member since:
December 31st, 2012 Points: 1,682,568

Member since:
December 31st, 2012 Points: 1,682,568
"The fault code E04 means that the dishwasher has suffered a power module failure. The programming of replacement power modules has been locked down by Bosch so in the event of an error code of this type it’s recommended that you contact a Bosch approved dishwasher engineer." (http://www.drdishwasher.com/troubleshooting/manufacturer/bosch/)
Please refer to the above given link on how to run the test cycle. You may also save the link for future reference.
Related Bosch SHX7PT55UC Manual Pages
Installation Instructions - Page 2
... bags or items that come with the original package until after the entire installation has been completed. 1 If the dishwasher is replacing another dishwasher, check the existing dishwasher connections for compatibility with the new dishwasher, and replace parts as necessary.
• This appliance has been found to
meet all connections are intended for outdoor...
Installation Instructions - Page 3
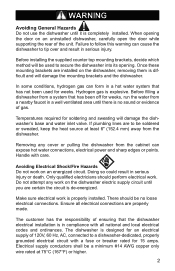
...area until there is completely installed. Temperatures required for weeks, run the water from the dishwasher. Avoiding Electrical Shock/Fire Hazards Do not work . Make sure electrical work on an ...energized circuit. Ensure all national and local electrical codes and ordinances.
The dishwasher is properly installed. Electrical supply conductors shall be used for 15 amps. ...
Installation Instructions - Page 4
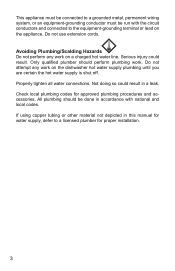
... should be run with national and local codes. Do not use extension cords. Properly tighten all water connections. Do not attempt any work on the dishwasher hot water supply plumbing until you are certain the hot water supply is shut off.
Installation Instructions - Page 5
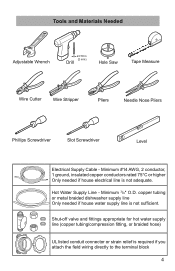
...
Hole Saw
Tape Measure
Wire Cutter
Wire Stripper
Pliers
Needle Nose Pliers
Phillips Screwdriver
Slot Screwdriver
Level
Electrical Supply Cable - copper tubing or metal braided dishwasher supply line Only needed if house electrical line is not adequate. Minimum #14 AWG, 2 conductor, 1 ground, insulated copper conductors rated 75°C or higher Only...
Installation Instructions - Page 8
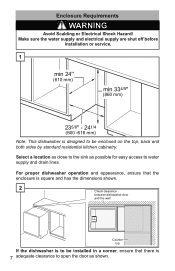
... shown. For proper dishwasher operation and appearance, ensure that the enclosure is square and has the dimensions shown.
2
If the dishwasher is to be installed...
Note: This dishwasher is 7 adequate clearance to water supply and drain lines. Enclosure Requirements
WARNING
Avoid Scalding or Electrical Shock ...
Installation Instructions - Page 9
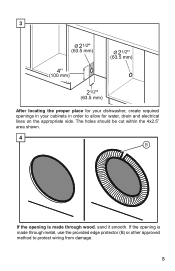
3
After locating the proper place for your dishwasher, create required openings in your cabinets in order to protect wiring from damage.
8 If the opening is made through metal, use the provided edge protector (B) ...
Installation Instructions - Page 10

Set toe panel aside for later use. 9 5
1
2
Twist the end of the water supply line to detach from the dishwasher base as shown.
6
Pull the drain hose out of the packaging base as shown.
Installation Instructions - Page 11
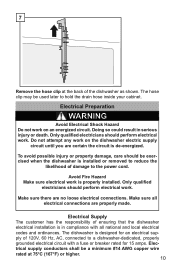
... Do not work is installed or removed to reduce the
likelihood of ensuring that the dishwasher electrical installation is de-energized.
Make sure all national and local electrical codes and ordinances...compliance with a fuse or breaker rated for an electrical supply of the dishwasher as shown. Only qualified electricians should perform electrical work .
To avoid possible injury or ...
Installation Instructions - Page 14
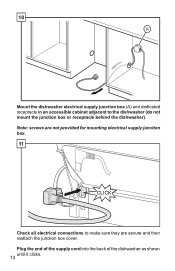
Note: screws are not provided for mounting electrical supply junction box.
11
Check all electrical connections to the dishwasher (do not mount the junction box or receptacle behind the dishwasher). 10
A
Mount the dishwasher electrical supply junction box (A) and dedicated receptacle in an accessible cabinet adjacent to make sure they are secure and then...
Installation Instructions - Page 15
....
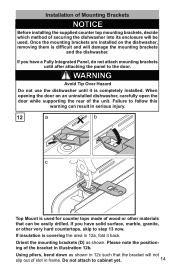
12
Top Mount is difficult and will damage the mounting brackets
and the dishwasher. Orient the mounting brackets (D) as shown in 12a, fold it is covering the area in... back. If insulation is completely installed. Once the mounting brackets are installed on an uninstalled dishwasher, carefully open the door while supporting the rear of the unit. Please note the positioning of...
Installation Instructions - Page 17
..., unhook the strap that the hoses are installing the dishwasher, you will need to step 16.
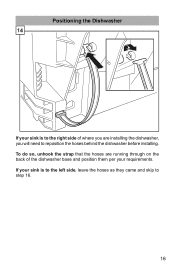
16 Positioning the Dishwasher 14
If your requirements. If your sink is to the right side of where you are running through on the back of the dishwasher base and position them per your sink is to...
Installation Instructions - Page 18
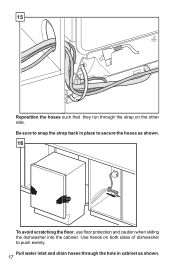
... Be sure to snap the strap back in cabinet as shown.
16
To avoid scratching the floor, use floor protection and caution when sliding the dishwasher into the cabinet. Use hands on the other side. 15
Reposition the hoses such that they run through the hole in place to push evenly...
Installation Instructions - Page 20
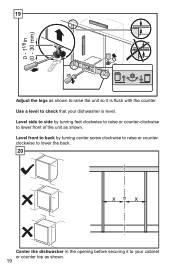
... counter top as shown. 19 Level side to side by turning center screw clockwise to raise or counterclockwise to lower the back.
20
Center the dishwasher in the opening before securing it is level. Level front to back by turning feet clockwise to raise or counter-clockwise to lower front of...
Installation Instructions - Page 21
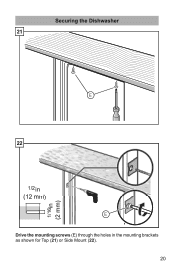
Securing the Dishwasher 21
E
22
E Drive the mounting screws (E) through the holes in the mounting brackets as shown for Top (21) or Side Mount (22).
20
Installation Instructions - Page 22
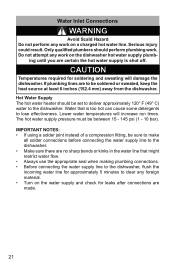
... when making plumbing connections. • Before connecting the water supply line to the dishwasher, flush the incoming water line for approximately 5 minutes to lose effectiveness. ing until... be between 15 - 145 psi (1 - 10 bar).
Lower water temperatures will damage the dishwasher. Water Inlet Connections
WARNING
Avoid Scald Hazard Do not perform any foreign material. • Turn...
Installation Instructions - Page 23
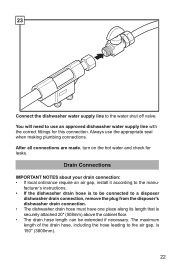
... securely attached 20″ (508mm) above the cabinet floor. • The drain hose length can be connected to the manu- facturer's instructions. • If the dishwasher drain hose is 150″ (3800mm).
22 The maximum length of the drain hose, including the hose leading to use the appropriate seal when making...
Instructions for Use - Page 6
.... Check with a cord having an equipment-grounding conductor. • Improper connection of least resistance for electric current.
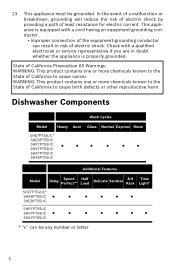
Dishwasher Components
Wash Cycles
Model
Heavy Auto Glass Normal Express Rinse
SHE7PT5xUC* SHE8PT55UC SHP7PT55UC SHV7PT53UC SHX7PT55UC SHX8PT55UC
Additional Features
Model
Delay
Speed Perfect™
Half Load
Delicate Sanitize
3rd Rack
Time Light®...
Instructions for Use - Page 18
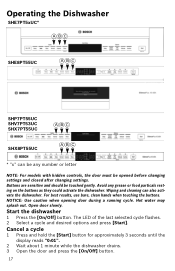
...clean hands when touching the buttons. Wiping and cleaning can be touched gently. Start the dishwasher
1 Press the [On/Off] button. Cancel a cycle
1 Press and hold the [...dishwasher drains. 3 Open the door and press the [On/Off] button.
17 Operating the Dishwasher
SHE7PT5xUC*
ABC
SHE8PT55UC
ABC
SHP7PT55UC SHV7PT53UC SHX7PT55UC
ABC
SHX8PT55UC
ABC
* "x" can also activate the dishwasher...
Instructions for Use - Page 28
..., accidents, neglect, improper operation, failure to maintain, improper or negligent installation, tampering, failure to follow operating instructions, mishandling, unauthorized service (including self-performed "fixing" or exploration of the appliance's internal workings); (3) adjustment, alteration or modification of any kind; (4) a failure to comply with any concessions, including repairs, pro...
Instructions for Use - Page 46
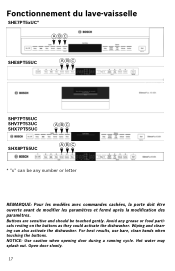
... lave-vaisselle
SHE7PT5xUC*
ABC
SHE8PT55UC
ABC
SHP7PT55UC SHV7PT53UC SHX7PT55UC
SHX8PT55UC
ABC ABC
* "x" can also activate the dishwasher. Wiping and cleaning can be touched gently. Buttons are sensitive and should be any grease or food particals resting on the buttons as they could activate the dishwasher. NOTICE: Use caution when opening door during a running...
Similar Questions

Can Turn On Dishwasher
I ran the dishwasher a few days ago, now it won't turn on when I push the on/off button or the start...
I ran the dishwasher a few days ago, now it won't turn on when I push the on/off button or the start...
(Posted by KLladybug28829 8 years ago)

Dishwasher Whines Or Whistles
Our Bosch dishwasher whines or whistles in the middle of the cycle. how to repair? model #SHE55PO5US...
Our Bosch dishwasher whines or whistles in the middle of the cycle. how to repair? model #SHE55PO5US...
(Posted by conniewest66 8 years ago)

Bosch Dishwasher Red Flashing Floor Light
My Bosch SHX68T55UC/02 dishwasher now has a red flashing light on the floor, and the dishwasher won'...
My Bosch SHX68T55UC/02 dishwasher now has a red flashing light on the floor, and the dishwasher won'...
(Posted by podoherty 9 years ago)

My Dishwasher Is Beeping And Wont Stop Mid Cycle What Can It Be?
(Posted by smountanos 9 years ago)

No Heat From My Bosch 500 Series Dryer Can I Fix This Myself?
(Posted by ccurtis 9 years ago)