
Bosch SHX68T55UC Support Question
Bosch SHX68T55UC Support Question
Find answers below for this question about Bosch SHX68T55UC.Need a Bosch SHX68T55UC manual? We have 2 online manuals for this item!
Question posted by johnwolfe66 on December 4th, 2014
Status Light
What is the status light, and how is it used?
Current Answers
Answer #1: Posted by TommyKervz on December 9th, 2014 1:58 AM
TommyKervz

Member since:
January 10th, 2013 Points: 17,776,833

Member since:
January 10th, 2013 Points: 17,776,833
Please download and refer to the instructions manual below
http://www.helpowl.com/manuals/Bosch/SHX68T55UC/197555
Contact our customer service team for assistance with your Bosch appliance 1-800-944-2904
Related Bosch SHX68T55UC Manual Pages
Installation Instructions - Page 2
... be installed by qualified installers only. IMPORTANT • The dishwasher drain hose must be in specific installations.
• Not for outdoor use.
NOTE: Do not discard any damage immediately.
These instructions are properly made before the dishwasher is intended for use only, and should not be used in commercial food service establishments.
• NEW INSTALLATION...
Installation Instructions - Page 3
... is completely installed.
Failure to follow this warning can cause the dishwasher to be used for soldering and sweating will damage the dishwasher's base and water inlet valve.
In some conditions, hydrogen gas... can form in a hot water system that has not been used to a dishwasher-dedicated, properly grounded electrical circuit with a fuse or breaker rated for weeks, run the water ...
Installation Instructions - Page 4
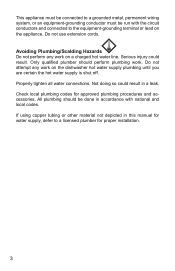
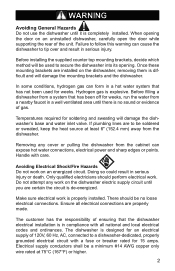
...Plumbing/Scalding Hazards Do not perform any work on a charged hot water line. Do not use extension cords. Not doing so could result. Properly tighten all water connections. Do not attempt... any work . All plumbing should perform plumbing work on the dishwasher hot water supply plumbing until you are certain the hot water supply is shut off. ...
Installation Instructions - Page 9
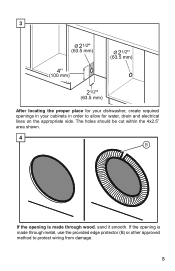
If the opening is made through metal, use the provided edge protector (B) or other approved method to allow for water, drain and electrical lines on the appropriate side. 3
After locating the proper place for your dishwasher, create required openings in your cabinets in order to protect wiring from damage.
8 The holes ...
Installation Instructions - Page 10

Set toe panel aside for later use. 9 5
1
2
Twist the end of the water supply line to detach from the dishwasher base as shown.
6
Pull the drain hose out of the packaging base as shown.
Installation Instructions - Page 11
...rated for 15 amps. Avoid Fire Hazard Make sure electrical work on the dishwasher electric supply
circuit until you are no loose electrical connections. Make sure ...cabinet. The dishwasher is designed for an electrical supply of ensuring that the dishwasher electrical installation is properly installed.
Electrical supply conductors shall be used later to a dishwasher-dedicated, ...
Installation Instructions - Page 12
...connection to a receptacle is connected to the equipment grounding terminal or lead on the dishwasher. This appliance must be connected to a grounded metal permanent wiring system or an equipment...
Note: Installations employing a Receptacle The accessory cord kit (Model # SMZPC002UC) designed for later use . Remove outer casing and insulation of a local code, with all local codes or, in ...
Installation Instructions - Page 15
..., bend down as shown. If insulation is covering the area in 12a, fold it is completely installed. When opening the door on the dishwasher, removing them is used . Please note the positioning of the unit. Do not attach to step 13 now. If you have solid surface, marble, granite, or other materials...
Installation Instructions - Page 18
15
Reposition the hoses such that they run through the hole in place to push evenly. Use hands on the other side. Pull water inlet and drain hoses through the strap on both sides of dishwasher to secure the hoses as shown. 17 Be sure to snap the strap back in cabinet as...
Installation Instructions - Page 20
11/16
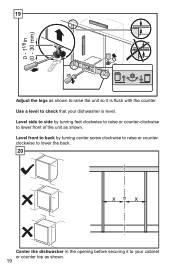
19
Adjust the legs as shown. 19 Use a level to check that your cabinet or counter top as shown to lower front of the unit as shown. Level front to back by turning ... unit so it is level. Level side to side by turning center screw clockwise to raise or counterclockwise to lower the back.
20
Center the dishwasher in the opening before securing it to your...
Installation Instructions - Page 22
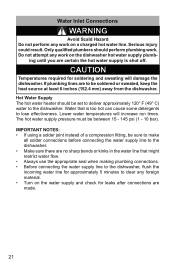
... a compression fitting, be between 15 - 145 psi (1 - 10 bar). Water that might restrict water flow. • Always use the appropriate seal when making plumbing connections. • Before connecting the water supply line to the dishwasher, flush the incoming water line for approximately 5 minutes to lose effectiveness. The hot water supply pressure must...
Installation Instructions - Page 23
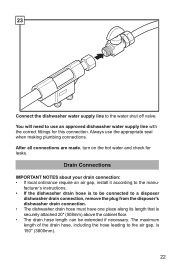
... cabinet floor. • The drain hose length can be connected to the water shut off valve. You will need to use the appropriate seal when making plumbing connections. Always use an approved dishwasher water supply line with the correct fittings for leaks. After all connections are made, turn on the hot water and...
Installation Instructions - Page 24
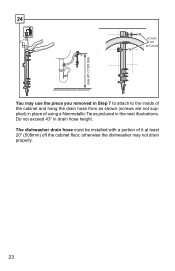
... Tie as pictured in the next illustrations.
24
screws not
provided
You may not drain properly.
23 otherwise the dishwasher may use the piece you removed in Step 7 to attach to the inside of the cabinet and hang the drain hose from as shown (screws are not ...
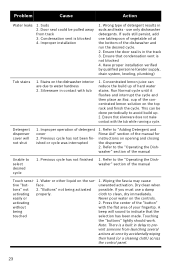
Instructions for Use - Page 7
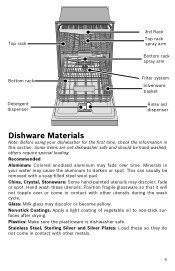
...aid dispenser
Dishware Materials
Note: Before using your water may cause the aluminum to non-stick surfaces after drying.
Some items are not dishwasher safe and should be removed with ...other metals.
6 Non-stick Coatings: Apply a light coating of vegetable oil to darken or spot. Plastics: Make sure the plasticware is dishwasher safe.
Position fragile glassware so that it will not...
Instructions for Use - Page 11
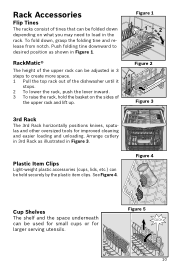
... utensils. Plastic Item Clips
Light-weight plastic accessories (cups, lids, etc.) can be used for small cups or for... improved cleaning and easier loading and unloading. See Figure 4. Rack Accessories
Flip Tines
The racks consist of tines that can be folded down , grasp the folding tine and release from notch. To fold down depending on the sides of the dishwasher...
Instructions for Use - Page 13
...)
none
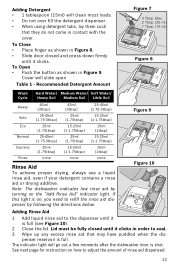
Rinse Aid
To achieve proper drying, always use a liquid rinse aid, even if your detergent contains a rinse aid or drying additive.
Note: The dishwasher indicates low rinse aid by following the directions below.... it is shut. To Open • Push the button as shown in Figure 9. If this light is full. To Close • Place finger as shown in Figure 8. • Slide door ...
Instructions for Use - Page 14
... you are ready to rinse food soil off .
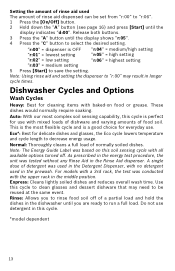
Dishwasher Cycles and Options
Wash Cycles
Heavy: Best for use detergent in the middle position.
Release both buttons. ...
5 Press [Start] to select the desired setting.
Express: Cleans lightly soiled dishes and reduces overall wash time. Do not use with all available options turned off of normally soiled dishes. For models...
Instructions for Use - Page 15
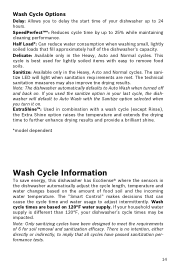
... tests.
14 The sanitize LED will default to Auto Wash when turned off and back on 120°F water supply. ExtraShine™: Used in your last cycle, the dishwasher will light when sanitation requirements are based on . Wash cycle times are met. SpeedPerfect™*: Reduces cycle time by up to 24 hours. Note...
Instructions for Use - Page 23
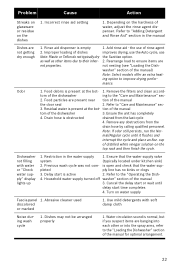
... completes
4. Household water supply turned off washer" section of the dishwasher
3. Abrasive cleaner used discolored or marked
1. Note: If odor still persists, run the Nor-
cup
of the manual for optimal arrangement.
22 Use mild detergents with water or "Check water supply" display lights up
1. Water circulation sound is normal, but if you suspect...
Instructions for Use - Page 24
...and then place an 8oz. cup of the dishwasher and run the desired cycle. 2. Ensure .... 2.
Refer to the "Operating the Dishwasher" section of hard water stains. Press ... to prevent someone from track 3. Improper installation
1. use a damp cloth to avoid build up of the ... for instructions on the dishwasher interior are due to the "Operating the Dishwasher" section of your fingertip...
Similar Questions

Bosch Dishwasher Shx68t55uc Door Won't Open After Cycle Completes.
The door on our Bosch model SHX68T55UC won't open after the wash cycle completes. Latch was just rep...
The door on our Bosch model SHX68T55UC won't open after the wash cycle completes. Latch was just rep...
(Posted by keefersva 1 year ago)


Red Light Is Flashing
door doesn't seem to be closing tight unless I give it a push. Red light on floor is flashing
door doesn't seem to be closing tight unless I give it a push. Red light on floor is flashing
(Posted by dixiedi51 8 years ago)

Soap Dispenser Does Not Open During Wash Cycle
cycle runs water only and dishes not cleaned due to dispenser not opening during wash cycle. Is thei...
cycle runs water only and dishes not cleaned due to dispenser not opening during wash cycle. Is thei...
(Posted by Devobabe28 8 years ago)

Dishwasher Dispenser - Bosch Dishwasher Model #shx68t55uc/01
How do I remove the Dishwasher dispenser assembly for Bosch Dishwasher model #SHX68T55UC/01
How do I remove the Dishwasher dispenser assembly for Bosch Dishwasher model #SHX68T55UC/01
(Posted by rflokk 9 years ago)