Bosch HMV8051U Support Question
Bosch HMV8051U Support Question
Find answers below for this question about Bosch HMV8051U.Need a Bosch HMV8051U manual? We have 2 online manuals for this item!
Question posted by rickott on September 12th, 2015
How Do You Replace The Door Handle On A Bosch Hmv8051u
The person who posted this question about this Bosch product did not include a detailed explanation. Please use the "Request More Information" button to the right if more details would help you to answer this question.
Current Answers
Answer #1: Posted by waelsaidani1 on September 12th, 2015 10:59 AM
waelsaidani1

Member since:
May 12th, 2013 Points: 19,501,797

Member since:
May 12th, 2013 Points: 19,501,797
Hello refer here for help: http://www.justanswer.com/uk-appliance/8hpyl-replace-handle-bosch-hmv8051u-01-microwave.html#
Answer #2: Posted by tom1beck on March 25th, 2016 7:25 AM
tom1beck

Member since:
March 25th, 2016 Points: 30
Member since:
March 25th, 2016 Points: 30
as shown in youtube videos, you remove the soft plastic rectangular liner with a knife blade, lifting it gently all the way around the door frame. be careful not to tear/break the fragile liner. you can't see the screw heads yet. you have to remove the outside plastic door frame itself, away from the inner metal door structure. there are two screws on the inside to remove. then the plastic outer door is held on to the inner metal door by plastic latches spaced around the door. gently pry and wiggle the outer edges of the plastic door frame away from the metal door latches. eventually, the plastic door popped out, somewhat held on near the door hinge, but later it just came off completely. the door handle screw heads are then visible on the inside of the plastic door frame and can be removed. it was a tight fit so I had to remove the good door handle mount in order to get both mounts and the metal bar screwed back in place. then follow the steps in reverse to put the microwave back together.
PS - when I called the Bosch 800 number, they sent me the replacement door mounts for free.
Tom
Related Bosch HMV8051U Manual Pages
Installation Instructions - Page 3

... stud configurations 10 Attaching the mounting plate to the wall 12 Installation types 16 Roof venting 17 Wall venting 20 Room venting 25 Mounting the microwave oven 27 Hood exhaust 29 Service 30
3
Installation Instructions - Page 4
... door latches or cracks in the door. This oven is damaged.
When the oven ...Microwave operates on a circuit with the electrical rating as to play with a grounding plug. Notify dealer immediately if oven...oven for the electric current if an electrical short occurs.
Safety
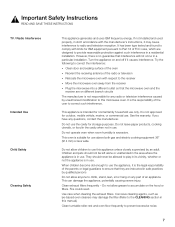
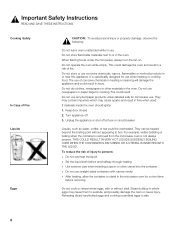
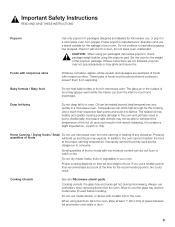
ř Important Safety Instructions READ AND SAVE THESE INSTRUCTIONS
Important
Examine your oven Appliance handling...
Installation Instructions - Page 5

...dealer is at least 7" (178 mm) of clearance between the wall and the microwave oven, so that the materials used must conform to 20Ćamp branch circiut single ...a higher voltage is properly grounded.
D Support for this microwave oven. Notes:
D If installing the microwave oven near a left sidewall, make sure that the door can open fully. The installer must be employed to a...
Installation Instructions - Page 8
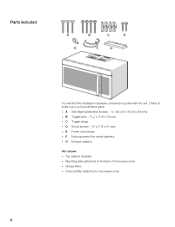
... - ¼" x 2" (6 x 51 mm)
D E Power chord strap
D F Nylon grommet (for metal cabinets)
D G Exhaust adaptor
Not shown: D Top cabinet template D Mounting plate (attached to the back of microwave oven) D Grease filters D Charcoal filter (attached to...
Installation Instructions - Page 10

... wall stud.
Electrical wires may be taken when drilling holes. If no wall studs exist within the cabinet opening , do not grip or use the door or door handle while the microwave oven is being handled. Locate the edges of preferred installation configurations with them could result in electrical shock.
10 Note:ĄThe...
Installation Instructions - Page 27
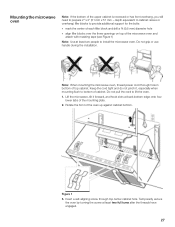
... and do not pinch it forward, and hook slots at least two full turns after the threads have engaged.
27 Do not grip or use handle during the installation. Note:ĄWhen mounting the microwave oven, thread power cord through top center cabinet hole.
Rotate the front of top cabinet.
Instructions for Use - Page 7
... could result.
Try the following to correct the interference:
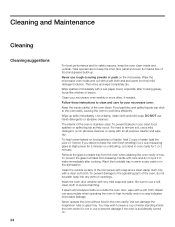
D Clean door and sealing surface of the oven
D Reorient the receiving antenna of an appliance. This appliance is intended... accumulate on different branch circuits
The manufacturer is in this microwave oven. Corrosive cleaning agents, such as lyeĆbased oven cleaners may cause interference to the CLEANING section in use...
Instructions for Use - Page 8
..., and possibly damage the oven or cause injury. Keep door closed 2. Steam buildup in the oven. Reheating sliced hardĆboiled eggs and cooking scrambled eggs is not always present. Do not store flammable materials next to or in whole eggs may cause sparks and result in the microwave oven for microwave use recycled paper products...
Instructions for Use - Page 9
... oven walls or door.
9
Cooking utensils, the glass tray and racks get hot during microwaving....microwave oven. In addition, the oven cannot maintain the food
at least 1" (25,4 mm) of foods
will scorch or burn. Small quantities of any closed jar.
Do not leave oven unattended.
ř CAUTION:ĄWhen using preĆpackaged microwave popcorn, check package weight before handling...
Instructions for Use - Page 12

... boards will dry out and may break in the microwave oven. Baskets made of the food. Tightly covered utensils:
Be sure to shield poultry legs and wings.
Use these with care because the plastic may soften from the side walls of the oven cavity and door of aluminum foil because they hinder cooking and...
Instructions for Use - Page 13

āGetting started
Microwave overview
Front view
Window Bottom view
Front vent grill Control panel
Door handle
Surface lights
Ventilation filters
13
Instructions for Use - Page 16
.... Note:ĄRack must be approximately the same in both above and below rack.
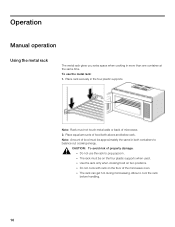
D The rack must not touch metal walls or back of the microwave oven. Allow to pop popcorn. āOperation
Manual operation
Using the metal rack
The metal rack gives you extra space when cooking in the four plastic...
Instructions for Use - Page 26

... not open the door to heat. Press START pad. D The potato should be covered loosely with vented plastic wrap or package cover. Press START pad. D After cookings, let potatoes stand for cooking by sensor, follow these recommendations: D Food cooked with the program number during sensing time. The microwave oven automatically determines required cooking...
Instructions for Use - Page 29
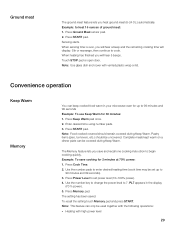
... remaining cooking time will hear 5 beeps. Note:ĄThis feature can be uncovered. Touch STOP pad or open door. Use the number key to change the power level to cook. When sensing time is over, you save cooking... lets you will display. Press Ground Meat sensor pad. 2. PL7 appears in your microwave oven for up to heat 16 ounces of ground meat: 1. Press Cook Time. 2.
Instructions for Use - Page 30

... popcorn automatically: 1. Popcorn Beverages
D Heating with lower power level D Heating with multiple cooking stages D Keep Warm D Convection (without preheating)
ř CAUTION:ĄDo not leave microwave oven unattended while popping corn. The popcorn feature lets you will hear 5 beeps. Use the table below to determine the setting to heat 1 cup of a beverage...
Instructions for Use - Page 34
... wipe completely dry.
Remove the glass turntable tray from breaking, handle with care and do not let water seep into any vents or openings. Clean the outside the oven door, wipe with a soft cloth.
You may wish to clean and care for your microwave oven weekly or more often, if needed. Wash the turntable tray...
Instructions for Use - Page 36
Unplug the microwave oven or turn the power back on at the main circuit breaker.
2. Replace bulb cover and mounting screw. 5. Replace bulb with 30 watt appliance bulb.
4. Plug the microwave back into the power supply or turn off power at the
main circuit breaker.
36 Remove the bulb cover mounting screws at both light positions...
Instructions for Use - Page 37

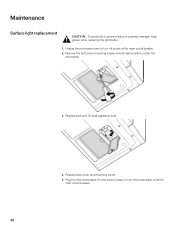
Oven light replacement
1. Remove the vent grill mounting screws.
3. Pull the vent grill away from the unit.
37 To replace light bulb, first disconnect power to the microwave oven at the circuit breaker panel or by pushing it inwards, then turn and pull it away from the unit.
4. Remove the charcoal filter by unplugging.
2.
Instructions for Use - Page 38
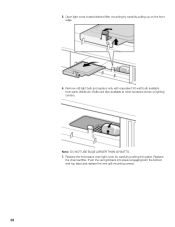
... carefully pushing into place (engaging both the bottom and top tabs) and replace the vent grill mounting screws.
38 Note:ĄDO NOT USE BULB LARGER THAN 30 WATTS. 7. Bulbs are also available at most hardware stores or lighting centers. Replace the microwave oven light cover by carefully pulling up on the front edge.
6.
Instructions for Use - Page 39

... nonvented, recirculated installation (Room Venting). Carefully push the vent grill back into place and replace the screws removed in the cooking vapours.
39 Charcoal filter replacement
The charcoal Filter, which was enclosed with your microwave oven, is not possible to the microwave oven at the circuit breaker panel or by
unplugging. 2. Change the charcoal filter.
5. Pull...
Similar Questions

Door Replacent
How do you replace the door on Bosch microwave HMV8051U. I have removed old door, but am having trou...
How do you replace the door on Bosch microwave HMV8051U. I have removed old door, but am having trou...
(Posted by jd0000007 7 years ago)

How To Replace The Door Handle?
(Posted by emerritt 9 years ago)

Do You Have Plastic Door Handle Ends For Model Hmv9302/01 Bosch.
Microwave handle ends are plastic and have cracked. do you have a replacement set?
Microwave handle ends are plastic and have cracked. do you have a replacement set?
(Posted by ronbockunion 9 years ago)

Bosch Range Hinge Problem
I have a Bosch HDI7282U/03 range (oven). This AM my wife opened the oven door (thankfully, it was co...
I have a Bosch HDI7282U/03 range (oven). This AM my wife opened the oven door (thankfully, it was co...
(Posted by billwilkins 10 years ago)
Cardboard On Inside Right Side Of Micro
there is cardboard on the middle inside right side of the microwave. should that be there or removed...
there is cardboard on the middle inside right side of the microwave. should that be there or removed...
(Posted by karenstowell 11 years ago)