Bosch B36IB70NSP Support Question
Bosch B36IB70NSP Support Question
Find answers below for this question about Bosch B36IB70NSP.Need a Bosch B36IB70NSP manual? We have 2 online manuals for this item!
Question posted by bergeroni on February 26th, 2012
Refrigerator Will Not Cool
The refrigerator has power, but will not cool. The freezer section is working fine. I reset to original factory settings per the user manual, but it is still not cooling. Additionally, there are no alarms showing.
Current Answers
Related Bosch B36IB70NSP Manual Pages
Installation Instructions - Page 3
... accessories from specialist outlets 12 4. Transport of the kitchen units 6
Installation location 7 Installation room 7 Installation cavity 7 Furniture/fixtures 7 Base 7 Connecting the power 8 Additional grounding procedure 8 Grounding instruction 8 Connecting the water 8
Installation dimensions 9 Single installation 9 SideĆbyĆSide installation 10
Appliance dimensions 11...
Installation Instructions - Page 4

... water to the furniture door (refrigerator compartment 25 21. Attaching the individual appliance to the top of the cavity 22 15. Mounting of air separator 33 30. 10.SideĆbyĆSide installation 19 11. Attaching the toe kick panel 23 17. Attaching the adjusting rail (freezer compartment 27 23. Attaching...
Installation Instructions - Page 5
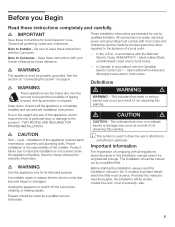
...Electric Code C22.1 - Product failure due to improper installation is used to draw the user's attention to leave these instructions with local codes and ordinances and be emphasised enough.
... observing this manual is required.
Provided this warning. In the absence of personal injury or damage to reduce the risk of a local code:
- See the section on Connecting the power" on page...
Installation Instructions - Page 6
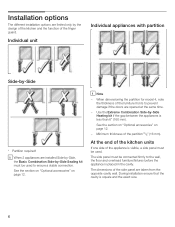
...;byĆSide Sealing kit must be used . During installation ensure that the cavity is placed in the cavity.
See the section on Optional accessories" on page 12.
- See the section on Optional accessories" on page 12.
3.
4. Minimum thickness of the finger guard.
The side panel must be connected firmly to prevent...
Installation Instructions - Page 7
... the appliance is unavoidable, use a suitable insulating plate or observe the following table:
Bottom Freezer 36"
approx. 430 lbs / 195 kg
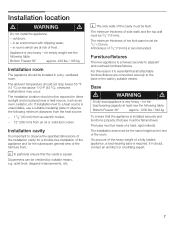
Installation room
The appliance should be installed in...-
i The side walls of the appliance and for empty weight see the following table:
Bottom Freezer 36"
approx. 1200 lbs / 540 kg
To ensure that all attachable furniture/fixtures are at ...
Installation Instructions - Page 8
...following table:
Appliance Bottom Freezer 36"
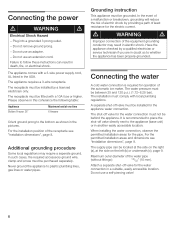
Maximum load ... page 8. Connecting the power2. The appliance comes with a 3Ćwire power supply cord, UL listed in the pictures. The water pressure must be between... a 3Ćwire receptacle. The receptacle must be behind the appliance.
Additional grounding procedure3.
In such cases, the required accesseory ground wire, clamp and...
Installation Instructions - Page 9
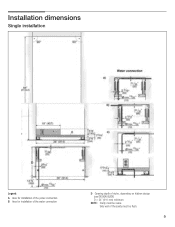
Side wall of niche, depending on kitchen design (see DESIGN GUIDE) D = 24" (610 mm) minimum
NOTE: Cavity must be suare. Single installation6. Installation dimensions5.
Legend:
A Area for installation of the power connection B Area for installation of the water connection
D Opening depth of the cavity must be flush.
9
Installation Instructions - Page 10
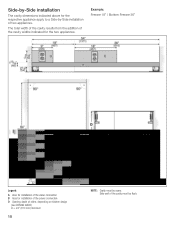
Example: Freezer 18" / Bottom Freezer 36"
Legend: A Area for installation of the water connection B Area for the two appliances. Side wall of niche, depending on ...appliance apply to a SideĆbyĆSide installation of the cavity widths indicated for installation of the power connection D Opening depth of the cavity must be flush.
The total width of the cavity results from the...
Installation Instructions - Page 12
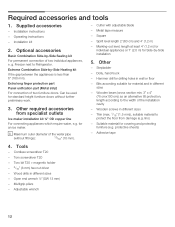
Operating instructions - Freezer next to the width of the water pipe
(without further preliminary work.
3. Spirit level length 2' (60 cm) and 4' (1,2 m)
- Wooden beam (cross section min. 3" x 4" (75 cmx100 cm)) as an alternative tilt protection, length according to Refrigerator. lino)
- Tools
- Wood drills in different sizes - g. Cutter with adjustable blade
- Other
- ...
Installation Instructions - Page 13
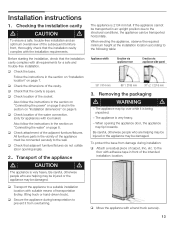
...all requirements for appliances with ice maker)
Also follow the instructions in the section on Connecting the power" on page 8.
Removing the packaging
d
WARNING
d
- The appliance may ... a residual piece of the intended installation location.
Also follow the instructions in the section on Installation location" on page 9. q Check that adjacent furniture/fixtures do not...
Installation Instructions - Page 14
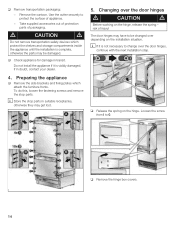
... complete, otherwise the parts may be changed over depending on the installation situation.
Use the cutter securely to change over the door hinges
d
CAUTION
d
Before working on the hinge.
i Store the stop parts.
d
CAUTION
d
Do not remove transportation safety devices which attach the furniture fronts.
Do not install the appliance if...
Installation Instructions - Page 16

... area which the screws could penetrate -
q If the installation cavity is equal to the section on Installation dimensions" starting on the rear panel of the antiĆtip brackets and ...be used to fasten the antiĆtipĆbrackets to existing studs on page 9. The supplied set contains fastening screws for secure attachment of the installation cavity!
! risk of the antiĆtip...
Installation Instructions - Page 17
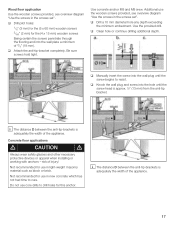
... necessary protective devices or apparel when installing or working with anchors ć risk of 3/4" (19...Additional use in lightĆweight masonry material such as block or brick.
q Knock the wall plug and screw into the wall plate a minimum of injury!
q Manually... provided, see overview diagram Use the screws in the screws set ".
Use concrete anchor M8 and M8 srew. q Drill pilot...
Installation Instructions - Page 18
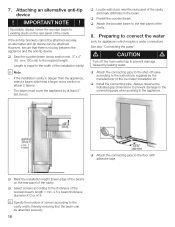
...attached. However, ensure that the beam can be attached securely.
18 q Saw the wooden beam (cross section min. 3" x 4" (75 cmx 100 cm)) to the floor with adhesive tape. i Note
-...shutĆoff the main water tap to connect the water
(only for appliances which has a larger cross section or attach 2 beams.
-
q Install the connecting pipe. i Specify the number of the ice maker ...
Installation Instructions - Page 19

... Put the mains plug into the installation cavity. 9. Do not damage the water pipe or power cord attached to the installation cavity adjust height adjustable wheels before you move the appliance into the... the appliance is intended, now connect the two appliances together. See the Installation Manual for each appliance.
19 Attaching the edge protection
10.SideĆbyĆSide installation
i If...
Installation Instructions - Page 20
... to be adjusted from the front. i The installation aid parts on the door.
q Prevent the power cord from the rear panel of the power cord and feed forwards under the appliance.
The heightĆadjustable feet at a height of 11/4" (32 mm) above the floor.
d
CAUTION
d
Never use a cordless ...
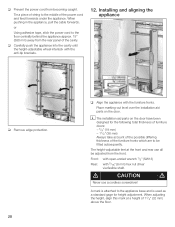
Installation Instructions - Page 24

... furniture door to be adjusted precisely and attached securely to the base panel. q Press the POWER button. Only for appliances with a water connection:
!
i If required, the toe kick ... to the appliance.
17. Commissioning the Appliance
To guarantee the accuracy of the following working steps and thus the appearance of the furniture doors during installation.
There are attached to...
Installation Instructions - Page 25
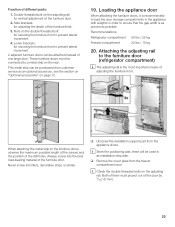
...freezer compartment door. This metal strip can be used in order to the furniture door (refrigerator compartment)
i The adjusting rail is as precise as an optional accessory, see the section...compartments in the appliance with weights in an installation step later. Recommendations:
Refrigerator compartment 55 lbs / 25 kg
Freezer compartment
22 lbs / 10 kg
20. i Store the positioning aids...
Installation Instructions - Page 26
One screw should be inserted under each double threaded bolt. Attaching and aligning the furniture door (refrigerator compartment)
i The double threaded bolts are responsible for the many different design options of the furniture front. q Screw on the double threaded bolt. Attach the ...
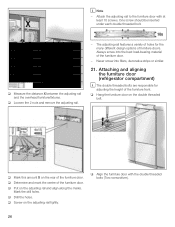
Installation Instructions - Page 29
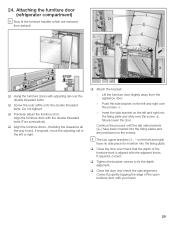
... door with the adjacent fronts.
Correct by gently tapping the edge of the furniture front is aligned with your hand.
29 Attaching the furniture door (refrigerator compartment)
i Now fit the furniture handles which are positioned on the left and right into the fixing plate. q Precisely adjust the furniture door.
Similar Questions

My Bosch B21cl80sns Refrigerator Is In The 54 F But The Freezer Is Working.
Request ideas for what is the problem
Request ideas for what is the problem
(Posted by jonbergstedt 1 year ago)
Bosch B26ft70sns
fridge and ice maker portion are not cooling. Freezer is working
fridge and ice maker portion are not cooling. Freezer is working
(Posted by jprovost 7 years ago)

Bosch B36it71sns Refrigerator Parts Needed
Hi, I bought a Bosch Integra Series (new) Floor modelrefrigerator . The Model is B36IT71SNS. I need ...
Hi, I bought a Bosch Integra Series (new) Floor modelrefrigerator . The Model is B36IT71SNS. I need ...
(Posted by stuffisale 9 years ago)

Refrig Only Cools To 54 Degrees
FREEZER FREEZES OK. FRIG FAN WORKS OK. WHEN TEMP IS SET AT 37 FRIG ONLY COOLS MAX 56 DEGREES FAN ONL...
FREEZER FREEZES OK. FRIG FAN WORKS OK. WHEN TEMP IS SET AT 37 FRIG ONLY COOLS MAX 56 DEGREES FAN ONL...
(Posted by carlff 13 years ago)
No Control Panel Power / Freezer Light Works
(Posted by drkpoole 14 years ago)