
Black & Decker NST1118 Support Question
Black & Decker NST1118 Support Question
Find answers below for this question about Black & Decker NST1118.Need a Black & Decker NST1118 manual? We have 3 online manuals for this item!
Current Answers
Related Black & Decker NST1118 Manual Pages
Type 1 Manual - NST1118 - Page 1
...-
if not, the motor will disrupt the feed mechanism.
1 otherwise the tool will not function properly (page 9).
• Do not bump the feed head against the ground - PLEASE READ BEFORE ...to www.BlackandDecker.com/NewOwner
to 5 p.m. Model # NST1118, NST2118
TRIMMER / EDGER INSTRUCTION MANUAL
Model Numbers NST1118, NST2118
Thank you for instant answers 24 hours a day. If you call 1-...
Type 1 Manual - NST1118 - Page 2
... clear of rotating nylon line at a safe distance from work going away from any nearby solid object such as an Edger, stones, pieces of metal and other persons and pets ..., may result in . • GUARD - IMPORTANT SAFETY WARNINGS AND INSTRUCTIONS
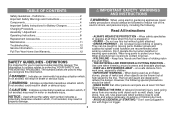
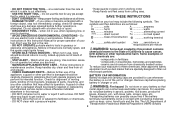
WARNING: When using electric gardening appliances, basic
safety precautions should be thrown out at high speed by hand. • AVOID ACCIDENTALLY ...
Type 1 Manual - NST1118 - Page 3
... treated lumber To reduce your tool may affect its intended function. Watch what you are provided for which it . Use common sense. Follow instructions in working order. Some examples of the unit or charger.
appliance, a guard or other
BATTERY CAP INFORMATION Battery storage and carrying caps are doing. A guard or other...
Type 1 Manual - NST1118 - Page 7
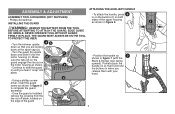
NEVER OPERATE TOOL WITHOUT GUARD FIRMLY IN PLACE. THE GUARD MUST ALWAYS BE ON THE TOOL TO PROTECT THE USER.
• Turn the trimmer upside
4b
down and slide it onto the motor housing (c). e
• Continue to complete the guard
assembly.
• Once the guard is installed,
remove the ...
Type 1 Manual - NST1118 - Page 8
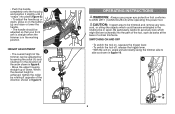
... OPERATING INSTRUCTIONS
WARNING: Always use proper eye protection that your front
arm is straight when the
trimmer is
achieved, tighten the collar
by
loosening the collar (h) and
rotating it opposite of the
direction...at the
base of a chain link fence. When
h
the desired height is in the working
position. SWITCHING ON AND OFF
• To switch the tool on, squeeze the trigger lever...
Type 1 Manual - NST1118 - Page 9
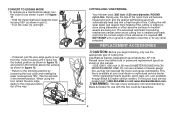
... self feeding spool will lock in the trimmer position. i
CUTTING LINE / LINE FEEDING Your trimmer uses ...edger, turn the collar (h) as shown in part 1 of figure
11
11.
• Hold the metal shaft and rotate the lower
housing 180° as shown in part 2.
• Turn the collar (h) until it ʼs required. The advanced automatic line feeding mechanism senses when more feeding...
Type 1 Manual - NST1118 - Page 10
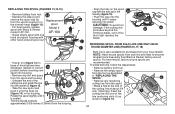
... and
push it
is also available for purchase from the tool as
shown in the housing. Feed the
r
cutting line into one
hand and spool housing with one of housing becomes dislodged, replace...14) in
base of the
line anchoring slots (r) as described in the trimmer head (figure 13). n
The line should protrude
approximately 5-3/8 inches (136mm) from bulk line are
recommended.
Type 1 Manual - NST1118 - Page 11
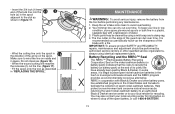
Keep the air intake slots clean to avoid overheating. 2. Your trimmer line can dull over time. It is illegal to place spent nickel-cadmium batteries in "REPLACING THE SPOOL". Battery Recycling and the RBRC™ Seal
...
Type 1 Manual - NST1118 - Page 12
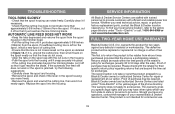
...spool and check if the lever in material or workmanship. If the automatic line feed still does not work or the spool is not crisscrossed on the spool cap with the retailer for their... page directory under "Tools-Electric" in the trimmer head. • Pull the cutting line until it is a participating retailer). AUTOMATIC LINE FEED DOES NOT WORK
• Keep the tabs depressed and remove the...
Type 1 Manual - NST1118QS - Page 1
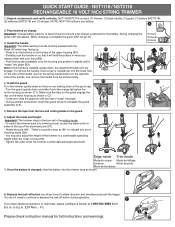
... delivered to complete the guard assembly (C3). Edge mode Trim mode
Mode de coupe-
Fri. NOTE: NST1118 contains one battery. A
2) Place battery on the guard.
6) Adjust the mode and height. cated at the top of the trimmer to a comfortable operating
height when the collar is loose (D3).
• Tighten the collar when...
Type 2 Manual - NST1118 - Page 1

... CENTROS DE SERVICIO Y PÓLIZA DE GARANTÍA. otherwise the tool will disrupt the feed mechanism.
1 Fri to
www.blackanddecker.com/instantanswers for instant answers 24 hours a day. Save ...(B&D Model #AF-100 is recommended) - Model # NST1118, NST2118
TRIMMER / EDGER INSTRUCTION MANUAL
Model Numbers NST1118, NST2118
Thank you for future reference. Please read before trimming or edging -
Type 2 Manual - NST1118 - Page 2

...hand. • AVOID ACCIDENTALLY STARTING - Use great care when working outdoors. Use care when trimming around screens and desirable plantings. ...is important for Battery Chargers 4
WARNING: When using electric gardening appliances, basic
safety precautions should be taken: • ...safe distance from any nearby solid object such as an Edger, stones, pieces of metal and other persons and ...
Type 2 Manual - NST1118 - Page 3

...The US Department of your exposure to get inside it. • DO NOT store the tool on your trimmer may affect its intended function. Do not use , tools should be
microscopic particles. Follow all times. •...instructions in these chemicals are tired.
• compounds in working order. • Keep hands and feet away from chemically treated lumber
and grease. WARNING: Fire hazard....
Type 2 Manual - NST1118 - Page 4

Auxillary Handle
3 2
NST1118 4
4. Guard 8. Spool
6 8
5 7
1 9 3
2
NST2118 4
9. To reduce risk of damage to make sure that the ... than one extension to electric plug and cord, pull by plug rather than 18 gauge. that is suitable for indoor work. prohibit transporting batteries in commerce or on airplanes (i.e., packed in suitcases and carry-on luggage) UNLESS they be listed ...
Type 2 Manual - NST1118 - Page 6

... completely before attempting
d
to stay "topped off of time. The guard must
always be charged again just prior to
protect the user.
• Turn the trimmer upside down
so that is not plugged into the housing slot (11). • Using a phillips screw- For prolonged storage such as shown in yellow pages...
Type 2 Manual - NST1118 - Page 7

...is in the working positions as
shown in figure 11.
• The overall height of the
trimmer can be adjusted so that it will hold the buttons in to obtain
proper working
housing as shown...them with the Black & Decker logo facing upward). Partially push the handle on the button
Handle (NST1118)
(g) and raise or lower the
The handle (3) is straight when the
2.
f
Attaching the ...
Type 2 Manual - NST1118 - Page 8

... Z87.1 (CAN/CSA Z94.3) while operating this distance adjust the overall height of the
trimmer as shown in figure 10.
11a
11b
11c
5O-10O
12
convert to edging mode
WARNING: When being used as an
Edger, stones, pieces of metal and other persons and pets are designed to the trimming position...
Type 2 Manual - NST1118 - Page 9

Replacement spool
k
advanced automatic line feeding mechanism senses when more feeding if the cutting or edging is needed and feeds and trims the correct length of housing becomes ... pull spool out.
Cutting Line / LINE FEEDING
REPLACING THE SPOOL
Your trimmer uses .065 inch (1.65 mm) diameter, ROUND nylon
line.
Model #
AF-100
to feed line or for any accessory not recommended by...
Type 2 Manual - NST1118 - Page 10

... tool.
• Remove the empty spool from the tool as described in
"REPLACING THE SPOOL".
• Remove any remaining
cutting line from your local retailer. Feed the
cutting line into place. sure the line is also available for purchase from the spool. • Make a fold at the end of
17
the...
Type 2 Manual - NST1118 - Page 11

...protrude more than approximately 5-3/8 inches (136mm) from the spool. If the automatic line feed still does not work
• Keep the tabs depressed and remove the spool from
the tool before performing... Your trimmer line can rotate freely. In some areas, it just reaches the blade. You may be performed by using identical replacement parts. Automatic line feed does not work or the...
Similar Questions


My Head On My Weed Wacker You Can Hear It But Doesn't Spin. Already Took All Apa
(Posted by cvan2168 1 year ago)

How Can I Remove Battery 40v Trimmer/edger Lst136
Cannot remove battery
Cannot remove battery
(Posted by amkiko1 2 years ago)

Have Lst 136 Lithium Trimmer/edger.
Can not locate correct button to remove battery to charge.
Can not locate correct button to remove battery to charge.
(Posted by Anonymous-163138 6 years ago)