
Bernina Bernette 730 Support Question
Bernina Bernette 730 Support Question
Find answers below for this question about Bernina Bernette 730.Need a Bernina Bernette 730 manual? We have 1 online manual for this item!
Question posted by triciaokle1 on August 11th, 2013
Threading Machine
Can you please tell me the correct way to thread my machine. Thank you
Current Answers
Answer #1: Posted by TommyKervz on August 11th, 2013 5:41 AM
TommyKervz

Member since:
January 10th, 2013 Points: 17,776,813

Member since:
January 10th, 2013 Points: 17,776,813
Greetings - The manual on the link below may be able to help your case.
http://www.helpowl.com/manuals/Bernina/Bernette730/118100
http://www.helpowl.com/manuals/Bernina/Bernette730/118100
Related Bernina Bernette 730 Manual Pages
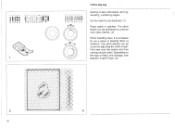
Manual - Page 3

l'intatet du progrilis technique. vooruitgang voorbehouden. L 1992 Fritz Gegauf Ltd.
Bernina Sewing Machines CH43266 Steckbern (Switzerland)
1992 Fritz Gegaut SA Faboque de machines a coudre Bernina CH-8266 Steckborn (Suisse)
1992 Fritz Gegauf AG Bernina Naaimachinefabtiek CH-8266 Steckbom (Zwitserland)
We reserve the right to make technical changes in ...
Manual - Page 4
... Presser loot - changing Buttons sewing on
(Model 740E onlyl Buttonholes
Colour code green and blue Colour code red and yellow COnneding the machine wrong tool
'Model 740E only...Band hemlingene stitch Bobbin - upper thread
34
Tension , lower thread..
26
Threading - tension Bobbin - winding Bringing up the lower
thread Bulb - insening Bobbin - upper thread
32
Three-slep zig-zag
54
...
Manual - Page 5
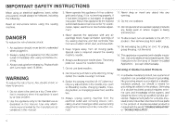
... not the cord.
16. IMPORTANT SAFETY INSTRUCTIONS
When using this appliance from the electrical outlet wen removing covers, lubricating. Always unplug this sewing machine. Do not unplug by the manufacturer as threading needle, changing needle. Use only identical replacement parts. WARNING
To reduce the risk of electric shock:
1. Use only attach. To unplug...
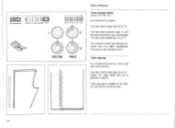
Manual - Page 7
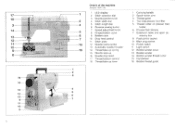
... 16
1 2 3
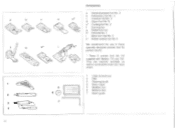
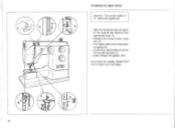
Details of the machine
IA0F.7301
1 LED display 2 Stitch selection dial 3 Needle position knob 4 Stitch width dial 5 Stitch length dial 6 Reverse sewing button 7 Speed adjustment knob 8 Hinged bobbin cover 9 Bobbin case I0 Drop feed control I I Stitch plate 12 Needle clamp screw 13 Automatic needle threader 14 Thread take -up 16 Needle stop...
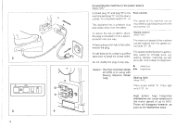
Manual - Page 8
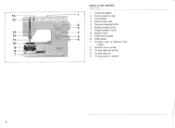
... of the machine
1.10001 r1})
1
1 Carrying handle 2 Stitch selection dial
3 Handwheel
4 Stitch length dial
2
5 Reverse sowing button
3
6 Bobbin winder cover
7 Hinged bobbin cover
4
8 Bobbin case
5
9 Drop feed control
6
10 Stich plate
II Thread cutter on presser fool
holder
12 Needle clamp screw
13 Thread take-up spring
14 Thread take.up
15 Thread tension control...
Manual - Page 9
I
i Blind hem loot No. 9
le Button sewing foot No. 6
We recommend the use of these specially designed presser feet for period results.
' Those 3 presser leet am not supplied with Models 715 and 730. a 9
cal'
2
3 IMO
iQ
4
C tiCZO
10
Accessories
a General purpose fool No. 3
b Embroidery toot No. 4
e"
c Overlock foot No 8
d Zipper foot No. N
et...
Manual - Page 11
... iMode' 7400
The maximum speed Of the machine can be reduced with Sewing Machine Model 740E. Do not modify the plug in the outlet.
sewing corners. and is intended to install the ...does not lit hilly in any way. Caution: The Foot Controller Model 4C-3378 is particu.
1
43..1. „9
•
CI •
D
•
3 14
Connecting the machine to the power source (moral MEI...
Manual - Page 12
... the machine can be regulated by applying pressure to the machine and plug 'B- to install the proper outlet
Do not modify the plug in any way
Caution! contact a qualified electrician to the mains socket. Sewing light... control (2)
T6 red ea the fisk of electric shock this plug is for using with Sewing
Machine Model 715 and
730A
16 The Foot Controller Model 3C-135B or 4C-3168 is intended lo...
Manual - Page 14
..., the presser loot can be in the fabric. the feeddogmust belowered. sewing corners. the feed-dog should be raised a second stage for needle down - darning or free-hand embroidery. e.g. r • •
A B
1
•
a
3 20
Automatic needle stop (WOW 740E orgy)
When the machine stops. e.g. Press button 'A' for easy positioning of work . (2)
Drop teed...
Manual - Page 20
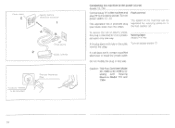
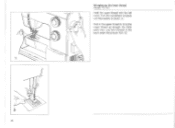
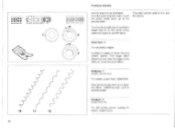
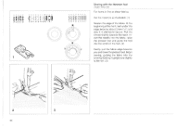
Raise the needle bar.
- Take the thread through the guides (5/6)
and thread the needle, always from front to back (see next page).
5
6
4
32 down through the guide on the back of the machine from right to left in the thread takeup spring (3)
- 2
3
p
O O
I
Threading the upper thread
Attention:Tum power switch to leflthrough the thread take-up lever (4)
- from...
Manual - Page 24
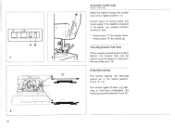
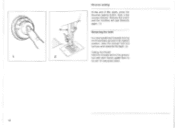
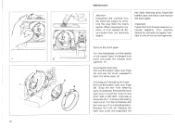
Bringing up through the stitch plate hole. Lay both threads to bring the lower thread up the lower thread (Mule% 715. 730) Hold the upper thread with the left hand. Turn the handvaieel forwards until the needle is raised. (1) Pull on the upper thread to the back under the presser foot. (2)
.\\.'"•'" 40
Manual - Page 25
... stitches. Release the button and the machine will sew forwards again. (1)
Removing the work
Turn the handwheel fontrardsto bring the thread take-up lever to its highest position, raise the presser foot and remove work towards the back (2)
Cutting the thread: Hold the threads behind the presser foot with both hands, guide them to the...
Manual - Page 29
Ruktofthumb:Thethickerthefabric, thread and needle. the longer the stitch should be. (I)
Zigzag
Adjust the stitch width. (2) Adjust to the zig-zag width desired. (3)
00000
Si3ii 24 22222120
0000.200•000
57 $
13100
O assiscon•-o-
,
'RO0
)%1
a
2/3
Sc "
0000000
0
s 11 4 1 4 321
a
Straight stitch
Set the machine as illustrated. 00000
t:It: Nunn»
60660000000
455181101...
Manual - Page 31
...machine as illustrated. (1)
Place patch in position. 00000
666466.0600
t:32:
24 23 n vs
•
A A
00000000 .
)g[181
$$$$$$ 32
3-Step Zig-zag
Sewing on the type of backing fabric to use a piece of fabric and damage, sew... can be shortened to produce very close stitches (2)
When mending tears. First sew over the centre and then overlap onboth sides. Depending on lace and elastic,...
Manual - Page 34
... up as illustrated. Turn the stitch width dial (2) to ' . The machine sews two stitches forwards and one stitch backwards. etc.
60
Triple zig-zag is...00 0 0 00000000000
II!!! S !?,13,1E1
0 0 0 fa 0 e • 9 I I 6 4 3 21
rTh
1
715/730 740 E
I
Stitch selection
Triple straight stitch (Models 733740E on y)
For hardwearing seams.
Turn the stitch length dial (3) to between 3 and 5....
Manual - Page 37
...740E Only)
For flat joining seams, sewing on sheer, fine and stretch fabrics ...lusl over the edge of the fabric to suit the fabric. Bridging 17 illoOels 730,'1&0( any,
For seams. place mats. visible hems. Decorative pining seam for ...16
17
C
er C , __,)
r C
18
66
Practical stitches
Set the machine as illustrated. Turn the stitch widthdtal12)andslitch length dial (3) to the same colour code...
Manual - Page 42
... 2
vc
3 76
000 . 00 00 t131§1i
Buttonholes
Set the machine as illustrated.
The gauge is advisable to sew the buttonhole. 00000 nits
1413210 ao
00000000•0•
of the pail lc and...It is now set for sewing perfectly even length buttonholes. (3)
When starting to use gimp cord for line or stretchy fabrics.
- A slightly reduced upper thread tension produces beget results.
...
Manual - Page 47
...1111 M6M OW% "71-t
\., 1
00 a a co: f I 7 r f 4 32 1
Sewing with the Hemmer foot mate 704E onfi
For hems in fine or sheer fabrics. Insert the needle into the...the back. Pell the
thread slightly towards you and rower thepresser fool.Begin sewing, guiding the fabric into the scroll by about 3 mm (re") and
Sew 4-5 stitches to the left (3)
2
3
86 Set the machine as illustrated. (t)
Neaten...
Manual - Page 49
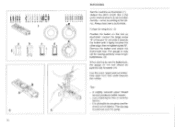
...is hilly raised. Your machine should be disconnected from the mains socket. Important Fabric fluff and threads must always be serviced ...machine from the electricity supply by removing the plug from the electricity supply.
--- -
When cleaning the machine. Snap the two hook retaining arms (31outwards. Remove the hook race cover (4) and the hook (5) and clean with sewing machine...
Manual - Page 50
... reed The machnn is mug M In the hook
AtMOW& Desconnecl machine from deraddly supply. The machine is too thick lei We needle 4. The thread is flat bread correct' 2. The mole is not moaned cocrethly
2. The bobbin case is not msened correctly S. The needle Is not correctly inserted 3. The bobbin ease is too thtek lot 0th tebriO...
Similar Questions


I Purchased Used Bernina 009dcc, Need Clarification On Threading Machine.
(Posted by rsb209 10 years ago)

Threading The Bobbin
On my model i want to know how to thread the bobbin on the machine
On my model i want to know how to thread the bobbin on the machine
(Posted by Jerengbret 11 years ago)
Stitch Setting
I have had my Bernette 730 serviced today, and they have left it on zig zag. I cannot remember how t...
I have had my Bernette 730 serviced today, and they have left it on zig zag. I cannot remember how t...
(Posted by vivienlee 11 years ago)