
Bernina Bernette 340 deco Support Question
Bernina Bernette 340 deco Support Question
Find answers below for this question about Bernina Bernette 340 deco.Need a Bernina Bernette 340 deco manual? We have 1 online manual for this item!
Question posted by carolruhle on July 6th, 2014
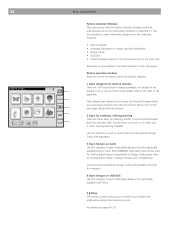
Deco 340 Faceplate
Hi I want to know details about how to remove the faceplate. I unscrewed it but do not want to break it. Do I lift it up & out, pull it straight out, or what? It seems stuck on something. Thank you.
Current Answers
Related Bernina Bernette 340 deco Manual Pages
User Guide - Page 2

...(«0») position then
remove the plug from all controls to those parts in this sewing computer from the electrical outlet
immediately after using and before pulling. 16. Replacement parts for...the sewing computer. 17.
Under no longer require this sewing computer is not working properly • it has been dropped or damaged, • it in terms of double-insulated machines.
...
User Guide - Page 3
... hope you will have been implemented to make your bernette Deco 340. Please visit your creativity to enhance your BERNINA dealer; New features like the USB Stick Port and the Thread Cutter have a wonderful sewing experience with help to new heights. In order to buy the bernette Deco 340. he will help , ideas and embroidery essentials, to...
User Guide - Page 7
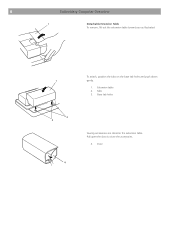
Tabs 3. Door Base tab holes
2 3
4
Sewing accessories are stored in the extension table. To attach, position the tabs on the base tab holes and push down
1
gently.
1. Pull open the door to store the accessories.
4. 6
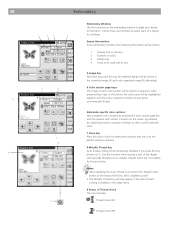
Embroidery Computer Overview
1
Detachable Extension Table
To remove, lift out the extension table toward you as illustrated. Extension table 2.
User Guide - Page 8
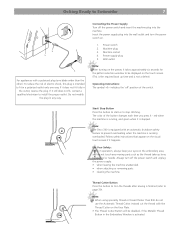
... and unplug the power supply: • when leaving the machine unattended. • when attaching or removing parts. • cleaning the machine. Wall outlet
Note: After turning on the power, it still does not fit, contact a qualified electrician to install the proper outlet. Note: The Deco 340 is equipped with an automatic shutdown safety feature to...
User Guide - Page 9
... plate release button 2.
Hole
To achieve the best embroidery quality, BERNINA recommends to the right, and remove the hook cover plate. Lift out the bobbin from large or loose wound spools.
6. Extra spool pin 11. Spool Net
Use the...: Use the small spool holder to wind the bobbin without unthreading the machine while working with the thread coming off the spool as illustrated.
8.
User Guide - Page 18
... it is supplied with the reference lines.
9. For more detailed informations please contact your project.
Starting point for monogramming in ...to a 200 x 140 mm (8" x 51/2").
1. The following hoops are preset in horizontal placement 7. Embroidery Hoop The Deco 340 is important to use the correct materials and tools for free arm embroidery, 50 x 50 mm Hoop F: round, embroidery...
User Guide - Page 19
...Getting Ready to Embroider
There are now ready to attach the hoop with the fabric onto the Deco 340. For hooping instructions follow the descriptions below, for the use a screwdriver. d) Push the ... screw on the outer hoop. c) Lay the inner hoop over the top of the fabric. e) Remove the template.
6 Template
Having finished step 2 the fabric should be flush with the same fabric and...
User Guide - Page 26
...key to bring the carriage back to its idle position. This is the required boot up the bernette 340 Deco logo is not a defect. During the boot up time and is displayed.
Note: The screen...yourself first with hard or sharp pointed objects like pencils, screwdrivers, or the like. When the machine is using icons and a status line.
For your convenience it is switched on, the pattern ...
User Guide - Page 27
...) The USB Sticks can be used to save stitch data and transfer embroidery designs between the Deco 340 and your PC. Modification in this screen will pop out.
6.
Otherwise, data stored in ...Selection Tabs:
A.B.C
Touch to choose the different categories on the stick) is blinking. To remove pull firmly on the USB Stick
Caution! • Do not disconnect the USB Stick while stitching...
User Guide - Page 33
...details about compatibility of Design Cards please refer to corresponding chapter «Design Transfer and Compatibility»
Choose frames included on Design Cards with alphabets) • Design Cards • USB Stick • Personal Designs stored in the internal memory of the Deco 340... available USB Sticks.
5 Editing The editing function allows you previously saved into the Deco 340.
User Guide - Page 37
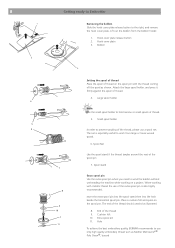
... until the desired color section is enabled in the utility menu.
9 Status of the Deco 340 is disabled as well. • This Metallic Thread key will be highlighted together with ...the fabric. Use this function when sewing a part of a design for thread cutting.
Screen Information In the embroidery window, the following information will be shown.
1 Sewing time in minutes 2 Number of each...
User Guide - Page 47
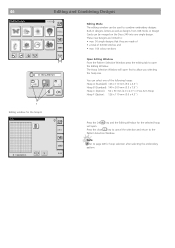
... the selected hoop will open first to page 48 for the hoop B
Edit
A.B.C
B: 140x200mm
X
Edit
Editing Mode The editing window can be merged on the Deco 340 into one of 64'000 stitches and • max. 104 colour sections
Open Editing Window From the Pattern Selection Window press the editing tab to...
User Guide - Page 53
... the memory may be automatically assigned, starting from M_001 in memory of the Deco 340 can hold a large number of your reference.
10 File Name key The ...details). Otherwise, data stored in a certain memory location. ATA Personal Design Card C.
Caution: Never turn off the power, eject the Design Card or remove the USB Stick when the warning sign or hourglass appears on the Deco 340...
User Guide - Page 55
...Machine Write»). Most other brand cards and designs on the Deco and / or through optionally available PC software and accessories. This includes Bernette / BERNINA deco 500/600/650 cards, for the Deco 340... Files for details of embroidery software and design manufacturers, whose purpose is a non-profit group of the transfer procedure and note, that licensed designs on the Deco 340.
User Guide - Page 56

... and transfer by any of the above memory media to transfer embroidery designs into the Deco 340 and back. While we have run extensive tests with memory media available on the markets...card may be guaranteed
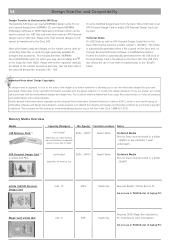
Transfer of Embroidery Designs
Below is a graphical summary of all different ways to Deco 340
Note: CDs produced in PCMCIA slot of laptop PC!
(Studio BERNINA CD)*
not applicable .EXP(+),...
User Guide - Page 57
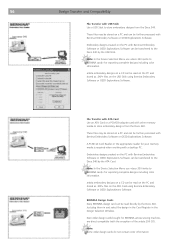
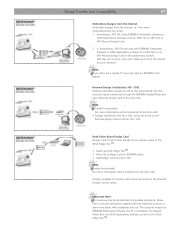
... with USB Stick Use a USB Stick to the Deco 340 by the ATA Card.
A PCMCIA Card Reader or the appropriate reader for BERNINA artista sewing machine, are direct compatible (with the exception of the ....
These files may be stored on the PC with other memory media to the Deco 340 by the Deco 340. These files may be stored on the USB Stick using Bernina Embroidery Software or OESD...
User Guide - Page 58
...well as .ART file.
No colour information will be transferred to the Deco 340 • Designs modified on the Deco 340 cannot be stored on the
Personal Design Card for artista. Write file...Note: • Limited functionality! No colour information will be transferred to the Deco 340
Designs modified on the Deco 340 cannot be stored on the Personal Design Card for artista 165 / 185. Using...
User Guide - Page 59
... carrying not only the stitch coordinates, but the extension .INF.
Caution: To transfer the design completely to the sewing computer both or all three files must be accessed through the use USB Stick or ATA Personal Design Card (Windows...
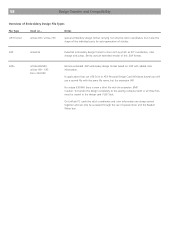
Overview of this .EXP format.
.EXP+
artista 630/640, artista 160 - 185 Deco 330/340
Bernina extended .EXP embroidery design format based on ...
User Guide - Page 61

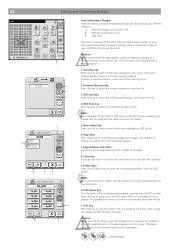
... the setscrew, and attach the cap.
1 Cap
2 Setscrew
4
3 Faceplate
4 Lamp Socket
5 Light bulb
5 Pull out the
bulb from the socket.
To remove:
3
Remove the cap and setscrew. Remove the faceplate. The bulb could be HOT, wait until it has cooled down before replacing the light bulb. To replace:
Insert the bulb into the opening of ...
User Guide - Page 62

... is not set in the
thread holder when starting the machine. 6 Sewing speed is noisy.
1 Threads have been caught in the... the bobbin. Remove the object.
Stop the machine and free the fabric.
See page 15.
The needle breaks.
1 The ...machine. 4 The fabric is caught or pulled for the design being used.
See page 19 See page 18
Use a stabilizer. Abnormal noise when turning the machine...
Similar Questions

Bernette Deco 340 Embroidery Machine
I am seeking an Embroidery Foot no 22 for the Bernette Deco 340
I am seeking an Embroidery Foot no 22 for the Bernette Deco 340
(Posted by baxterclan 1 year ago)

Does The Bernette Deco 340 Have A Nut To Hold The Bobbin Govenor In Place?
(Posted by l184m 1 year ago)

New Bulb Not Working In Sewing Machine Bernette 12 What Can It Be
(Posted by Anonymous-152221 8 years ago)

Clumping Benetton Deco 340
How do you stop clumping on the bernette deco 340
How do you stop clumping on the bernette deco 340
(Posted by rrheeder 9 years ago)

My Sewing Machine Bernette 15 Stops Working
After 1 day using my Bernette 15 stops working - engine hoots but doesn't rotate spindle and hand wh...
After 1 day using my Bernette 15 stops working - engine hoots but doesn't rotate spindle and hand wh...
(Posted by sgrayxx 12 years ago)