Bernina 215 Support Question
Bernina 215 Support Question
Find answers below for this question about Bernina 215.Need a Bernina 215 manual? We have 1 online manual for this item!
Question posted by connieharpur11 on September 7th, 2014
Changing Needle Position
I cant change the needle position on my Bernina 215, it was working well a couple of days ago however the now it wont move from side to side. It shows up on the screen when i press the relevent buttons however the needle shows no response. What can i do to fix this? Thanks, C
Current Answers
Related Bernina 215 Manual Pages
User Guide - Page 1

... questions you have will also be dealt with courteously and efficiently by a youthful appeal which is my personal wish to continue this tradition of rewarding sewing. H.P. The new BERNINA 215 are assured of years of offering you , dear Customer, more...
User Guide - Page 2

... computer where aerosol products (spray) or oxygen is not working properly - Always unplug the sewing computer from all instructions before cleaning. 3. Close attention is used as described in this sewing computer if: - Special care is not in use the sewing computer outdoors. 8. Always use bent needles. 11.
Never operate this
manual. it should be...
User Guide - Page 3

..., such as changing the needle or the presser foot, etc.
14.
To disconnect, turn power switch to minimize the environmental impact of this product with the words: «DoubleInsulation» or «double-insulated». Please note the advice on the product.
In case of grounding.
Do not throw away this sewing computer...
User Guide - Page 4

... Typesetting, Layout, DTP: Silvia Bartholdi Graphics: Müller-Melzer ID, Kreuzlingen
© copyright 2010 BERNINA International AG, Steckborn
All rights reserved For technical and product improvement reasons, the sewing computer's features, parts and accessory are subject to country. The accessory included can differ from country to unannounced changes and alterations at any time.
User Guide - Page 5

Important safety Instructions
2
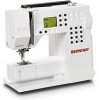
Details of the sewing computer
6
Standard Accessories
8
Feet selection
9
Optional Accessories
10
Setting up the sewing computer
12
Operating instructions
20
Stitch overview
23
Selected practical stitches
24
Sewing Needles
31
Maintenance
33
Troubleshooting
34
Index
35
Contents
5
User Guide - Page 7

...
12 Bobbin pre-tension
32 Rear thread guide
13 Thread tension adjustment 33 Accessory box connection
14 LCD display
34 Presser foot lifter (manual)
15 Needle stop up/down
35 Thread cutter
16 1/2 motor speed
17 Bobbin winder
18 Stitch width button
19 Needle position button
31 30
4
Back view
32 33
34 35
7 3
User Guide - Page 8
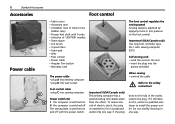
To red uce the risk of 130/705H needles • Seam ripper • Lint brush • 3 spool discs • Foam pad • Oiler • Foot control • Power cable • Angular Torx button • Warranty card
The foot control regulates the sewing speed Sewing speed is intended to fit in a polarized outlet only one...
User Guide - Page 10
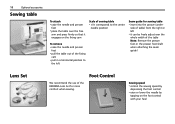
... the right or left
Scale of sewing table • «0» corresponds to the centre
needle position
Seam guide for more comfort when sewing. Lens Set
We recommend the use of the BERNINA Lens Set for sewing table • insert into the groove (under- Foot Control
Sewing speed • control the sewing speed by
depressing the foot control...
User Guide - Page 13

Bobbin case
Setting up the sewing computer
13
A
To remove the bobbin case • raise the needle • turn power switch to «0» • open the bobbin cover • grasp the latch of the bobbin
case • remove case
To insert ... thread does not have to be brought up as the loose end is just the right length to the safety instruction! Please refer to start sewing.
User Guide - Page 14

... clock wise when thread is pulled.
14
Setting up the sewing computer
Inserting the bobbin
Insert the bobbin Insert the bobbin so that the thread runs clockwise. Changing the needle
Pull the thread to the back • insert the needle as far as it lies in the T-shaped slit at the end...
User Guide - Page 15

...
Setting up the sewing computer
15
Changing the presser foot sole • raise the needle and the
presser foot shaft • turn power switch to «0» • press the button on the back of the shaft
• lower the presser foot lifter and the foot sole will click into its vertical position
• when...
User Guide - Page 18

... the sewing computer
Stitch plate
Note: To change the stitch plate see page 33
Stitch plate markings • the stitch plate is marked with vertical, horizontal and diagonal
lines in mm and inches • the lines help to the right and left, measuring
from the center needle position
Feed-dog and fabric feed
Button flush...
User Guide - Page 21

... of the chosen stitch
blink constantly
Needle position • left button = needle to the left • right button = needle to zig-zag, your choice; LCD Display
1
0 1 2 3 4 5 5.5
3
4
5 6
5 4 3 2
17 20
The LCD display shows 1 stitch width, basic setting blinks constantly 2 stitch length, basic setting blinks constantly 3 needle position (9 positions) 4 needle stop up/down 5 stitch number...
User Guide - Page 22

... . 22
Operating instructions
Functions
Functions are cleared Exceptions: • needle stop up • press button • arrow points down = sewing computer stops
with needle down • press button again • arrow points up = sewing computer stops
with needle up
Note: Press button a bit longer = the needle will go automatically up or down • 1/2 motor speed • when...
User Guide - Page 24

... edges • for decorative work
Satin stitch • dense (shorter) zig-zag stitch = filled in zig-zag • adjust stitch width as you sew for fine fabrics
24
Selected practical stitches
Straight stitch No. 1
Use reverse pattern sole No. 1 or blindstitch sole No. 5
Outer Edges • needle position far left for outer edge...
User Guide - Page 28

... • baste in the zipper, each side from bottom to top
• once with needle position far right and once with visible seam • for all cotton, wool, synthetic and mixed fiber jersey
Preparation press 1 cm (3/8") to wrong side
Sewing • sew from the right at a foot's width from the edge • trim surplus fabric...
User Guide - Page 29

... higher • mark the buttonhole length in the appropriate position
Test sewing • test on the fabric and stabilizer you intend to use • sew buttonholes in top left of damaged area • sew the first length and stop the sewing computer • press the quick reverse button: length is programmed • complete the darn; matically •...
User Guide - Page 33

... soiling your work
Cleaning the LCD display and the sewing computer • wipe with a damp cloth
Important! Clean the sewing computer after every use • turn power switch to «0» (off) and pull out
plug from electric outlet • remove presser foot and needle • open the free-arm cover • press the stitch...
User Guide - Page 34

...in off position. • Sewing computer has been
standing in
the bobbin case finger. • Sewing computer threaded
with the needle still in the stitch plate has been damaged by the needle. Check ...• Needle inserted all the way
to the top. • The needle point does not
suit the fabric being sewn. Take your sewing computer to your BERNINA dealer. • The needle is bent...
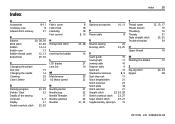
User Guide - Page 35
...
15
Changing the needle
14
Cleaning
33
Clear / Delete
22
F Fabric cover Fabric feed Feed-dog Foot control
H Honeycomb stitch
I Inserting the bobbin
L LCD display Lens Set
M Maintenance 1/2 Motor speed
D
Darning program Delete / Clear Details of the sewing computer Display Double overlock stitch
23, 29 22
6-7 21 23, 26
N
Needle position Needle stop Needle Threader Needle up/down Needles...
Similar Questions


Wanted :bernina 1260 Sewing Machine.
wanted to buy : Bernina 1260 sewing machine , in good working order.
wanted to buy : Bernina 1260 sewing machine , in good working order.
(Posted by beektze 10 years ago)

Bernina 1090 S Sewing Machine Manual
I Dont See The User Manual For This Machine For Free Downloading.what User Manual Are The Same As Th...
I Dont See The User Manual For This Machine For Free Downloading.what User Manual Are The Same As Th...
(Posted by cynthianel 10 years ago)

Oiling My Bernina 215 Machine
I want to effectively maintain my bernina 215. Other than the bobbin area, is there any other place ...
I want to effectively maintain my bernina 215. Other than the bobbin area, is there any other place ...
(Posted by Jmbsews 11 years ago)
