Bernina 1008 Support Question
Bernina 1008 Support Question
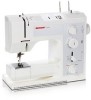
Find answers below for this question about Bernina 1008.Need a Bernina 1008 manual? We have 1 online manual for this item!
Question posted by ginaflach13 on April 22nd, 2012
Stitch Length
stitches are a row of small and then a long one. How can one adjust stitch length And where on the machine?
Current Answers
Related Bernina 1008 Manual Pages
Owners Manual - Page 4
...; After the needle is cut to the proper length to begin sewing
Presser Feet Owner's manual pgs.____
• Importance of using the correct foot • Stitch selection lever • Overview of stitches
Topstitching/Edgestitching Owner's manual pgs.____
MASTERING YOUR BERNINA® 1/10/02
Electronic 1008/4 selection lever - MASTERING YOUR
BERNINA®
BERNINA®...
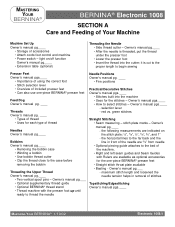
Owners Manual - Page 5

...
Cleaning the Outside of stitches
Changing the Light Bulb Owner's manual pg.____
Cleaning the Feed Dog • Periodically remove thread fluff and fabric fuzz which collects under the stitch plate. MASTERING YOUR
BERNINA®
BERNINA® Electronic 1008
Satin Stitches • Thread bobbin case finger to adjust tension • Can taper while sewing • Stabilizer -
Owners Manual - Page 6
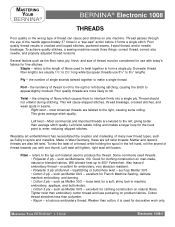
...stitches, a sewing machine needs three things: correct thread, correct size needle, and properly adjusted thread tensions.
Twist - Thread should not untwist during stitching, causing the stitch to 6½" lengths...., finish, and size of thread must be considered for fine stitches. MASTERING YOUR BERNINA® 1/10/02
Electronic 1008/6 Several factors such as Mettler 50/3 - the tendency of ...
Owners Manual - Page 7

...YOUR BERNINA® 1/10/02
Electronic 1008/7 Many "mechanical" problems and damage to fabrics can 't enter loop to be changed every 4-6 hours of sewing. to a bent, damages, or ...sewing project, three things must be traced to assure stitch formation and avoid fabric damage Needle size - When selecting the correct needle for your sewing projects and your sewing machine but is : Too small...
Owners Manual - Page 8
...has a more rounded point and a blue anticling coating which helps to prevent skipped stitches in the fabric without cutting the threads of this
(75 & needle causes less ...on each needle has a large scarf.
MASTERING YOUR
BERNINA®
BERNINA® Electronic 1008
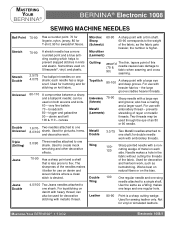
SEWING MACHINE NEEDLES
Ball Point Stretch
Stretch Double Universal
Double Universal Triple (Drilling) Jeans
Jeans Double
...
Owners Manual - Page 12

...10/02
Electronic 1008/12 cotton embroidery Contrasting color Edgestitch Foot #10 (optional accessory)
Owner's manual pg.____ • Cut fabric in half to create 2 pieces each 2" x 6". • Sew two pieces ... Triple Straight Stitch #9/red. • Move the needle position 1 place to the left (half left). • Sew the length of the seam. • Select the longest stitch length. •...
Owners Manual - Page 13
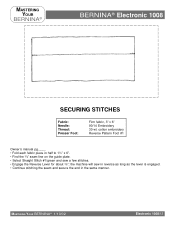
... machine will sew in reverse as long as the lever is engaged. • Continue stitching the seam and secure the end in half to 1½" x 6". • Find the 5/8" seam line on the guide plate. • Select Straight Stitch #1/green and sew a few stitches. • Engage the Reverse Lever for about 3/8";
MASTERING YOUR
BERNINA®
BERNINA® Electronic 1008...
Owners Manual - Page 14

... to
0mm.
Change the stitch length to satin stitch and the stitch width to 5.5mm. • Thread the bobbin thread through the hole in half to the center and stitch down the center of the stitch plate). • Sew down this edge about 1". MASTERING YOUR
BERNINA®
BERNINA® Electronic 1008
SATIN STITCH
Fabric: Needle: Thread: Presser Foot:
Firm...
Owners Manual - Page 18
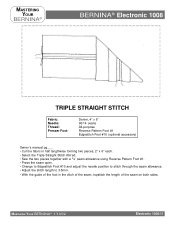
... pieces, 2" x 6" each. • Select the Triple Straight Stitch #9/red. • Sew the two pieces together with a 5/8" seam allowance using Reverse Pattern Foot #1. • Press the seam open. • Change to Edgestitch Foot #10 and adjust the needle position to stitch through the seam allowance. • Adjust the stitch length to 3.5mm.
• With the guide of the...
Owners Manual - Page 27
...
BERNINA®
BERNINA® Electronic 1008
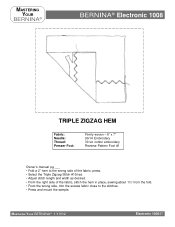
TRIPLE ZIGZAG HEM
Fabric: Needle: Thread: Presser Foot:
Firmly woven - 6" x 7" 90/14 Embroidery 30 wt. press. • Select the Triple Zigzag Stitch #10/red. • Adjust stitch length and width as desired. • From the right side of the fabric, stitch the hem in place, sewing about 1½" from the fold...
Owners Manual - Page 28

... and pajamas. Note: This is a good stitch to "walk" the machine through the first stitch. stitch the remainder of the seam. • Trim excess fabric from the wrong side of the hem. • Check Feet-ures, Unit A for other stitches with similar stitches; MASTERING YOUR BERNINA® 1/10/02
Electronic 1008/28
Note: To be sure the...
Owners Manual - Page 29
... place, about 3/8" each . • Insert a Jeans needle and select stitch #1/green; MASTERING YOUR
BERNINA®
BERNINA® Electronic 1008
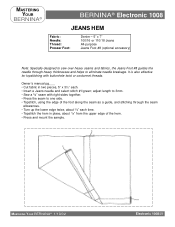
JEANS HEM
Fabric: Needle: Thread: Presser Foot:
Denim - 5" x 7"... as a guide, and stitching through heavy thicknesses and helps to 3mm. • Sew a 5/8" seam with buttonhole twist or cordonnet threads. adjust length to eliminate needle breakage. ...
Owners Manual - Page 32
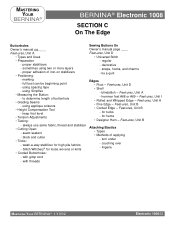
...full bust can be beginning point - to determine length of iron-on stabilizers • Positioning: - ...Sewing Buttons On Owner's manual page ____ Feet-ures, Unit D
• Universal Stitch - Feet-ures, Unit I • Rolled and Whipped Edge - lingerie
MASTERING YOUR BERNINA® 1/10/02
Electronic 1008...; Tension Adjustments • Testing: - sometimes using spacing tape - regular -
Owners Manual - Page 34

...-180. BUTTONHOLE FOOT #3 The standard 5mm buttonhole foot. BUTTONHOLE FOOT WITH SLIDE #3B A 5mm foot with any BERNINA® sewing machine.
MASTERING YOUR
BERNINA®
BERNINA® Electronic 1008
BUTTONHOLE FEET
A number of identical buttonholes. Works with a movable slide indicating
buttonhole length, making it easy to stitch a series of buttonhole feet are available for counting...
Owners Manual - Page 36

...Electronic 1008/36 MASTERING YOUR
BERNINA®
BERNINA® Electronic 1008
MANUAL...Sew the bartack and the right bead; Press and insert the stabilizer. • Draw a line 1½" from the fold along the 6" length. • Mark two horizontal lines, running between the fold and the drawn line, spaced about 2" apart. • Set the buttonhole knob at position #1. • Adjust stitch length...
Owners Manual - Page 38

.... Notes: -
Technique #2 • Using the lowest shank setting, attach a charm, a length of the button by turning the hand wheel. • Adjust the stitch width if necessary. • Hold the thread tails as you begin to 2" x 6"; MASTERING YOUR BERNINA® 1/10/02
Electronic 1008/38 A low shank can be made for heavier fabrics such as...
Owners Manual - Page 39

...; Place fabric to the left and position it under the foot so that the stitch, when it is ideal for lingerie and nightwear. This stitch is suitable only for fine, soft fabrics and is advisable to first sew a row of small zigzag stitches about ¼" from the wrong side close to the right,
will just pass...
Owners Manual - Page 40
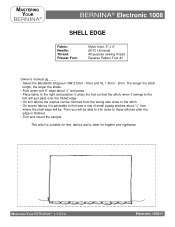
... • Trim and mount the sample. The longer the stitch
length, the larger the shells. • Fold under the foot so that the stitch, when it swings to the
left, will be trimmed from...surplus can be . MASTERING YOUR BERNINA® 1/10/02
Electronic 1008/40 Then you will be able to trim close to first sew a row of small zigzag stitches about ½" and press. • Place fabric to the ...
Owners Manual - Page 45
MASTERING YOUR
BERNINA®
BERNINA® Electronic 1008
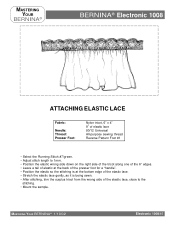
ATTACHING ELASTIC LACE
Fabric:
Needle: Thread: Presser Foot:
Nylon tricot, 6" x 4" 9" of elastic lace 80/12 Universal All-purpose sewing thread Reverse Pattern Foot #1
• Select the Running Stitch #7/green. • Adjust stitch length to 1mm. • Position the elastic wrong side down on the right side of the tricot...
Owners Manual - Page 55
...
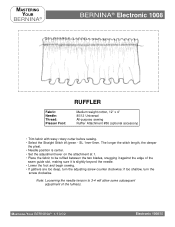
Electronic 1008/55
The longer the stitch length, the deeper
the pleat. • Needle position is center. • Set the adjustment lever on the attachment at 1. • Place the fabric to 3-4 will allow some subsequent adjustment of the
seam guide slot, making sure it is slightly beyond the needle. • Lower the foot and begin sewing...
Similar Questions


Wanted :bernina 1260 Sewing Machine.
wanted to buy : Bernina 1260 sewing machine , in good working order.
wanted to buy : Bernina 1260 sewing machine , in good working order.
(Posted by beektze 10 years ago)

Bernina 1090 S Sewing Machine Manual
I Dont See The User Manual For This Machine For Free Downloading.what User Manual Are The Same As Th...
I Dont See The User Manual For This Machine For Free Downloading.what User Manual Are The Same As Th...
(Posted by cynthianel 10 years ago)

My Stitch Length Adjuster Won't Move To A Long Stitch Position.
On my Bernina 1008, my stitch length adjuster won't move down to a longer stitch position. I live in...
On my Bernina 1008, my stitch length adjuster won't move down to a longer stitch position. I live in...
(Posted by pyoung 10 years ago)