Asus P8H61-M LX3 PLUS R2.0 Support Question
Asus P8H61-M LX3 PLUS R2.0 Support Question
Find answers below for this question about Asus P8H61-M LX3 PLUS R2.0.Need a Asus P8H61-M LX3 PLUS R2.0 manual? We have 1 online manual for this item!
Current Answers
Answer #1: Posted by Technoprince123 on June 27th, 2021 5:26 AM
Technoprince123

Member since:
February 8th, 2021 Points: 1,205,190

Member since:
February 8th, 2021 Points: 1,205,190
https://www.asus.com/in/SupportOnly/P8H61-M%20LX3%20PLUS%20R2-0/HelpDesk_Knowledge/
https://icecat.biz/en/p/vendorName/mpn/desc-14870691.html
https://www.crucial.in/compatible-upgrade-for/asus/p8h61-m-lx3-plus-r2*0
Please response if this answer is acceptable and solw your problem thanks
Related Asus P8H61-M LX3 PLUS R2.0 Manual Pages
P8H61-M LX3 PLUS R2.0 User's Manual - Page 1

Motherboard
P8H61-M LX3 R2.0 Series
• P8H61-M LX3 R2.0 • P8H61-M LX3 PLUS R2.0
P8H61-M LX3 PLUS R2.0 User's Manual - Page 3
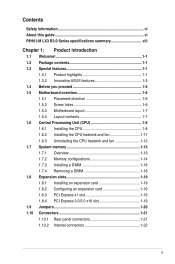
Contents
Safety information vi About this guide vi P8H61-M LX3 R2.0 Series specifications summary viii
Chapter 1: Product introduction
1.1 Welcome 1-1 1.2 Package contents 1-1 1.3 Special features 1-1
1.3.1 Product highlights 1-1 1.3.2 Innovative ASUS features 1-3 1.4 Before you proceed 1-5 1.5 Motherboard overview 1-6 1.5.1 Placement direction 1-6 1.5.2 Screw holes 1-6 1.5.3 ...
P8H61-M LX3 PLUS R2.0 User's Manual - Page 11
...
Product highlights
LGA1155 socket for the following items.
Motherboard Cables Accessories Application DVD Documentation
ASUS P8H61-M LX3 R2.0 Series motherboard 2 x Serial ATA 3.0Gb/s cables 1 x I/O shield ASUS motherboard support DVD User Manual
• P8H61-M LX3 R2.0 Series motherboards include P8H61-M LX3 R2.0 and P8H61-M LX3 PLUS R2.0 two models. Intel® 3rd/2nd generation Core...
P8H61-M LX3 PLUS R2.0 User's Manual - Page 12
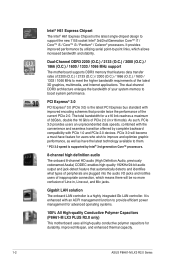
... 3.0 speed is enhanced with an ACPI management function to provide efficient power management for advanced operating systems.
100% All High-quality Conductive Polymer Capacitors (P8H61-M LX3 PLUS R2.0 only)
This motherboard uses all high-quality conductive polymer capacitors for a x16 link reaches a maximum of 32Gb/s, double the 16 Gb/s of PCIe 2.0 (in , Line-out, and...
P8H61-M LX3 PLUS R2.0 User's Manual - Page 14
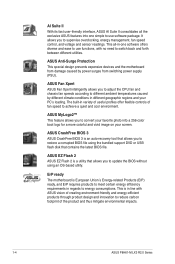
... between different utilities. ASUS Anti-Surge Protection This special design prevents expensive devices and the motherboard from switching power supply (PSU). ASUS MyLogo2™ This feature allows you to achieve... offer flexible controls of the product and thus mitigate environmental impacts.
1-4
ASUS P8H61-M LX3 R2.0 Series This is an auto-recovery tool that allows you to convert your ...
P8H61-M LX3 PLUS R2.0 User's Manual - Page 15
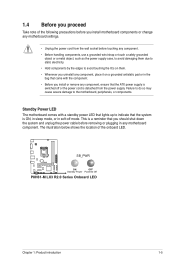
Standby Power LED The motherboard comes with the component. • Before you install or remove any component, ensure that the ATX power supply is switched off mode.
SB_PWR
P8H61-M LX3 R2.0 Series
ON
OFF
Standby Power Powered Off
P8H61-M LX3 R2.0 Series Onboard LED
Chapter 1: Product introduction
1-5 Failure to do so may cause severe damage to indicate that...
P8H61-M LX3 PLUS R2.0 User's Manual - Page 16

... screws!
Place this side towards the rear of the chassis
P8H61-M LX3 R2.0 Series
1-6
ASUS P8H61-M LX3 R2.0 Series Doing so can cause you physical injury and damage motherboard components.
1.5.1 Placement direction
When installing the motherboard, ensure that you unplug the power cord before installing or removing the motherboard. The edge with external ports goes to the rear part...
P8H61-M LX3 PLUS R2.0 User's Manual - Page 17
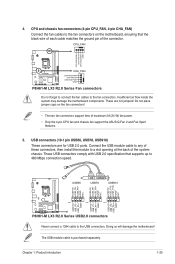
... connectors (4-pin CPU_FAN, 4-pin CHA_FAN)
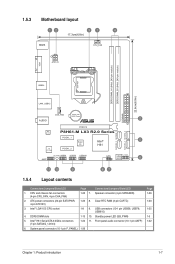
1-25 7. 1.5.3 Motherboard layout
12
31
4
17.3cm(6.8in)
KBMS
CPU_FAN
ATX12V
VGA
DDR3 DIMM_A1 (64bit, 240-pin module) DDR3 DIMM_B1 (64bit, 240-pin module)
LGA1155
USB34
22.6cm(8.9in)
LAN1_USB12
EATXPWR
CHA_FAN
Lithium Cell CMOS Power
AUDIO
2
PCIEX16
RTL 8111F
P8H61-M LX3 R2.0 Series
SATA3G_3 SATA3G_1 SATA3G_4 SATA3G_2
PCIEX1_1...
P8H61-M LX3 PLUS R2.0 User's Manual - Page 18
... cap is shipment/transit-related.
• Keep the cap after installing the motherboard. P8H61-M LX3 R2.0 Series
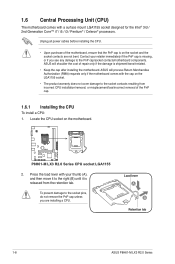
P8H61-M LX3 R2.0 Series CPU socket LGA1155
2. Press the load lever with the cap on the motherboard.
Contact your thumb (A), and then move it to the PnP cap/socket contacts/motherboard components. Unplug all power cables before installing the CPU.
• Upon...
P8H61-M LX3 PLUS R2.0 User's Manual - Page 22

3. Connect the CPU fan cable to disengage the heatsink and
fan assembly from the connector on the motherboard labeled CPU_FAN. A
B
A
B B
A
B
A
1-12
ASUS P8H61-M LX3 R2.0 Series
CPU_FAN
CPU FAN PWM CPU FAN IN
CPU FAN PWR GND
P8H61-M LX3 R2.0 Series
P8H61-M LX3 R2.0 Series CPU fan connector
Do not forget to plug this connector.
1.6.3 Uninstalling the CPU heatsink and fan...
P8H61-M LX3 PLUS R2.0 User's Manual - Page 23
...:
DIMM_A1 DIMM_B1
P8H61-M LX3 R2.0 Series
Channel Channel A Channel B
Sockets DIMM_A1 DIMM_B1
P8H61-M LX3 R2.0 Series 240-pin DDR3 DIMM sockets
Chapter 1: Product introduction
1-13 A DDR3 module has the same physical dimensions as a DDR2 DIMM but is notched differently to ensure correct orientation when reinstalling.
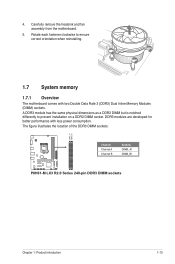
1.7 System memory
1.7.1 Overview
The motherboard comes with less...
P8H61-M LX3 PLUS R2.0 User's Manual - Page 24
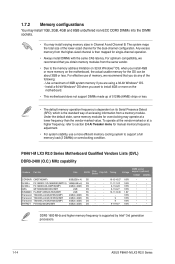
... cooling system to the memory address limitation on 32-bit Windows® OS, when you do any of the following: - P8H61-M LX3 R2.0 Series Motherboard Qualified Vendors Lists (QVL) DDR3-2400 (O.C.) MHz capability
Vendors Part No. Timing
Voltage support (optional) 1DIMM 2DIMMs
CORSAIR CMGTX8(...SPD), which is supported by Intel® 3rd generation processors.
1-14
ASUS P8H61-M LX3 R2.0 Series
P8H61-M LX3 PLUS R2.0 User's Manual - Page 28
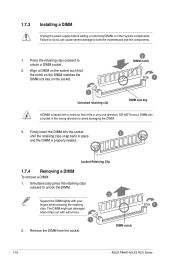
... or removing DIMMs or other system components. Press the retaining clips outward to both the motherboard and the components.
1. The DIMM might get damaged
when it fits in only one ... the DIMM lightly with your
fingers when pressing the retaining
1
clips.
DIMM notch
1-18
ASUS P8H61-M LX3 R2.0 Series Align a DIMM on the socket such that it flips out with a notch so that...
P8H61-M LX3 PLUS R2.0 User's Manual - Page 32

...PORT1 L PORT1 R PORT2 R SENSE_SEND PORT2 L
P8H61-M LX3 R2.0 Series
HD-audio-compliant
Legacy AC'97
pin definition
compliant definition
P8H61-M LX3 R2.0 Series Front panel audio connector
• We recommend... BIOS setup to [AC97].
USB 2.0 ports 1 and 2. Connect one end of the motherboard's high-definition audio capability.
• If you want to connect a high-definition front ...
P8H61-M LX3 PLUS R2.0 User's Manual - Page 35
... CPU FAN IN
CPU FAN PWR GND
P8H61-M LX3 R2.0 Series
CHA_FAN
CHA FAN PWM CHA FAN IN
CHA FAN PWR GND
P8H61-M LX3 R2.0 Series Fan connectors
Do not forget to connect the fan cables to the USB connectors. Insufficient air flow inside the system may damage the motherboard components. The USB module cable is purchased...
P8H61-M LX3 PLUS R2.0 User's Manual - Page 40
...] Select or Load [Tab] Switch [Up/Down/PageUp/PageDown/Home/End] Move [Esc] Exit
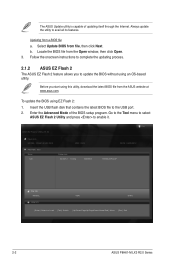
2-2
ASUS P8H61-M LX3 R2.0 Series Select Update BIOS from a BIOS file a. Locate the BIOS file from the ASUS website at www.... OS‑based utility. Insert the USB flash disk that contains the latest BIOS file to enable it. Enter the Advanced Mode of updating itself through the Internet. Go to the Tool menu...
P8H61-M LX3 PLUS R2.0 User's Manual - Page 41
... using this utility, rename the BIOS file in the removable device into H61MLX3R.CAP (P8H61-M LX3 R2.0) or H61ML3PR.CAP (P8H61-M LX3 PLUS R2.0).
• The BIOS file in the support DVD may not be the latest version... you to recover BIOS setting. Doing so can restore a corrupted BIOS file using the motherboard support DVD or a USB flash drive that allows you to enter BIOS Setup to restore...
P8H61-M LX3 PLUS R2.0 User's Manual - Page 42
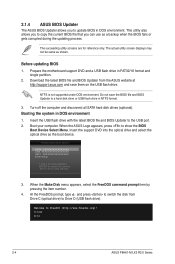
The succeeding utility screens are for reference only. Prepare the motherboard support DVD and a USB flash drive in DOS environment 1.
C:\>d: D:\>
2-4
ASUS P8H61-M LX3 R2.0 Series Turn off the computer and disconnect all SATA hard disk drives (optional). When the ASUS Logo appears, press to Drive D (USB flash drive).
At ...
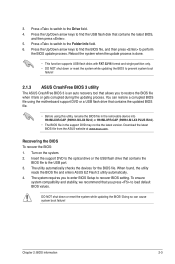
P8H61-M LX3 PLUS R2.0 User's Manual - Page 50

...system to malfunction. support.
2.4.2 ASUS MultiCore Enhancement [Enabled]
[Enabled] Select this option for maximum performance under XMP/...motherboard. Configuration options: [DDR3-800MHz] [DDR3-1066MHz] [DDR3-1333MHz] [DDR3-1600MHz] [DDR3-1866MHz] [DDR3-2133MHz] [DDR3-2400MHz]
Selecting a very high memory frequency may cause the system to the default setting.
2-12
ASUS P8H61-M LX3 R2...
P8H61-M LX3 PLUS R2.0 User's Manual - Page 66

... highest standards for protecting our environment. Please go to enable proper reuse of parts and recycling. A-2
ASUS P8H61-M LX3 R2.0 Series
DO NOT throw the mercury-containing button cell battery...other components as well as the packaging materials.
DO NOT throw the motherboard in the Radio Interference Regulations of the Canadian Department of electronic products.
Check local...
Similar Questions


Asus P8h61-m Le/usb3 Cannot Boot
My Asus Motherboard P8H61-M LE Rev. 3.0 failed to boot-up or no boot sequence, black screen and no k...
My Asus Motherboard P8H61-M LE Rev. 3.0 failed to boot-up or no boot sequence, black screen and no k...
(Posted by Anonymous-156286 8 years ago)

E Exactly Is The Mobo Head On The Asus P8h61 -mlx Motherboard?
(Posted by victor95221 11 years ago)
I Lost Intel Hd Graphic Driver On My Computer. What Should I Do, Please?motherbo
(Posted by heinzawsoe07 11 years ago)

Should My Motherboard Asustek Computer Inc. P8h61-m Le/csm (lga1155) Be Running
(Posted by dijkstrabmd 12 years ago)