Acer H5360 Support Question
Acer H5360 Support Question
Find answers below for this question about Acer H5360.Need a Acer H5360 manual? We have 3 online manuals for this item!
Question posted by yulola on May 20th, 2014
How To Disassemble Acer H5360
The person who posted this question about this Acer product did not include a detailed explanation. Please use the "Request More Information" button to the right if more details would help you to answer this question.
Current Answers
Related Acer H5360 Manual Pages
Acer H5360 Projector Series User's Guide - Page 2
... used herein for identification purposes only and belong to the contents hereof and specifically disclaims the implied warranties of HDMI Licensing LLC." All Rights Reserved. Acer Projector H5360 Series User's Guide Original Issue: 08/2009
Changes may be made periodically to your unit should include the serial number, model number and purchase information...
Acer H5360 Projector Series User's Guide - Page 46
...34
English
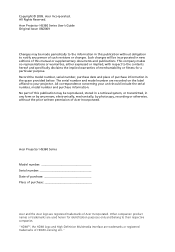
Specifications
The specifications listed below are subject to Acer's published marketing specifications. Projection system Resolution
Computer compatibility
...Audio Weight Dimensions (W x D x H) Digital Zoom Power supply Power consumption
Operating temperature I/O connectors
DLP® H5360: Native: 720P (1280 x 720) , Maximum: UXGA (1600 x 1200), WSXGA+ (1680x1050), 1080p(1920x1080...
Acer H5360 Projector Series User's Guide - Page 55
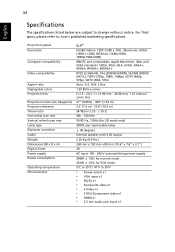
... this device must accept any interference received, including interference that may not cause harmful interference, and (2) this declaration:
Product:
DLP Projector
Model Number:
H7P0901
Machine Type:
H5360 series
Name of Responsible Party: Acer America Corporation
Address of the FCC Rules.
San Jose, CA 95110 U. S. S. A. The following two conditions: (1) this device may cause...
Acer H5360 Projector Series User's Guide - Page 56

... SA Via Cantonale, Centro Galleria 2 6928 Manno Switzerland
Hereby declare that:
Product: Trade Name: Model Number: Machine Type:
Projector Acer H7P0901 H5360 series
Is compliant with the essential requirements and other relevant provisions of the following EC directives, and that all the necessary steps have been taken ...
Acer X1161, X1261, X110 and H5360 Projector Series Service Guide - Page 4

... and DMD Board
Disassemble Zoom Ring
Disassemble Focus Ring
Disassemble System Fan Module
Disassemble Blower
Disassemble LVPS Module
Disassemble Lamp Driver Module
Disassemble Interrupt Switch
Disassemble Bottom Shielding
Disassemble Speaker (for X1261/H5360)
Rod Adjustment
Re...
Acer X1161, X1261, X110 and H5360 Projector Series Service Guide - Page 15
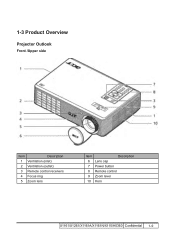
1-3 Product Overview
Projector Outlook
Front /Upper side
Item
Description
1 Ventilation (inlet)
2 Ventilation (outlet)
3 Remote control receivers
4 Focus ring
5 Zoom lens
Item
Description
6 Lens cap
7 Power button
8 Remote control
9 Zoom lever
10 Horn
X1161/X1261/X1161A/X1161N/X110/H5360 Confidential 1-
Acer X1161, X1261, X110 and H5360 Projector Series Service Guide - Page 19
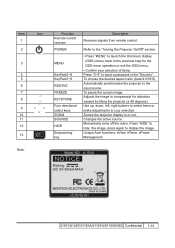
...the image. Momentarily turns off the video. X1161/X1261/X1161A/X1161N/X110/H5360 Confidential 1-13 MENU
KeyPad 0~9 KeyPad 0~9 RESYNC FREEZE KEYSTONE Four directional select...back to the previous step for distortion caused by tilting the projector (± 40 degrees). Unique Acer functions: eView, eTimer, ePower Management. Zooms the projector display in the "Security".
Item 1 2
3
4 ...
Acer X1161, X1261, X110 and H5360 Projector Series Service Guide - Page 20
X1161/X1261/X1161A/X1161N/X110/H5360 Confidential 1-14
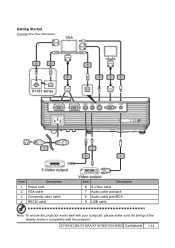
Getting Started Connecting the Projector
Item
Description
1 Power cord
2 VGA cable
3 Composite video cable
4 RS232 cable
Item
Description
6 S-Video cable
7 Audio cable jack/jack
8 Audio cable jack/RCA
9 USB cable
Note: To ensure the projector works well with your computer, please make sure the timing of...
Acer X1161, X1261, X110 and H5360 Projector Series Service Guide - Page 25
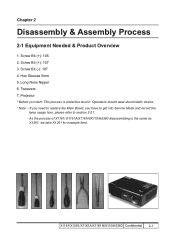
Long Nose Nipper 6. Projector * Before you have to get into Service Mode and record the
lamp usage hour, please refer to replace the Main Board, you start: This process is the same as
X1261, we take X1261 for example here. As the process of X1161/ X1161A/X1161N/X110/H5360 disassembling is protective level II...
Acer X1161, X1261, X110 and H5360 Projector Series Service Guide - Page 26
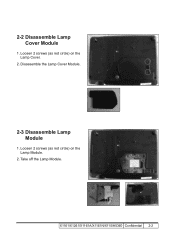
Loosen 2 screws (as red circle) on the Lamp Module.
2.
Loosen 2 screws (as red circle) on the Lamp Cover.
2. X1161/X1261/X1161A/X1161N/X110/H5360 Confidential 2- 2-2 Disassemble Lamp Cover Module
1. Take off the Lamp Module. Disassemble the Lamp Cover Module.
2-3 Disassemble Lamp Module
1.
Acer X1161, X1261, X110 and H5360 Projector Series Service Guide - Page 27

Remove the Top Cover Module.
X1161/X1261/X1161A/X1161N/X110/H5360 Confidential 2- Note: - Unscrew 5 screws (as green square).
2-5 Disassemble Top Shielding
1. When you remove the Top Cover, take
care the 6 tenons (as red circle) to disassemble the Top Shielding. 2-4 Disassemble Top Cover Module
1. Unscrew 2 screws (as red circle) from the Bottom Cover.
2.
Acer X1161, X1261, X110 and H5360 Projector Series Service Guide - Page 28
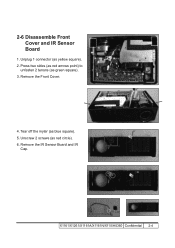
2-6 Disassemble Front Cover and IR Sensor Board
1. IR Cap IR Sensor Board
X1161/X1261/X1161A/X1161N/X110/H5360 Confidential 2- Tear off the mylar (as yellow square). 2. Unplug 1 connector (as blue square). 5. Remove the IR Sensor Board and IR
Cap. Remove the Front Cover.
4. ...
Acer X1161, X1261, X110 and H5360 Projector Series Service Guide - Page 29
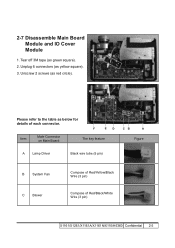
... (as below for details of Red/Black/White Wire (3 pin)
X1161/X1261/X1161A/X1161N/X110/H5360 Confidential 2- Please refer to the table as yellow square). 3. F
ED
Item
Male Connector on...Red/Yellow/Black Wire (3 pin)
Compose of each connector. Unscrew 2 screws (as green square). 2. 2-7 Disassemble Main Board Module and IO Cover Module
1.
Tear off 3M tape (as red circle).
Acer X1161, X1261, X110 and H5360 Projector Series Service Guide - Page 30

X1161/X1261/X1161A/X1161N/X110/H5360 Confidential 2- Disassemble the Main Board Moudle. 6. Item
Male Connector on Main Board
D Photo Sensor
The key feature
Compose of Red/Black/White Wire and Black wire tube (3 pin)
E IR
Compose of Red/Black/Whit Wire and Black wire tube (3 pin)
F
Speaker (for X1261/H5360)
Compose of Red/Black...
Acer X1161, X1261, X110 and H5360 Projector Series Service Guide - Page 31

... and IO Cover
Module. Please detach the Circuit boards and follow local regulations for disposal.
2-8 Disassemble Engine Module
1. IO Cover
NOTE: Circuit boards > 10 cm² has been highlighted with the yellow rectangle as yellow circle) to
disassemble the Engine Module. Unscrew 4 screws (as above image shows.
Tear off EMI Gasket (as...
Acer X1161, X1261, X110 and H5360 Projector Series Service Guide - Page 32

... from the Color Wheel Module. Avoid touching the glass parts of Color Wheel.
2-10 Disassemble DMD Chip and DMD Board
1. Note: - Avoid touching the DMD Chip when you disassemble it.
- X1161/X1261/X1161A/X1161N/X110/H5360 Confidential 2- Pay attention to disassemble the DMD Board and DMD Chip. Unscrew 1 screw (as above image shows. Unscrew...
Acer X1161, X1261, X110 and H5360 Projector Series Service Guide - Page 33
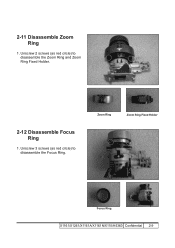
2-11 Disassemble Zoom Ring
1.
Zoom Ring
Zoom Ring Fixed Holder
Focus Ring
X1161/X1261/X1161A/X1161N/X110/H5360 Confidential 2- Unscrew 2 screws (as red circle) to disassemble the Zoom Ring and Zoom Ring Fixed Holder.
2-12 Disassemble Focus Ring
1. Unscrew 3 screws (as red circle) to disassemble the Focus Ring.
Acer X1161, X1261, X110 and H5360 Projector Series Service Guide - Page 34
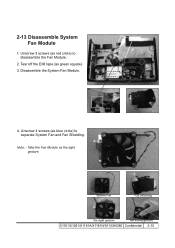
... red circle) to separate System Fan and Fan Shielding. Note: - System Fan
Fan Shielding
the right gesture
the wrong gesture
X1161/X1261/X1161A/X1161N/X110/H5360 Confidential 2-10 2-13 Disassemble System Fan Module
1. Unscrew 4 screws (as the right gesture. Take the Fan Module as blue circle) to...
Acer X1161, X1261, X110 and H5360 Projector Series Service Guide - Page 35

... as red circle). 3. Please detach the Circuit boards and follow local regulations for disposal. Disassemble the Blower.
2-15 Disassemble LVPS Module
1.
Unscrew 6 screws (as above image shows. AC Inlet Bracket
X1161/X1261/X1161A/X1161N/X110/H5360 Confidential 2-11 2-14 Disassemble Blower
1. Disassemble the LVPS Module and
the AC Inlet Bracket. 4. Unscrew 3 screws (as red circle...
Acer X1161, X1261, X110 and H5360 Projector Series Service Guide - Page 36

...10 cm² has been highlighted with the yellow rectangle as green square) to disassemble the Lamp Driver Module and Lamp Driver Holder. Unscrew 4 screws (as blue circle... follow local regulations for disposal.
Unscrew 2 screws (as yellow circle) to disassemble the cables from Lamp Driver Module.
4. 2-16 Disassemble Lamp Driver Module
1. Unscrew 1 screw (as red circle) to Lamp Cable...


