Acer Aspire X1430 Support Question
Acer Aspire X1430 Support Question
Find answers below for this question about Acer Aspire X1430.Need a Acer Aspire X1430 manual? We have 1 online manual for this item!
Question posted by ert1955 on May 28th, 2012
Nic Will Not Connect To Lan At Bootup.
When the PC is turned on the NIC will not connect to the LAN. But once booted and the patch cable is reseated the connection is established.
Current Answers
Related Acer Aspire X1430 Manual Pages
Acer Aspire X1430 and X1430G Desktop Service Guide - Page 1
Aspire AX1430 Desktop Computer Service Guide
PRINTED IN TAIWAN
Acer Aspire X1430 and X1430G Desktop Service Guide - Page 2
Revision History
Refer to the table below for changes made on this version of the Aspire AX1430 Desktop Computer Service Guide. Date
Chapter
Updates
ii
Aspire AX1430 Service Guide
Acer Aspire X1430 and X1430G Desktop Service Guide - Page 8
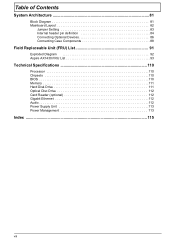
... Contents
System Architecture 81
Block Diagram 81 Mainboard Layout 82
Jumper Setting 83 Internal header pin definition 84 Connecting Optional Devices 86 Connecting Case Components 88
Field Replaceable Unit (FRU) List 91
Exploded Diagram 92 Aspire AX1430 FRU List 93
Technical Specifications 110
Processor 110 Chipsets 110 BIOS 110 Memory 111 Hard Disk...
Acer Aspire X1430 and X1430G Desktop Service Guide - Page 9
...x1 slot
• Wired LAN: Realtek RTL8111E-VL (...Aspire AX1430 Service Guide
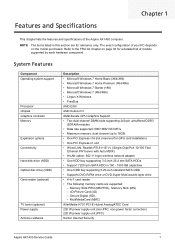
1 Features and Specifications
Chapter 1
This chapter lists the features and specifications of your PC... depends on page 93 for a detailed list of models supported by each hardware component. System Features
Component Operating system support
Processor Chipset Graphics controller Memory
Expansion options Connectivity...
Acer Aspire X1430 and X1430G Desktop Service Guide - Page 13
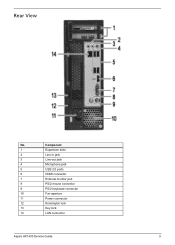
Component
1
Expansion slots
2
Line-in jack
3
Line-out jack
4
Microphone jack
5
USB 2.0 ports
6
HDMI connector
7
External monitor port
8
PS/2 mouse connector
9
PS/2 keyboard connector
10
Fan aperture
11
Power connector
12
Kensington lock
13
Key lock
14
LAN connector
Aspire AX1430 Service Guide
5 Rear View
No.
Acer Aspire X1430 and X1430G Desktop Service Guide - Page 25
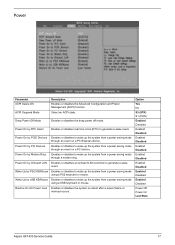
...Enabled Disabled
Enabled Disabled
Enabled Disabled
Enabled Disabled
Enabled Disabled
Power Off Power On Last State
Aspire AX1430 Service Guide
17
Wake Up by PCIE Devices Enables or disables to wake up ...power saving mode using a PS2 keyboard or mouse.
Power On by Onboard LAN Enables or disables an onboard LAN controller to wake up the system from a power saving mode through an ...
Acer Aspire X1430 and X1430G Desktop Service Guide - Page 27
...LAN
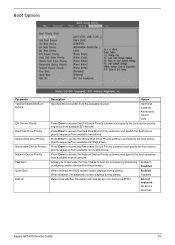
Press Enter to access the Optical Disk Drive Priority submenu and specify the boot device priority sequence from available EFI devices. Press Enter to access the EFI Device Priority submenu and specify the boot...Priority submenu and specify the boot device priority sequence from available removable drives.
All, but keyboard
No Errors
All Errors
Aspire AX1430 Service Guide
19
...
Acer Aspire X1430 and X1430G Desktop Service Guide - Page 29
...with their corresponding components to the computer and all connected peripheral devices from the computer. 4. Unplug the... and the optional card reader slots are empty. 2. Aspire AX1430 Service Guide
21 Disassembly Tools
In performing the disassembly... steady surface. Turn off the power to avoid mismatches when putting back the components. Unplug the network cable and all peripherals...
Acer Aspire X1430 and X1430G Desktop Service Guide - Page 31
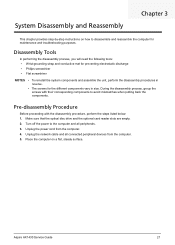
Release the front bezel retention tabs from the chassis. Pull the front bezel away from the chassis interior.
2. To detach the front bezel completely, you have to its connector on the mainboard.
NOTE: The power button and LED cable from the front bezel is still connected to remove the hard disk and optical drive. Aspire AX1430 Service Guide
23 Removing the Front Bezel
1.
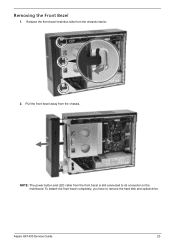
Acer Aspire X1430 and X1430G Desktop Service Guide - Page 50
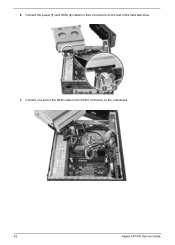
Secure the bracket to the front I/O and optional card reader assembly. .
42
Aspire AX1430 Service Guide 3. Connect the cables to the chassis with one screw. 5. Install the bracket into the chassis. 4.
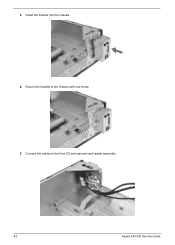
Acer Aspire X1430 and X1430G Desktop Service Guide - Page 51
6.
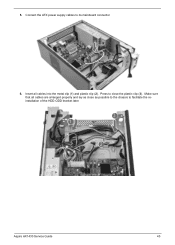
Slide the power supply module into the chassis (1) and tilt to their mainboard connectors.
Reinstalling the Power Supply Unit
1. Connect the front I/O and optional card reader cables to the left (2). Aspire AX1430 Service Guide
43
Acer Aspire X1430 and X1430G Desktop Service Guide - Page 53
Make sure that all cables into the metal clip (1) and plastic clip (2). Insert all cables are arranged properly and lay as possible to the chassis to facilitate the reinstallation of the HDD-ODD bracket later. 5.
Aspire AX1430 Service Guide
45 Press to its mainboard connector.
6. Connect the ATX power supply cables to close as close the plastic clip (3).
Acer Aspire X1430 and X1430G Desktop Service Guide - Page 56
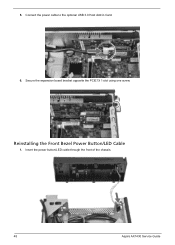
Reinstalling the Front Bezel Power Button/LED Cable
1. Insert the power button/LED cable through the front of the chassis.
48
Aspire AX1430 Service Guide 5.
Connect the power cable to the optional USB 3.0 Host Add in Card.
6. Secure the expansion board bracket opposite the PCIE1X 1 slot using one screw.
Acer Aspire X1430 and X1430G Desktop Service Guide - Page 57
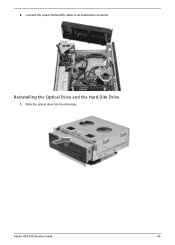
Reinstalling the Optical Drive and the Hard Disk Drive
1. Aspire AX1430 Service Guide
49 Slide the optical drive into the drive bay. Connect the power button/LED cable to its mainboard connector.
2.
Acer Aspire X1430 and X1430G Desktop Service Guide - Page 59
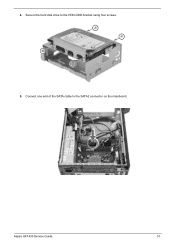
Secure the hard disk drive to the SATA2 connector on the mainboard. Connect one end of the SATA cable to the HDD-ODD bracket using four screws. 5.
Aspire AX1430 Service Guide
51 4.
Acer Aspire X1430 and X1430G Desktop Service Guide - Page 60
Connect one end of the hard disk drive. 7. 6. Connect the power (1) and SATA (2) cables to the SATA1 connector on the rear of the SATA cable to their connectors on the mainboard.
52
Aspire AX1430 Service Guide
Acer Aspire X1430 and X1430G Desktop Service Guide - Page 61
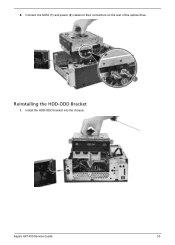
Connect the SATA (1) and power (2) cables to their connectors on the rear of the optical drive. Aspire AX1430 Service Guide
53 Install the HDD-ODD bracket into the chassis.
8. Reinstalling the HDD-ODD Bracket
1.
Acer Aspire X1430 and X1430G Desktop Service Guide - Page 63
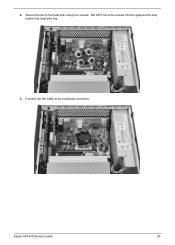
DO NOT force the screws into the gaps as this may deform the heat sink fins.
3. 2. Aspire AX1430 Service Guide
55 Connect the fan cable to the heat sink using four screws. Secure the fan to its mainboard connector.
Acer Aspire X1430 and X1430G Desktop Service Guide - Page 67
...the system will not power on page 74
to determine which corrective action to test Acer products. Aspire AX1430 Service Guide
59 Non-Acer products, prototype cards, or modified options can be determined, ...and the "Beep Codes" section on , do the following: • Check if the power cable is properly connected to the AC power jack and a functional AC power source. • Check if the voltage...
Acer Aspire X1430 and X1430G Desktop Service Guide - Page 68
...60
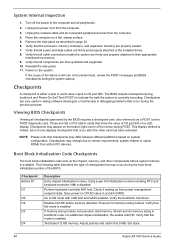
Aspire AX1430... that all cable connections inside the system...boot block initialization code sets up from the computer.
3.
If memory sizing module not executed, start memory refresh and do memory sizing in PCI devices. Test base 512 KB memory. If the cause of I /O initialization is enabled. Perform keyboard controller BAT test. System Internal Inspection
1. Turn...


