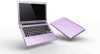
Acer Aspire V5-471 Support Question
Acer Aspire V5-471 Support Question
Find answers below for this question about Acer Aspire V5-471.Need a Acer Aspire V5-471 manual? We have 1 online manual for this item!
Question posted by Kansmi on June 7th, 2014
How To Remove Battery From Acer Notebook
The person who posted this question about this Acer product did not include a detailed explanation. Please use the "Request More Information" button to the right if more details would help you to answer this question.
Current Answers
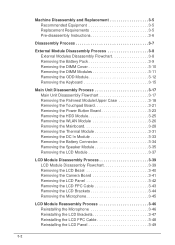
Related Acer Aspire V5-471 Manual Pages
Acer V5-471 Notebook Service Guide - Page 5
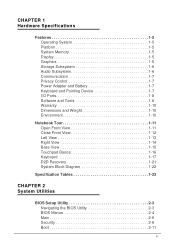
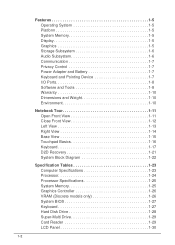
...Platform 1-5 System Memory 1-5 Display 1-5 Graphics 1-5 Storage Subsystem 1-6 Audio Subsystem 1-6 Communication 1-7 Privacy Control 1-7 Power Adapter and Battery 1-7 Keyboard and Pointing Device 1-7 I/O Ports 1-8 Software and Tools 1-8 Warranty 1-10 Dimensions and Weight 1-10 Environment 1-10
Notebook Tour 1-11 Open Front View 1-11 Close Front View 1-12 Left View 1-13 Right View...
Acer V5-471 Notebook Service Guide - Page 6
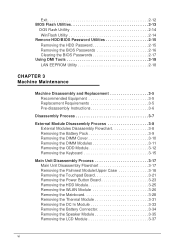
... Disassembly Flowchart 3-17 Removing the Palmrest Module/Upper Case 3-18 Removing the Touchpad Board 3-21 Removing the Power Button Board 3-23 Removing the HDD Module 3-25 Removing the WLAN Module 3-26 Removing the Mainboard 3-28 Removing the Thermal Module 3-31 Removing the DC In Module 3-33 Removing the Battery Connector 3-34 Removing the Speaker Module 3-35 Removing the LCD Module...
Acer V5-471 Notebook Service Guide - Page 7
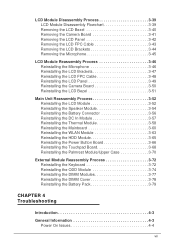
... Flowchart 3-39 Removing the LCD Bezel 3-40 Removing the Camera Board 3-41 Removing the LCD Panel 3-42 Removing the LCD FPC Cable 3-43 Removing the LCD Brackets 3-44 Removing the Microphone 3-45... 3-52 Reinstalling the LCD Module 3-52 Reinstalling the Speaker Module 3-54 Reinstalling the Battery Connector 3-56 Reinstalling the DC In Module 3-57 Reinstalling the Thermal Module 3-58...
Acer V5-471 Notebook Service Guide - Page 12
...Platform 1-5 System Memory 1-5 Display 1-5 Graphics 1-5 Storage Subsystem 1-6 Audio Subsystem 1-6 Communication 1-7 Privacy Control 1-7 Power Adapter and Battery 1-7 Keyboard and Pointing Device 1-7 I/O Ports 1-8 Software and Tools 1-8 Warranty 1-10 Dimensions and Weight 1-10 Environment 1-10
Notebook Tour 1-11 Open Front View 1-11 Close Front View 1-12 Left View 1-13 Right View...
Acer V5-471 Notebook Service Guide - Page 17
...0
WLAN:
IEEE 802.11b/g/n
Supports Acer SignalUp technology
LAN on Feature Port (thru bundled Y Cable):
...;Kensington lock slot
Power Adapter and Battery 0
19 V 3-pin 65 W AC adapter 4-Cell 2.8 Ah Li-ion battery pack Battery life: 4 hours Charging period...
Acer V5-471 Notebook Service Guide - Page 25
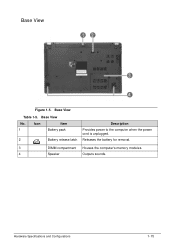
Icon
Item
1
Battery pack
2
Battery release latch
Description
Provides power to the computer when the power cord is unplugged.
Releases the battery for removal.
3
DIMM compartment Houses the computer's memory modules.
4
Speaker
Outputs sounds. Base View 0
Figure 1-5. Base View
No.
Hardware Specifications and Configurations
1-15
Base View
Table 1-5.
Acer V5-471 Notebook Service Guide - Page 77
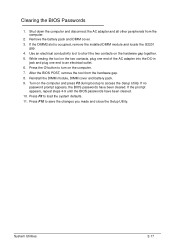
...the computer. 7. Remove the battery pack and DIMM cover. 3. After the BIOS POST, remove the tool from the computer.
2.
System Utilities
2-17 If the DIMM2 slot is occupied, remove the installed DIMM module...bootup to an electrical outlet. 6. Reinstall the DIMM module, DIMM cover and battery pack. 9. Shut down the computer and disconnect the AC adapter and all other peripherals from ...
Acer V5-471 Notebook Service Guide - Page 80
... the Palmrest Module/Upper Case 3-18 Removing the Touchpad Board 3-21 Removing the Power Button Board 3-23 Removing the HDD Module 3-25 Removing the WLAN Module 3-26 Removing the Mainboard 3-28 Removing the Thermal Module 3-31 Removing the DC In Module 3-33 Removing the Battery Connector 3-34 Removing the Speaker Module 3-35 Removing the LCD Module 3-37
LCD Module Disassembly Process...
Acer V5-471 Notebook Service Guide - Page 83
...
3-5 The screws for the different components vary in the same position.
During the removal and installation of the components, ensure all available cable channels and clips are used ... Replacement 0
This chapter contains step-by-step procedures on how to disassemble the notebook computer for preventing electrostatic discharge Non-marring scribe Phillips ...
Acer V5-471 Notebook Service Guide - Page 85
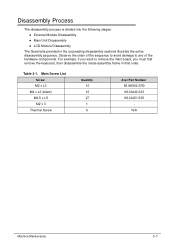
... illustrate the entire disassembly sequence. Table 3-1. Observe the order of the sequence to avoid damage to remove the main board, you want to any of the hardware components. Main Screw List Screw M2 ...M2 x L3 (black) M2.5 x L5 M2 x 3
Thermal Screw
Quantity 10 10 27 1 5
Acer Part Number 86.9A552.3R0 86.00J40.323 86.00J51.535 N/A
Machine Maintenance
3-7 Disassembly Process 0
The ...
Acer V5-471 Notebook Service Guide - Page 87
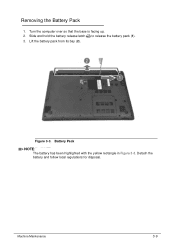
... and hold the battery release latch to release the battery pack (1). 3. Figure 3-3.
Machine Maintenance
3-9 Detach the battery and follow local regulations for disposal. Battery Pack
NOTE: NOTE:
The battery has been highlighted with the yellow rectangle in Figure 3-3. Removing the Battery Pack 0
1. Turn the computer over so that the base is facing up. 2. Lift the battery pack from...
Acer V5-471 Notebook Service Guide - Page 88
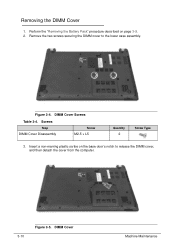
DIMM Cover
Machine Maintenance Perform the "Removing the Battery Pack" procedure described on the base door's notch to the lower case assembly. DIMM Cover Screws
Table 3-4. Insert a non-marring plastic scribe on page 3-9. 2. Removing the DIMM Cover 0
1. Remove the two screws securing the DIMM cover to release the DIMM cover, and then detach the cover...
Acer V5-471 Notebook Service Guide - Page 90
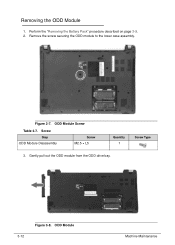
ODD Module
Machine Maintenance Perform the "Removing the Battery Pack" procedure described on page 3-9. 2. Figure 3-7. ODD Module Screw
Table 3-7. Screw Step
ODD Module Disassembly
Screw M2.5 × L5
Quantity 1
Screw Type
3. Gently pull out the ODD module from the ODD drive bay.
3-12
Figure 3-8. Removing the ODD Module 0
1. Remove the screw securing the ODD module...
Acer V5-471 Notebook Service Guide - Page 93

...
3-15 Take care not to the lower case. Perform the "Removing the ODD Module" procedure described on page 3-9. 2. Remove the screw securing the keyboard to use excessive force when removing. 1.
Screw Step
Keyboard Disassembly
Screw M2.5 × L5
Quantity 1
Screw Type
4. Perform the "Removing the Battery Pack" procedure described on page 3-12. 3. Turn the computer...
Acer V5-471 Notebook Service Guide - Page 95
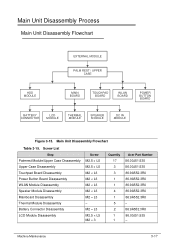
...
PALM REST / UPPER CASE
HDD MODULE
MAIN BOARD
TOUCHPAD BOARD
WLAN BOARD
POWER BUTTON BOARD
BATTERY CONNECTOR
LCD MODULE
THERMAL MODULE
SPEAKER MODULE
DC IN MODULE
Figure 3-15. Main Unit Disassembly ...M2 × L3 M2.5 × L5 M2 × 3
Quantity 17 3 3 1 1 4 1 5 2 1 1
Acer Part Number 86.00J51.535 86.00J51.535 86.9A552.3R0 86.9A552.3R0 86.9A552.3R0 86.9A552.3R0 86.9A552.3R0 -...
Acer V5-471 Notebook Service Guide - Page 112
... × L5
Quantity 2
Screw Type
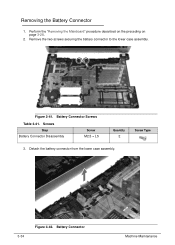
3. Battery Connector Screws
Table 3-41. Battery Connector
Machine Maintenance Remove the two screws securing the battery connector to the lower case assembly. Figure 3-41. Detach the battery connector from the lower case assembly.
3-34
Figure 3-42. Removing the Battery Connector 0
1. Perform the "Removing the Mainboard" procedure described on the...
Acer V5-471 Notebook Service Guide - Page 164
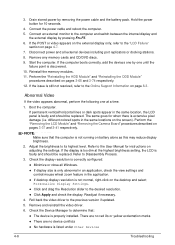
...device is extensive pixel damage (i.e. Check the Device Manager to the Online Support Information on battery alone as this may reduce display brightness.
2. Connect an external monitor to its highest ...the computer and switch between the internal display and the external display by removing the power cable and the battery pack. Refer to the previous version if updated. 5. Roll back the...
Acer V5-471 Notebook Service Guide - Page 177
...remains, replace the following devices:
Non-Acer devices Printer, mouse, and other external devices Battery pack Hard disk drive ... by a variety of reasons that all of the failure is inoperative. Remove power from the computer. 2. Remove or disconnect all attached devices are no error is detected, do not ...
Acer V5-471 Notebook Service Guide - Page 197
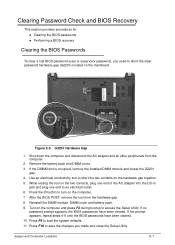
... computer and disconnect the AC adapter and all other peripherals from the hardware gap. 8. Press the button to short the two contacts on the computer. 7.
Remove the battery pack and DIMM cover. 3. If no
password prompt appears, the BIOS passwords have been cleared. 10. If the prompt appears, repeat steps 4-9 until the...
Acer V5-471 Notebook Service Guide - Page 207
....001 56.M1CN1.001 56.M3BN1.001 NI.23600.102 NI.23600.103 NI.23600.100
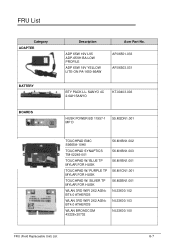
FRU (Field Replaceable Unit) List
6-7 FRU List 0
Category ADAPTER
BATTERY BOARDS
Description
ADP 65W 19V LV5 ADP-65VH BA LOW PROFILE ADP 65W 19V YELLOW LITE-ON PA-1650-86AW...
Similar Questions


How To Remove Battery From My Acer Aspire V5-471 Laptop
(Posted by reisnlg2 9 years ago)

How To Remove Battery Acer Aspire Laptop V5-571-6726
(Posted by vmnic 10 years ago)

How To Remove Battery From Acer Aspire V5-471g
i can't remove the battery of my laptop. i just want to remove it beacuse i heard that the battery o...
i can't remove the battery of my laptop. i just want to remove it beacuse i heard that the battery o...
(Posted by rob07daryl 10 years ago)