Acer Aspire 7741 Support Question
Acer Aspire 7741 Support Question
Find answers below for this question about Acer Aspire 7741.Need a Acer Aspire 7741 manual? We have 2 online manuals for this item!
Question posted by xyLIVA on November 18th, 2013
How To Access The Video Cable On Laptop Acer Aspire 7741z
The person who posted this question about this Acer product did not include a detailed explanation. Please use the "Request More Information" button to the right if more details would help you to answer this question.
Current Answers
Related Acer Aspire 7741 Manual Pages
Quick Start Guide - Page 4

All Rights Reserved. Copyright © 2010. Acer Incorporated. Aspire 7741 Series Quick Guide Original Issue: 02/2010
Aspire 7741 Series Notebook PC
Model number Serial number Date of purchase Place of purchase
Quick Start Guide - Page 5
... in Portable Document Format (PDF) and comes preloaded on the screen to access it contains warranty information and the general regulations and safety notices for certain ...Acer notebook, we have designed a set of guides:
First off, the poster helps you get started with language such as "only for your computer can help you use Adobe Reader, access the Help and Support menu. The Aspire...
Quick Start Guide - Page 6

webcam
(only for video communication.
Top view
1 11
2
3 4
10
5
6
9
7 8
#
Icon Item
Description
1
Acer Crystal Eye Web camera for certain models) English
4
Your Acer notebook tour
After setting up your computer as illustrated in the poster, let us show you around your new Acer notebook.
Quick Start Guide - Page 8
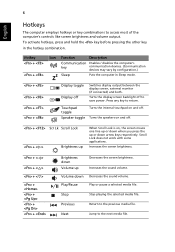
... between the display screen, external monitor (if connected) and both. Volume down arrow keys respectively.
Stop
Stop playing the selected media file.
Previous
Return to access most of the computer's controls like screen brightness and volume output. Scroll Lock does not work with some applications. To activate hotkeys, press and hold...
Quick Start Guide - Page 9
... to stay cool, even
after prolonged use.
4
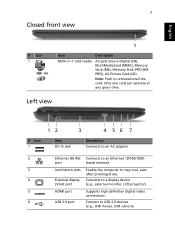
External display Connects to a display device
(VGA) port
(e.g., external monitor, LCD projector).
5
HDMI port
Supports high definition digital video
connections.
6
USB 2.0 port
Connect to an Ethernet 10/100/1000- Note: Push to remove/install the card.
Quick Start Guide - Page 10

....
English
8
# Icon 7
Item Microphone jack
Description
Accepts inputs from the drive.
Headphones/ speaker/line-out jack
Connects to a Kensington-compatible computer security lock.
Optical disk access Lights up when the optical drive is turned off . Right view
# Icon 1 2 3 4 5
6
1
2 3 45
6
Item
Description
USB 2.0 port
Connect to eject the optical drive tray when...
Quick Start Guide - Page 135

Aspire 7741 sorozat
Rövid útmutató
Quick Start Guide - Page 267

3
Acer
Acer
Aspire Aspire AcerSystem
AcerSystem PDF (Portable Document Format
1
Start All Programs AcerSystem
니다 . 2 AcerSystem
Adobe Reader Adobe Reader AcerSystem Adobe Reader Adobe Reader Help and Support
Service Guide - Page 1
for more information,
please refer to http://csd.acer.com.tw
PRINTED IN TAIWAN Aspire 4741 Series Service Guide
Service guide files and updates are available on the ACER/CSD web;
Service Guide - Page 3
Observe the order of the sequence to avoid damage to the system and all power and signal cables from the system.
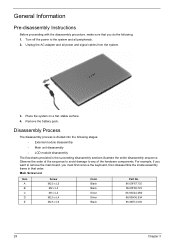
3. General Information
Pre-disassembly Instructions
Before proceeding with the disassembly procedure, make sure that you must first remove the keyboard, then disassemble ...
Service Guide - Page 11
... to the system. Size (Quantity) M2 x L3 (1)
Color Black
Torque 1.6 kgf-cm
Part No. 86.00F80.723
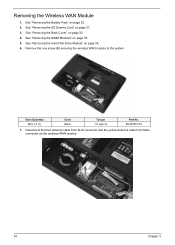
7. Disconnect the blue antenna cable from AUX connector and the yellow antenna cable from Main connector on page 32. 4. See "Removing the Back Cover" on the wireless WAN module.
36
Chapter 3
See "Removing the DIMM...
Service Guide - Page 12

... page 36. 7. See "Removing the Wireless WAN Module" on page 32. 4. NOTE: When attaching the antenna back to the wireless WAN module, make sure the cable are arranged properly.
Service Guide - Page 13

8. Remove the one screw (B) securing the WLAN module to the system. Size (Quantity) M2 x L3 (1)
Color Black
Torque 1.6 kgf-cm
Part No. 86.00F80.723
9. Disconnect the black antenna cable from MAIN connector and the white antenna cable from AUX connector on the WLAN module.
38
Chapter 3
Service Guide - Page 14
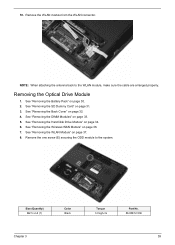
... WAN Module" on page 31. 3. Removing the Optical Drive Module
1. Remove the one screw (E) securing the ODD module to the WLAN module, make sure the cable are arranged properly.
See "Removing the DIMM Modules" on page 32. 4. See "Removing the Back Cover" on page 33. 5. See "Removing the WLAN Module" on...
Service Guide - Page 19
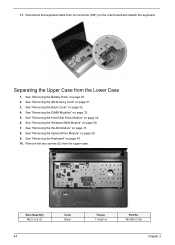
Disconnect the keyboard cable from its connector (KB1) on page 34. 6. Separating the Upper Case from the upper case. Remove the two screws (E) from the Lower Case
1. See "Removing ...
Service Guide - Page 20

11. Detach the power cable from its connector on the main board. Detach the touchpad cable from its connector on the main board. 12. Chapter 3
45 Detach the speaker cable from its connector on the main board. 13.
Service Guide - Page 23
... connector on page 33. 5. See "Removing the Wireless WAN Module" on page 31. 3. See "Removing the SD Dummy Card" on page 36. 7. Detach the microphone cable from the Lower Case" on page 30. 2. See "Removing the DIMM Modules" on the main board.
12. See "Removing the Hard Disk Drive Module" on...
Service Guide - Page 24
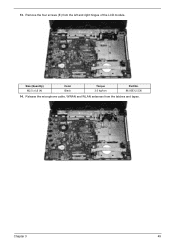
Size (Quantity) M2.5 x L6 (4)
Color Black
Torque 3.0 kgf-cm
Part No. 86.00E12.536
14. Remove the four screws (E) from the latches and tapes. Chapter 3
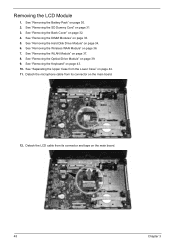
49 13. Release the microphone cable, WWAN and WLAN antennas from the left and right hinges of the LCD module.
Service Guide - Page 25

NOTE: When connecting the cable back to the unit, please note that the cable should be routed well.
50
Chapter 3 Carefully remove the LCD module from the hole(s). 16. Carefully pull out the wireless antenna cables from the base unit. 15.
Service Guide - Page 26
...
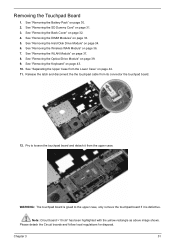
1. See "Removing the WLAN Module" on page 39. 9. See "Removing the Optical Drive Module" on page 37. 8. Release the latch and disconnect the the touchpad cable from the upper case. WARNING: The touchpad board is glued to loosen the touchpad board and detach it is defective. Note: Circuit board >10 cm...
Similar Questions

How To Change Out Lcd Video Cable For Acer Aspire 5534
(Posted by dorjcre 10 years ago)
How To Reset A Password On A Laptop Acer Aspire 7741z-4815
(Posted by racahmed 10 years ago)

Acer Aspire 7741z-4633 Microphone Jack Does Not Work.
My acer aspire 7741z-4633 microphone jack does not work. The regular speaker works but when I plug i...
My acer aspire 7741z-4633 microphone jack does not work. The regular speaker works but when I plug i...
(Posted by jmg0528 11 years ago)

Why Am I Getting Nothing But A Black Screen On My Acer Aspire 7741z?
why am i getting nothing but a black screen when i power up my aspire 7741Z?
why am i getting nothing but a black screen when i power up my aspire 7741Z?
(Posted by bmpatty2000 12 years ago)