Acer Aspire 5532 Support Question
Acer Aspire 5532 Support Question
Find answers below for this question about Acer Aspire 5532.Need a Acer Aspire 5532 manual? We have 2 online manuals for this item!
Question posted by raghurodcmi on July 8th, 2014
How To Remove The Cmos Battery From A Acer Laptop 5532
The person who posted this question about this Acer product did not include a detailed explanation. Please use the "Request More Information" button to the right if more details would help you to answer this question.
Current Answers
Related Acer Aspire 5532 Manual Pages
Acer Aspire 5532 Notebook Series Service Guide - Page 1
for more information,
please refer to http://csd.acer.com.tw
PRINTED IN TAIWAN Aspire 5532 Service Guide
Service guide files and updates are available on the ACER/CSD web;
Acer Aspire 5532 Notebook Series Service Guide - Page 7
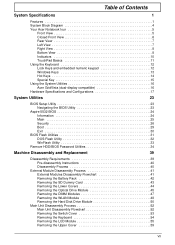
...BIOS Utility 23
Aspire 5532 BIOS 24 Information 24 Main 25 Security 26 Boot 29 Exit 30
BIOS Flash Utilities 31 DOS Flash Utility 32 WinFlash Utility 33
Remove HDD/BIOS ...Flowchart 41 Removing the Battery Pack 42 Removing the SD Dummy Card 43 Removing the Lower Covers 44 Removing the Optical Drive Module 45 Removing the DIMM Modules 47 Removing the WLAN Module 48 Removing the ...
Acer Aspire 5532 Notebook Series Service Guide - Page 9
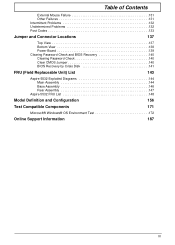
... Clearing Password Check and BIOS Recovery 140 Clearing Password Check 140 Clear CMOS Jumper 140 BIOS Recovery by Crisis Disk 141
FRU (Field Replaceable Unit) List
143
Aspire 5532 Exploded Diagrams 144 Main Assembly 144 Base Assembly 146 Rear Assembly 147
Aspire 5532 FRU List 148
Model Definition and Configuration
156
Test Compatible Components
171...
Acer Aspire 5532 Notebook Series Service Guide - Page 34
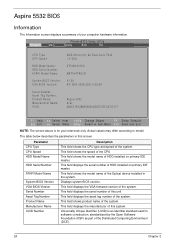
Aspire 5532 BIOS
Information
The Information screen displays a summary of HDD installed on primary IDE master.
This field...: UUID:
AMD Athlon(tm) 64 Dual-Core TK42 1.6 GHz
ST9160310AS
MATSHITADVD
V1.00 ATI M92 V008.050I.0-26.00
Aspire 5532 Acer 39353164386665643635001EECE1D377
F1 Help Esc Exit
Select Item F5/F6 Change Values
F9 Setup Defaults
Select Menu Enter Select Sub-Menu F10 Save...
Acer Aspire 5532 Notebook Series Service Guide - Page 50

...The disassembly process is faulty, such as the camera, antenna or LCD panel, the whole module must first remove the keyboard, then disassemble the inside assembly frame in the succeeding disassembly sections illustrate the entire disassembly sequence. ...17
86.N2802.004
SCREW M3*3
4
86.N2802.005
40
Chapter 3
Remove the battery pack.
Unplug the AC adapter and all peripherals. 2.
Acer Aspire 5532 Notebook Series Service Guide - Page 52
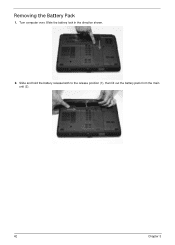
Slide and hold the battery release latch to the release position (1), then lift out the battery pack from the main unit (2). 2 1
42
Chapter 3 Slide the battery lock in the direction shown.
2. Removing the Battery Pack
1. Turn computer over.
Acer Aspire 5532 Notebook Series Service Guide - Page 54
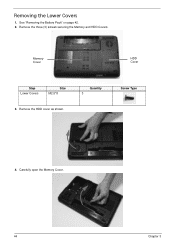
Remove the three (3) screws securing the Memory and HDD Covers. Quantity 3
Screw Type
4. Remove the HDD cover as shown. Carefully open the Memory Cover.
44
Chapter 3
Memory Cover
HDD Cover
Step Lower Covers
Size M2.5*8
3.
See "Removing the Battery Pack" on page 42. 2. Removing the Lower Covers
1.
Acer Aspire 5532 Notebook Series Service Guide - Page 55

Chapter 3
45 See "Removing the Battery Pack" on page 42. 2. Gently lever the ODD module out of the chassis.
4.
Pull the optical drive module out from the chassis. Remove the screw securing the ODD module. Insert a suitable tool into the access slot in the battery bay as shown. Step ODD Module
Size M2.5*8
Quantity 1
Screw Type
3. Removing the Optical Drive Module
1.
Acer Aspire 5532 Notebook Series Service Guide - Page 63

... tool (or finger) and pry the Switch Cover upward, away from the Upper Cover.
3. Lift the Switch Cover clear of the computer.
Chapter 3
53 See "Removing the Battery Pack" on the right side of plastic tools or fingers is recommended to the outer casing...
Acer Aspire 5532 Notebook Series Service Guide - Page 132
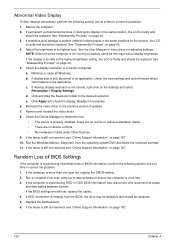
...Video Display
If video displays abnormally, perform the following actions one year old, replace the CMOS battery. 2. If extensive pixel damage is present (different colored spots in the same location, ...3. Readjust if necessary. 6. Roll back the video driver to correct the problem. 1. Remove and reinstall the video driver. 8. If the Issue is experiencing intermittent loss of BIOS ...
Acer Aspire 5532 Notebook Series Service Guide - Page 142
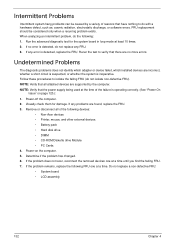
...does not recur, reconnect the removed devices one at the time of the following devices:
• Non-Acer devices • Printer, mouse, and other external devices • Battery pack • Hard disk... Power-on page 120.): 1. Follow these procedures to do not replace any FRU. 3. Remove or disconnect all attached devices are incorrect, whether a short circuit is suspected, or whether the...
Acer Aspire 5532 Notebook Series Service Guide - Page 150
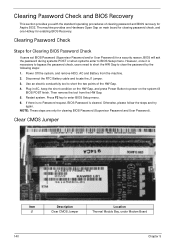
... by the following steps: 1. NOTE: These steps are only for Aspire 5532. Disconnect the RTC Battery cable and locate the J1 jumper. 3. Restart system. Power Off the system, and remove HDD, AC and Battery from the HW Gap. 5. Clear CMOS Jumper
Item J1
Description Clear CMOS Jumper
Location Thermal Module Bay, under Modem Board
140
Chapter 5 Clearing...
Acer Aspire 5532 Notebook Series Service Guide - Page 153
... of this chapter whenever ordering for parts to repair or for repair and service of Aspire 5532.
FRU (Field Replaceable Unit) List
Chapter 6
This chapter gives you should follow the...follow the rules set by your regional Acer office to order FRU parts for RMA (Return Merchandise Authorization).
For ACER AUTHORIZED SERVICE PROVIDERS, your Acer office may have a DIFFERENT part number ...
Acer Aspire 5532 Notebook Series Service Guide - Page 181

Refer to the Aspire 5532 Compatibility Test Report released by Acer's internal testing department. Regarding configuration, combination and test procedures, please refer to the following lists for components, adapter... and Windows® 7 environments. Test Compatible Components
Appendix B
This computer's compatibility is tested and verified by the Acer Mobile System Testing Department.
Aspire 5740DG Notebook Series Users Guide - Page 15
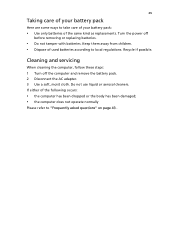
..." on page 43 . If either of the same kind as replacements. Do not use liquid or aerosol cleaners.
Turn the power off the computer and remove the battery pack. 2 Disconnect the AC adapter. 3 Use a soft, moist cloth. Cleaning and servicing
When cleaning the computer, follow these steps: 1 Turn off
before...
Aspire 5740DG Notebook Series Users Guide - Page 18
...
Music
21
Online Media (only for certain models)
22
YouTube
22
Flickr
22
Battery pack
23
Battery pack characteristics
23
Maximizing the battery's life
23
Installing and removing the battery pack
24
Charging the battery
25
Checking the battery level
25
Optimising battery life
25
Battery-low warning
26
Taking your notebook PC with you
27
Disconnecting from the...
Aspire 5740DG Notebook Series Users Guide - Page 44
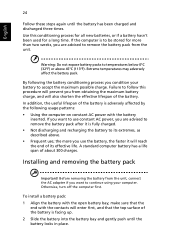
... unit, connect the AC adapter if you want to remove the battery pack after it will reach the end of the battery is facing up. 2 Slide the battery into the battery bay and gently push until the battery has been charged and discharged three times. Before removing the battery from the unit. If you want to be stored...
Aspire 5740DG Notebook Series Users Guide - Page 45
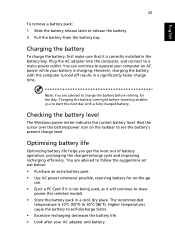
... computer on the taskbar to charge the battery before traveling enables you get the most out of battery operation, prolonging the charge/recharge cycle and improving recharging efficiency.
Checking the battery level
The Windows power meter indicates the current battery level. English
25
To remove a battery pack: 1 Slide the battery release latch to self-discharge faster. •...
Aspire 5740DG Notebook Series Users Guide - Page 57
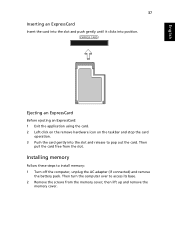
... the card gently into position.
Then turn the computer over to install memory: 1 Turn off the computer, unplug the AC adapter (if connected) and remove
the battery pack. English
37 Inserting an ExpressCard
Insert the card into the slot and push gently until it clicks into the slot and release to pop...
Aspire 5740DG Notebook Series Users Guide - Page 67
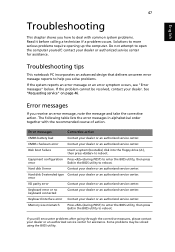
... action. contact your dealer. Troubleshooting tips
This notebook PC incorporates an advanced design that delivers onscreen error message reports to reboot. Error messages
Corrective action
CMOS battery bad
Contact your dealer or an authorized service center.
error
I/O parity error
Contact your dealer or an authorized service center.
Error messages
If you solve...
Similar Questions


