
AIWA CX-NA222 Support Question
AIWA CX-NA222 Support Question
Find answers below for this question about AIWA CX-NA222.Need a AIWA CX-NA222 manual? We have 1 online manual for this item!
Question posted by lysannejb on November 28th, 2012
How Do I Turn Off Alarm???
how do I turn off alarm?
Current Answers
Related AIWA CX-NA222 Manual Pages
Operating Instructions - Page 2
...Instructions and on a wall or ceiling, unless specified in the Operating
Instructions.
The heating system has just been turned on the unit. 2 Polarization - The unit is moved from a cold spot to overturn...secured to keep the Operating Instructions for a few hours,
then try again. Serial No. (Lot No.)
CX-NA222
SX-NA332 (For NSX-A222)
I SX-NA335 (For NSX-A223) I
I
[ SX-R275 (NSX...
Operating Instructions - Page 3
... the AC power cord from power lines. 2 Outdoor antenna grounding - When connecting an outdoor antenna, make
sure it is turned off. Foreign objects or liquid have gotten inside the unit
- The unit has been exposed to the National Electrical Code
GROUND...can be used for grounding terminals themselves.
Be sure the antenna system
is properly grounded to operate normally
-
Operating Instructions - Page 4
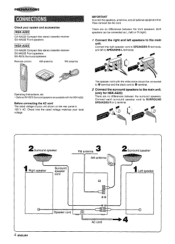
... local voltage,
The speaker cord with the NSX-A222,
Before connecting the AC cord The rated voltage of your system and accessories
= CX-NA222 Compact disc stereo cassette receiver SX-NA332 Front speakers
CX-NA222 Compact disc stereo cassette receiver SX-NA335 Front speakers SX-R275 Surround speakers
Remote control
AM antenna
FM antenna
IMPORTANT Connect the...
Operating Instructions - Page 5

... on a spot that can cause short circuits in a T-shape and fix its weight.
m
q Be sure to an AC outlet. To connect other optional equipment,
the stereo system itself, the AC cord or speaker cords, since noise will begin when the AC cord is recommended. To mount the surround speakers on the wall...
Operating Instructions - Page 6
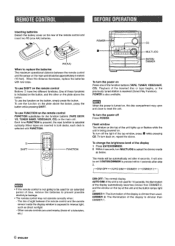
...are used for an extended period of the display 1 Press ENTER/DIMMER. 2 Within 4 seconds, turn back on, repeat the above the button, press the button while pressing SHIFT.
It will be ... Each time FUNCTION is pressed, the next function is being powered on.
E ... . 8
To turn the power off Press POWER. The remote control may open and close to select the dimmer mode
as...
Operating Instructions - Page 7

...to the score. Three numbers on the display.
Each time it
SUPER T-BASS SYSTEM
The T-BASS system enhances the realisn of equalizing. Turn the power on to the actual operation light up on the display start or ... number from 1 to MAX (31). m
Low frequency sound may be distorted when the T-BASS system is pressed, the level changes. The number on the main unit, or press VOL cm the ...
Operating Instructions - Page 8
...played back in . The selected equalization mode is displayed cyclically as follows. To select with a standard stereo plug (06.3 mm, '/4 inch).
CLASSIC-
To fast forward or rewind, press + or >. To...is designed for Type II tapes. However, "SOFT" playback will start play when the power is turned off (Direct Play Function) Press TAPE.
NO sound is switched to play (deck 2 only), ...
Operating Instructions - Page 9
To select a band with the remote control Press BAND while pressing SHIFT.
2 Press 7 Press TUNER BAND repeatedly to select the desired band.
~FM-
AMT
When TUNER BAND is pressed while the power is off, the power is turned on directly.
Operating Instructions - Page 10
... loaded. To remove discs, press A OPEN/CLOSE. When A OPEN/CLOSE is pressed, the power is turned on one compact disc on and play and continues to the beginning of time remaining until all discs in... malfunctions. q Do not place more than one disc tray. The power is also turned on tray 1 and 2. The selected track starts to open the disc compartment. pressed and release it...
Operating Instructions - Page 14
... printed on the second side. To check the order of recording
Time on cassette tapes and editing time The actual cassette recording time is displayed.
8 Turn over the tape in the CD compartment 1 Press CD EDIT/CHECK while pressing SHIFT on the remote
control to select side A or B. 2 Press DISC DIRECT...
Operating Instructions - Page 15
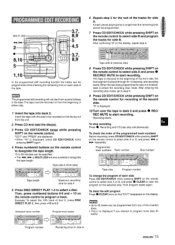
... than 30 tracks. Then program tracks again. 6 Repeat step 5 for the Irest of the tracks for side A.
'~',!,l',!,, ,gfi
A track whose playing time is displayed.
10 Turn over the tape in the tape.
In the programmed edit recording function the tracks can be programmed while checking the remaining time on each side...
Operating Instructions - Page 16

... clock display flashes.
1 Press 11 or ENTER. To check the time remaining until the power is turned off automatically at a specified time. 9
The clock is displayed. (The ":" between 5 and 240...seconds. When using the remote control, press CLOCK while pressing SHIFT.
2 Within 4 seconds, turn MULTI JOG to restore the previous time setting. Repeat the same procedure to designate
the hour ...
Operating Instructions - Page 17
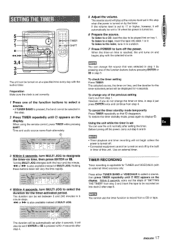
... TIMER repeatedly until ~ REC appears on by pressing one of "SETTING THE TIMER" from step 1.
Turning MULTI JOG changes both the hour and the minute. + or - or E iS alSO available instead... will not begin unless the
power is pressed within 4 seconds after setting the timer. Within 4 seconds, turn off the power, carry out step 5 and 6. To restore the timer standby mode, press again to...
Operating Instructions - Page 19
... step 2. high frequency sound is distorted. After every 20 to turn off -balance or not adequately high. An erroneous display or a malfunction occurs.
+ Reset the unit as... follows. 1 Press POWER to turn the power back on while pressing s
CLEAR. The reception contains noise interferences or the sound is not emitted - q Is the system picking up external noise or multipath distortion?
...
Operating Instructions - Page 20
... equipment generates, uses, and can be determined by turning the equipment off and on, the user is encouraged...or more
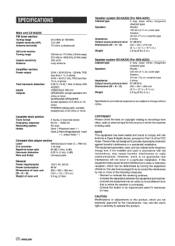
Cassette deck section Track format Frequency response Recording system Heads
4 tracks, 2 channels stereo 50 Hz -10000 HZ AC bias Deck 1: Playback head...is being used in a residential installation. Main unit CX-NA222
FM tuner section Tuning range Usable sensivity (IHF) Antenna...
Similar Questions

How Do You Repair The Volume Control On The Aiwa Stereo Model No. Cx-na71 ?
Once the volume is up and you try to turn it back down, the volume continues to go up.
Once the volume is up and you try to turn it back down, the volume continues to go up.
(Posted by Anonymous-120754 10 years ago)

I Dont Have A Remote For My Aiwa Cx - Na222 Digital Audio System.
(Posted by littlemissbitchrpt 11 years ago)

Cx-na71 When Sound Is Turned Up, The Numbers Go 0 1 2 Then Back To 0 And No Soun
When the sound is turned up it goes 0 1 2 then 0 and no sound.
When the sound is turned up it goes 0 1 2 then 0 and no sound.
(Posted by btdia1 11 years ago)

