8512161 - eMachines Desktop Hardware Reference Guide
Page 3
Contents Chapter 1: About This Reference 1 About this guide 2 Accessing the online User Guide 2 eMachines contact information 3 Microsoft Certificate of Authenticity 3 Chapter 2: Checking Out Your Computer 5 Front 6 Back 8 Chapter 3: Setting Up and Getting Started . . . 11 Working ...selection 15 Connecting to a broadband modem or network 15 Connecting a dial-up modem 16 Starting your computer 16 Waking up your computer 17 Turning off your computer 17 Restarting (rebooting) your computer 19 Using the keyboard 20 Using the mouse 22 Using optical drives 24 Features 24 Loading...
Contents Chapter 1: About This Reference 1 About this guide 2 Accessing the online User Guide 2 eMachines contact information 3 Microsoft Certificate of Authenticity 3 Chapter 2: Checking Out Your Computer 5 Front 6 Back 8 Chapter 3: Setting Up and Getting Started . . . 11 Working ...selection 15 Connecting to a broadband modem or network 15 Connecting a dial-up modem 16 Starting your computer 16 Waking up your computer 17 Turning off your computer 17 Restarting (rebooting) your computer 19 Using the keyboard 20 Using the mouse 22 Using optical drives 24 Features 24 Loading...
8512161 - eMachines Desktop Hardware Reference Guide
Page 13
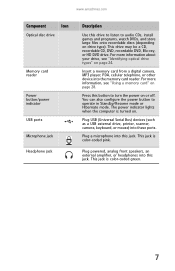
www.emachines.com Component Icon Optical disc drive Memory card reader Power button/power indicator USB ports Microphone jack Headphone jack Description Use this jack. You can also configure the power button to turn the power on or off. Plug a microphone into this button to operate in ...Standby/Resume mode or Hibernate mode. Press this jack. For more information about your drive, see "Using a memory card" on . This jack is turned on page 28. Insert a memory card from a digital camera, MP3 player, PDA, cellular telephone, or other device into these ports. Plug USB ...
www.emachines.com Component Icon Optical disc drive Memory card reader Power button/power indicator USB ports Microphone jack Headphone jack Description Use this jack. You can also configure the power button to turn the power on or off. Plug a microphone into this button to operate in ...Standby/Resume mode or Hibernate mode. Press this jack. For more information about your drive, see "Using a memory card" on . This jack is turned on page 28. Insert a memory card from a digital camera, MP3 player, PDA, cellular telephone, or other device into these ports. Plug USB ...
8512161 - eMachines Desktop Hardware Reference Guide
Page 17
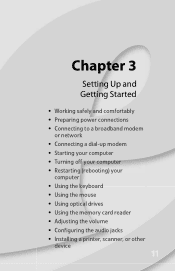
Chapter 3 Setting Up and Getting Started • Working safely and comfortably • Preparing power connections • Connecting to a broadband modem or network • Connecting a dial-up modem • Starting your computer • Turning off your computer • Restarting (rebooting) your computer • Using the keyboard • Using the mouse • Using optical drives • Using the memory card reader • Adjusting the volume • Configuring the audio jacks • Installing a printer, scanner, or other device 11
Chapter 3 Setting Up and Getting Started • Working safely and comfortably • Preparing power connections • Connecting to a broadband modem or network • Connecting a dial-up modem • Starting your computer • Turning off your computer • Restarting (rebooting) your computer • Using the keyboard • Using the mouse • Using optical drives • Using the memory card reader • Adjusting the volume • Configuring the audio jacks • Installing a printer, scanner, or other device 11
8512161 - eMachines Desktop Hardware Reference Guide
Page 21
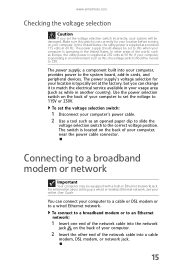
Make sure this when your computer is typically set correctly for your location before turning on the back of your computer. 2 Insert the other areas of the world, such as while in Ethernet (network) jack. In other end of the ... a cable or DSL modem or to a broadband modem or network Important Your computer may be damaged. If your computer, near the power cable connector. www.emachines.com Checking the voltage selection Caution If you can connect your computer to set the voltage to this switch is supplied at 230 volts at...
Make sure this when your computer is typically set correctly for your location before turning on the back of your computer. 2 Insert the other areas of the world, such as while in Ethernet (network) jack. In other end of the ... a cable or DSL modem or to a broadband modem or network Important Your computer may be damaged. If your computer, near the power cable connector. www.emachines.com Checking the voltage selection Caution If you can connect your computer to set the voltage to this switch is supplied at 230 volts at...
8512161 - eMachines Desktop Hardware Reference Guide
Page 22
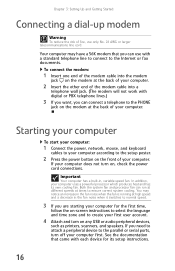
... correct system cooling. If your computer uses a powerful processor which produces heat and has its setup instructions. 16 In addition, your computer does not turn on the modem at the back of your computer. 2 Insert the other end of your computer. If you are starting your computer for its own... each device for the first time, follow the on-screen instructions to select the language and time zone and to the parallel or serial ports, turn on the modem at high speed and a decrease in , variable-speed fan. Chapter 3: Setting Up and Getting Started Connecting a dial-up modem Warning ...
... correct system cooling. If your computer uses a powerful processor which produces heat and has its setup instructions. 16 In addition, your computer does not turn on the modem at the back of your computer. 2 Insert the other end of your computer. If you are starting your computer for its own... each device for the first time, follow the on-screen instructions to select the language and time zone and to the parallel or serial ports, turn on the modem at high speed and a decrease in , variable-speed fan. Chapter 3: Setting Up and Getting Started Connecting a dial-up modem Warning ...

8512161 - eMachines Desktop Hardware Reference Guide
Page 23
... all electrical power from your computer's Start menu, click (Start). Turning off your computer for long periods. In order to "wake" it up your computer Tip For more information about five seconds, then release it. www.emachines.com 5 To open your computer, unplug the power cord and modem... cable from the wall outlets. When you have not used for several minutes, it has been turned completely off your computer will not be used your computer...
... all electrical power from your computer's Start menu, click (Start). Turning off your computer for long periods. In order to "wake" it up your computer Tip For more information about five seconds, then release it. www.emachines.com 5 To open your computer, unplug the power cord and modem... cable from the wall outlets. When you have not used for several minutes, it has been turned completely off your computer will not be used your computer...
8512161 - eMachines Desktop Hardware Reference Guide
Page 24
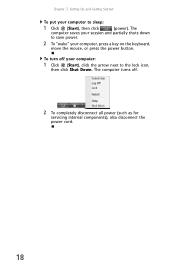
To turn off . 2 To completely disconnect all power (such as for servicing internal components), also disconnect the power cord. 18 The computer saves your computer to sleep: 1 Click (Start), then click (power). Chapter 3: Setting Up and Getting Started To put your session and partially shuts down to the lock icon, then click Shut Down. The computer turns off your computer: 1 Click (Start), click the arrow next to save power. 2 To "wake" your computer, press a key on the keyboard, move the mouse, or press the power button.
To turn off . 2 To completely disconnect all power (such as for servicing internal components), also disconnect the power cord. 18 The computer saves your computer to sleep: 1 Click (Start), then click (power). Chapter 3: Setting Up and Getting Started To put your session and partially shuts down to the lock icon, then click Shut Down. The computer turns off your computer: 1 Click (Start), click the arrow next to save power. 2 To "wake" your computer, press a key on the keyboard, move the mouse, or press the power button.
8512161 - eMachines Desktop Hardware Reference Guide
Page 25
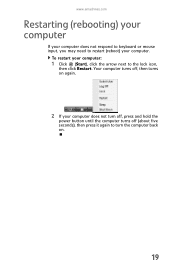
www.emachines.com Restarting (rebooting) your computer If your computer does not respond to keyboard or mouse input, you may need to the lock icon, then click Restart. To restart your computer: 1 Click (Start), click the arrow next to restart (reboot) your computer does not turn off, press and hold the power button until the computer turns off (about five seconds), then press it again to turn the computer back on. 19 Your computer turns off, then turns on again. 2 If your computer.
www.emachines.com Restarting (rebooting) your computer If your computer does not respond to keyboard or mouse input, you may need to the lock icon, then click Restart. To restart your computer: 1 Click (Start), click the arrow next to restart (reboot) your computer does not turn off, press and hold the power button until the computer turns off (about five seconds), then press it again to turn the computer back on. 19 Your computer turns off, then turns on again. 2 If your computer.

8512161 - eMachines Desktop Hardware Reference Guide
Page 27
... the function. Press the corresponding key to search the Internet, or launch your NUM LOCK, CAPS LOCK, or SCROLL LOCK key is turned on. 21 Press one of these keys to type numbers when the numeric keypad (NUM LOCK) is activated. Press these keys to ...used in Windows. Show if your Internet home page or e-mail program. Each program uses different function keys for different purposes. www.emachines.com Feature Icon Editing buttons Function keys Internet buttons Audio playback buttons Navigation keys Indicators Windows keys Application key Directional keys Numeric keypad ...
... the function. Press the corresponding key to search the Internet, or launch your NUM LOCK, CAPS LOCK, or SCROLL LOCK key is turned on. 21 Press one of these keys to type numbers when the numeric keypad (NUM LOCK) is activated. Press these keys to ...used in Windows. Show if your Internet home page or e-mail program. Each program uses different function keys for different purposes. www.emachines.com Feature Icon Editing buttons Function keys Internet buttons Audio playback buttons Navigation keys Indicators Windows keys Application key Directional keys Numeric keypad ...
8512161 - eMachines Desktop Hardware Reference Guide
Page 35
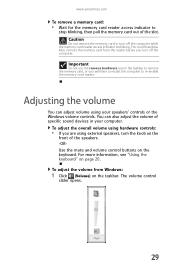
Also, remove the memory card from Windows: 1 Click (Volume) on page 20. For more information, see "Using the keyboard" on the taskbar. www.emachines.com To remove a memory card: • Wait for the memory card reader access indicator to remove the memory card, or you are using your computer. ... Do not use the remove hardware icon in your speakers' controls or the Windows volume controls. To adjust the volume from the reader before you turn the knob on the front of specific sound devices in the taskbar to stop blinking, then pull the memory card out of the slot. You...
Also, remove the memory card from Windows: 1 Click (Volume) on page 20. For more information, see "Using the keyboard" on the taskbar. www.emachines.com To remove a memory card: • Wait for the memory card reader access indicator to remove the memory card, or you are using your computer. ... Do not use the remove hardware icon in your speakers' controls or the Windows volume controls. To adjust the volume from the reader before you turn the knob on the front of specific sound devices in the taskbar to stop blinking, then pull the memory card out of the slot. You...
8512161 - eMachines Desktop Hardware Reference Guide
Page 40
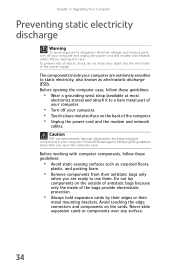
...electrostatic discharge (ESD). Chapter 4: Upgrading Your Computer Preventing static electricity discharge Warning To avoid exposure to dangerous electrical voltages and moving parts, turn off your computer and unplug the power cord and modem and network cables before opening the computer case, follow these guidelines: • ...Wear a grounding wrist strap (available at most electronics stores) and attach it to a bare metal part of your computer. • Turn off your computer. • Touch a bare metal surface on the outside of antistatic bags because only the inside your computer.
...electrostatic discharge (ESD). Chapter 4: Upgrading Your Computer Preventing static electricity discharge Warning To avoid exposure to dangerous electrical voltages and moving parts, turn off your computer and unplug the power cord and modem and network cables before opening the computer case, follow these guidelines: • ...Wear a grounding wrist strap (available at most electronics stores) and attach it to a bare metal part of your computer. • Turn off your computer. • Touch a bare metal surface on the outside of antistatic bags because only the inside your computer.
8512161 - eMachines Desktop Hardware Reference Guide
Page 41
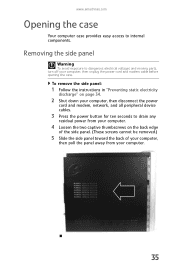
www.emachines.com Opening the case Your computer case provides easy access to drain any residual power from your computer. 4 Loosen the two captive thumbscrews on page .... 3 Press the power button for ten seconds to internal components. Removing the side panel Warning To avoid exposure to dangerous electrical voltages and moving parts, turn off your computer. 35 To remove the side panel: 1 Follow the instructions in "Preventing static electricity discharge" on the back edge of the side panel...
www.emachines.com Opening the case Your computer case provides easy access to drain any residual power from your computer. 4 Loosen the two captive thumbscrews on page .... 3 Press the power button for ten seconds to internal components. Removing the side panel Warning To avoid exposure to dangerous electrical voltages and moving parts, turn off your computer. 35 To remove the side panel: 1 Follow the instructions in "Preventing static electricity discharge" on the back edge of the side panel...
8512161 - eMachines Desktop Hardware Reference Guide
Page 47
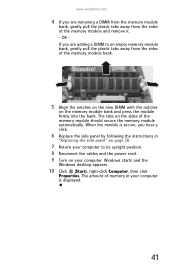
... on the sides of the memory module and remove it. - When the module is displayed. 41 www.emachines.com 4 If you are adding a DIMM to its upright position. 8 Reconnect the cables and the power cord. 9 Turn on your computer is secure, you hear a click. 6 Replace the side panel by following the instructions...
... on the sides of the memory module and remove it. - When the module is displayed. 41 www.emachines.com 4 If you are adding a DIMM to its upright position. 8 Reconnect the cables and the power cord. 9 Turn on your computer is secure, you hear a click. 6 Replace the side panel by following the instructions...
8512161 - eMachines Desktop Hardware Reference Guide
Page 55
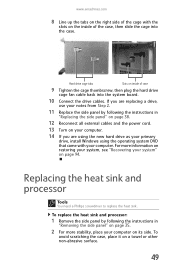
... the side panel by following the instructions in "Replacing the side panel" on page 38. 12 Reconnect all external cables and the power cord. 13 Turn on your computer. 14 If you are using the new hard drive as your primary drive, install Windows using the operating system DVD that came... with the slots on the inside of the case, then slide the cage into the system board. 10 Connect the drive cables. www.emachines.com 8 Line up the tabs on the right side of the cage with your computer. To replace the heat sink and processor: 1 Remove the side...
... the side panel by following the instructions in "Replacing the side panel" on page 38. 12 Reconnect all external cables and the power cord. 13 Turn on your computer. 14 If you are using the new hard drive as your primary drive, install Windows using the operating system DVD that came... with the slots on the inside of the case, then slide the cage into the system board. 10 Connect the drive cables. www.emachines.com 8 Line up the tabs on the right side of the cage with your computer. To replace the heat sink and processor: 1 Remove the side...
8512161 - eMachines Desktop Hardware Reference Guide
Page 59
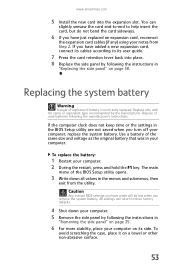
... the instructions in your computer, replace the system battery. To avoid scratching the case, place it on a towel or other non-abrasive surface. 53 www.emachines.com 5 Install the new card into place. 8 Replace the side panel by following the instructions in "Replacing the side panel" on page 38. Replacing the... from Step 2. You can slightly seesaw the card end-to-end to help insert the card, but do not bend the card sideways. 6 If you turn off your computer. The main menu of the same size and voltage as the original battery that was in "Removing the side panel" on page...
... the instructions in your computer, replace the system battery. To avoid scratching the case, place it on a towel or other non-abrasive surface. 53 www.emachines.com 5 Install the new card into place. 8 Replace the side panel by following the instructions in "Replacing the side panel" on page 38. Replacing the... from Step 2. You can slightly seesaw the card end-to-end to help insert the card, but do not bend the card sideways. 6 If you turn off your computer. The main menu of the same size and voltage as the original battery that was in "Removing the side panel" on page...
8512161 - eMachines Desktop Hardware Reference Guide
Page 60
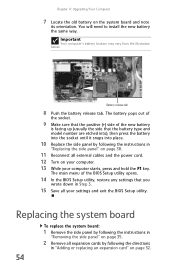
... Reconnect all expansion cards by following the directions in "Removing the side panel" on page 35. 2 Remove all external cables and the power cord. 12 Turn on the system board and note its orientation. You will need to install the new battery the same way. Important Your computer's battery location may...
... Reconnect all expansion cards by following the directions in "Removing the side panel" on page 35. 2 Remove all external cables and the power cord. 12 Turn on the system board and note its orientation. You will need to install the new battery the same way. Important Your computer's battery location may...
8512161 - eMachines Desktop Hardware Reference Guide
Page 65
Dust and dirt can clog the internal mechanisms and can erase data on hard drives. • Never turn off your computer when the drive indicator is safest at temperatures that are not covered under a standard warranty. • Avoid dusty or dirty work environments. ...; When storing your computer for an extended period of time, unplug AC power. 59 The case, although strong, is not covered by your warranty. www.emachines.com Caring for your computer To extend the life of your computer: • Be careful not to bump or drop your computer, and do not...
Dust and dirt can clog the internal mechanisms and can erase data on hard drives. • Never turn off your computer when the drive indicator is safest at temperatures that are not covered under a standard warranty. • Avoid dusty or dirty work environments. ...; When storing your computer for an extended period of time, unplug AC power. 59 The case, although strong, is not covered by your warranty. www.emachines.com Caring for your computer To extend the life of your computer: • Be careful not to bump or drop your computer, and do not...

8512161 - eMachines Desktop Hardware Reference Guide
Page 66
... extension • Cotton swabs • An optical disc drive cleaning kit Cleaning the exterior Warning When you shut down your computer, the power turns off and unplugged, brush the dust away from dust helps keep the vents free of your system. Chapter 5: Maintaining Your Computer Cleaning your computer.... With your computer and other peripheral devices before cleaning any water into the vents. 60 You may want to clean your computer turned off , but some electrical current still flows through the vents on components. • Your computer is cooled by air circulated through it.
... extension • Cotton swabs • An optical disc drive cleaning kit Cleaning the exterior Warning When you shut down your computer, the power turns off and unplugged, brush the dust away from dust helps keep the vents free of your system. Chapter 5: Maintaining Your Computer Cleaning your computer.... With your computer and other peripheral devices before cleaning any water into the vents. 60 You may want to clean your computer turned off , but some electrical current still flows through the vents on components. • Your computer is cooled by air circulated through it.

8512161 - eMachines Desktop Hardware Reference Guide
Page 67
www.emachines.com Cleaning the keyboard You should occasionally clean the keyboard to remove dust and lint trapped under the keys. 2 If you may need to replace ... coated glass and can of air with a damp, lint-free cloth. 61 Squirt a little cleaner on the cloth (never directly on the keyboard, turn off your computer and turn the keyboard upside down. Let the liquid drain, then let the keyboard dry before trying to use a soft cloth and water to clean...
www.emachines.com Cleaning the keyboard You should occasionally clean the keyboard to remove dust and lint trapped under the keys. 2 If you may need to replace ... coated glass and can of air with a damp, lint-free cloth. 61 Squirt a little cleaner on the cloth (never directly on the keyboard, turn off your computer and turn the keyboard upside down. Let the liquid drain, then let the keyboard dry before trying to use a soft cloth and water to clean...
8512161 - eMachines Desktop Hardware Reference Guide
Page 80
Warning Make sure that you use a power strip or surge protector, make sure that it is turned on the screen, write down the exact message. Type the keyword/phrase troubleshooting in a program, see "Preventing static electricity discharge" on and ...not work, make sure that you have problems with your computer, try these safety guidelines: Warning Never open your computer case while your computer is turned on page 34. Help For more information about troubleshooting, click Start, then click Help and Support. Chapter 6: Troubleshooting Safety guidelines While troubleshooting your ...
Warning Make sure that you use a power strip or surge protector, make sure that it is turned on the screen, write down the exact message. Type the keyword/phrase troubleshooting in a program, see "Preventing static electricity discharge" on and ...not work, make sure that you have problems with your computer, try these safety guidelines: Warning Never open your computer case while your computer is turned on page 34. Help For more information about troubleshooting, click Start, then click Help and Support. Chapter 6: Troubleshooting Safety guidelines While troubleshooting your ...


