
8512161 - eMachines Desktop Hardware Reference Guide
Page 21
...emachines.com Checking the voltage selection Caution If you can connect your computer to a cable or DSL modem or to a broadband modem or network Important Your computer may be equipped with a built-in Ethernet (network) jack. Make sure this switch is supplied at a nominal 115 volts at 60 Hz. The power supply... the electrical service available in your computer, provides power to 115V or 230V. The power supply, a component built into a cable modem, DSL modem, or network jack. 15 The power supply should be damaged. Use the power selection switch on the back of your computer. ...
...emachines.com Checking the voltage selection Caution If you can connect your computer to a cable or DSL modem or to a broadband modem or network Important Your computer may be equipped with a built-in Ethernet (network) jack. Make sure this switch is supplied at a nominal 115 volts at 60 Hz. The power supply... the electrical service available in your computer, provides power to 115V or 230V. The power supply, a component built into a cable modem, DSL modem, or network jack. 15 The power supply should be damaged. Use the power selection switch on the back of your computer. ...

8512161 - eMachines Desktop Hardware Reference Guide
Page 23
... turn off your computer is much faster than turning on the power button flashes. Waking your computer from your computer, press and hold the power button for several minutes, it does turn off . 17 www.emachines.com 5 To open your online User Guide. Important If for... using your computer's menus, see the "Customizing" chapter in Sleep mode, the power indicator on your computer for about changing the power button mode, see "Using Windows" and "Customizing Windows" in the power supply and system board remain energized. If your computer, certain components in your computer's ...
... turn off your computer is much faster than turning on the power button flashes. Waking your computer from your computer, press and hold the power button for several minutes, it does turn off . 17 www.emachines.com 5 To open your online User Guide. Important If for... using your computer's menus, see the "Customizing" chapter in Sleep mode, the power indicator on your computer for about changing the power button mode, see "Using Windows" and "Customizing Windows" in the power supply and system board remain energized. If your computer, certain components in your computer's ...
8512161 - eMachines Desktop Hardware Reference Guide
Page 61
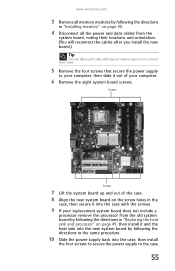
... the new board.) Tip You can label each cable with the screws. 9 If your computer. 6 Remove the eight system board screws. www.emachines.com 3 Remove all the power and data cables from the old system board by following the directions in "Replacing the heat sink and processor" on page 49, then..." on page 40. 4 Disconnect all memory modules by following the directions in the same procedure. 10 Slide the power supply back into the case, then install the four screws to secure the power supply to your computer, then slide it out of the case. 8 Align the new system board on the screw holes...
... the new board.) Tip You can label each cable with the screws. 9 If your computer. 6 Remove the eight system board screws. www.emachines.com 3 Remove all the power and data cables from the old system board by following the directions in "Replacing the heat sink and processor" on page 49, then..." on page 40. 4 Disconnect all memory modules by following the directions in the same procedure. 10 Slide the power supply back into the case, then install the four screws to secure the power supply to your computer, then slide it out of the case. 8 Align the new system board on the screw holes...

8512161 - eMachines Desktop Hardware Reference Guide
Page 110
... Customer Care: • Make sure that you did not purchase the hardware or software from CD or DVD" appears, press any key to boot from eMachines, see the manufacturer's documentation and technical support resources. • If you have "how to" questions about using a program, see "Recovering pre-installed software and drivers...
... Customer Care: • Make sure that you did not purchase the hardware or software from CD or DVD" appears, press any key to boot from eMachines, see the manufacturer's documentation and technical support resources. • If you have "how to" questions about using a program, see "Recovering pre-installed software and drivers...
8512161 - eMachines Desktop Hardware Reference Guide
Page 128
... 7 power supply 15 printer installing 32 parallel port 9 setting default 92 troubleshooting 92 USB port 7, 9 programs closing unresponsive 19 opening 23 recovery discs 96, 98 re-installing 95 PS/2 port keyboard 8 mouse 9 R RAM See memory rebooting computer 19 recordable drive 7 recording audio files 27 optical... discs 27 recovering defaults 102 drivers 95 programs 95 software 95 system 94 Windows 95 with eMachines Recovery Center 97 with Windows DVD 103 with Windows...
... 7 power supply 15 printer installing 32 parallel port 9 setting default 92 troubleshooting 92 USB port 7, 9 programs closing unresponsive 19 opening 23 recovery discs 96, 98 re-installing 95 PS/2 port keyboard 8 mouse 9 R RAM See memory rebooting computer 19 recordable drive 7 recording audio files 27 optical... discs 27 recovering defaults 102 drivers 95 programs 95 software 95 system 94 Windows 95 with eMachines Recovery Center 97 with Windows DVD 103 with Windows...
8512780 - eMachines Desktop PC User Guide
Page 77
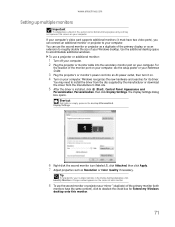
... Windows desktop onto this section are for its driver. You can connect an additional monitor or projector to install the driver from the disc supplied by the manufacturer or download the driver from the manufacturer's Web site. 5 After the driver is installed, click (Start), Control Panel,...the setup poster or your Reference Guide. 3 Plug the projector's or monitor's power cord into the secondary monitor port on the screen of your computer. The Display Settings dialog box opens. www.emachines.com Setting up multiple monitors Important The dialog boxes shown in the Display Settings ...
... Windows desktop onto this section are for its driver. You can connect an additional monitor or projector to install the driver from the disc supplied by the manufacturer or download the driver from the manufacturer's Web site. 5 After the driver is installed, click (Start), Control Panel,...the setup poster or your Reference Guide. 3 Plug the projector's or monitor's power cord into the secondary monitor port on the screen of your computer. The Display Settings dialog box opens. www.emachines.com Setting up multiple monitors Important The dialog boxes shown in the Display Settings ...


