User Guide
Page 4
... 46 Removing the side panel 46 Removing the front bezel 47 Closing the case 48 Replacing the side panel 48 Replacing the front bezel 49 Installing memory 50 Replacing the system battery 52 6 Troubleshooting 55 Safety guidelines 56 First steps 56 Troubleshooting 57 Add-in cards... 57 Audio 57 Battery 57 CD or DVD drives 57 Computer 59 Diskette drive 59 DVD drives 60 File management 60 Hard drive 61 Internet 62 Keyboard 63 Memory 64 ii www.eMachines...
... 46 Removing the side panel 46 Removing the front bezel 47 Closing the case 48 Replacing the side panel 48 Replacing the front bezel 49 Installing memory 50 Replacing the system battery 52 6 Troubleshooting 55 Safety guidelines 56 First steps 56 Troubleshooting 57 Add-in cards... 57 Audio 57 Battery 57 CD or DVD drives 57 Computer 59 Diskette drive 59 DVD drives 60 File management 60 Hard drive 61 Internet 62 Keyboard 63 Memory 64 ii www.eMachines...
User Guide
Page 43
Chapter 5 Maintaining Your Computer • Caring for your computer • Updating Windows • Protecting your computer from viruses • Cleaning your computer • Restoring your system • Opening the computer case • Adding memory and replacing the battery 37
Chapter 5 Maintaining Your Computer • Caring for your computer • Updating Windows • Protecting your computer from viruses • Cleaning your computer • Restoring your system • Opening the computer case • Adding memory and replacing the battery 37
User Guide
Page 58
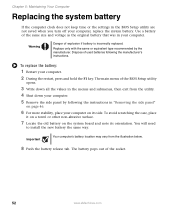
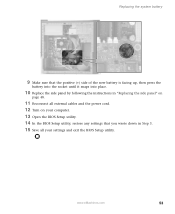
.... To avoid scratching the case, place it on a towel or other non-abrasive surface. 7 Locate the old battery on its orientation. Dispose of explosion if battery is incorrectly replaced. Use a battery of the socket. 52 www.eMachines.com The main menu of the BIOS Setup utility opens. 3 Write down your computer. 5 Remove the side panel...
.... To avoid scratching the case, place it on a towel or other non-abrasive surface. 7 Locate the old battery on its orientation. Dispose of explosion if battery is incorrectly replaced. Use a battery of the socket. 52 www.eMachines.com The main menu of the BIOS Setup utility opens. 3 Write down your computer. 5 Remove the side panel...
User Guide
Page 59
Replacing the system battery 9 Make sure that the positive (+) side of the new battery is facing up, then press the battery into the socket until it snaps into place. 10 Replace the side panel by following the instructions in "Replacing the side panel" on page 48. 11 Reconnect all external cables and the power cord. 12 Turn on your computer. 13 Open the BIOS Setup utility. 14 In the BIOS Setup utility, restore any settings that you wrote down in Step 3. 15 Save all your settings and exit the BIOS Setup utility. www.eMachines.com 53
Replacing the system battery 9 Make sure that the positive (+) side of the new battery is facing up, then press the battery into the socket until it snaps into place. 10 Replace the side panel by following the instructions in "Replacing the side panel" on page 48. 11 Reconnect all external cables and the power cord. 12 Turn on your computer. 13 Open the BIOS Setup utility. 14 In the BIOS Setup utility, restore any settings that you wrote down in Step 3. 15 Save all your settings and exit the BIOS Setup utility. www.eMachines.com 53
User Guide
Page 82
Appendix A: Important safety information Your eMachines system is designed and tested to meet the latest standards for safety of explosion if the CMOS battery is replaced incorrectly. Setting up your work surface. ■ The product should be operated only from the type of power source indicated on the rating label. ■ ...
Appendix A: Important safety information Your eMachines system is designed and tested to meet the latest standards for safety of explosion if the CMOS battery is replaced incorrectly. Setting up your work surface. ■ The product should be operated only from the type of power source indicated on the rating label. ■ ...
User Guide
Page 89
... jack 11 line out jack 11 microphone jack 9, 11 muting 21 audio CD See CD audio in jack 11 audio playback buttons 23 B battery replacing 52 bezel removing 47 replacing 49 broadband connection 27 connecting 12 buttons See keys and buttons C cable modem 27 connecting 12 Caps Lock indicator 23 cards inserting memory... 11 to Ethernet 12 to Ethernet network 27 to Internet 12, 27 to network 12, 27 connections audio in 11 digital camera 9, 11, 28 www.eMachines.com 83
... jack 11 line out jack 11 microphone jack 9, 11 muting 21 audio CD See CD audio in jack 11 audio playback buttons 23 B battery replacing 52 bezel removing 47 replacing 49 broadband connection 27 connecting 12 buttons See keys and buttons C cable modem 27 connecting 12 Caps Lock indicator 23 cards inserting memory... 11 to Ethernet 12 to Ethernet network 27 to Internet 12, 27 to network 12, 27 connections audio in 11 digital camera 9, 11, 28 www.eMachines.com 83
User Guide
Page 91
...66 files opening 25 troubleshooting 60 finding Help and Support topics 4 Firewire port 9, 12, 28 folders opening 25 front bezel removing 49 replacing 49 function keys 23 H hard drive indicator 9 troubleshooting 61 headphone jack 9, 11 help online 5 using 3 Help and Support 3 searching... camera 28 front bezel 47 memory 50 peripheral devices 28 printer 28 scanner 28 side panel 46 system battery 52 Internet broadband connection 27 buttons 23 troubleshooting 62, 66 J jacks See connections K keyboard buttons 22...L label Microsoft Certificate of Authenticity 13 model number 13 www.eMachines.com 85
...66 files opening 25 troubleshooting 60 finding Help and Support topics 4 Firewire port 9, 12, 28 folders opening 25 front bezel removing 49 replacing 49 function keys 23 H hard drive indicator 9 troubleshooting 61 headphone jack 9, 11 help online 5 using 3 Help and Support 3 searching... camera 28 front bezel 47 memory 50 peripheral devices 28 printer 28 scanner 28 side panel 46 system battery 52 Internet broadband connection 27 buttons 23 troubleshooting 62, 66 J jacks See connections K keyboard buttons 22...L label Microsoft Certificate of Authenticity 13 model number 13 www.eMachines.com 85
User Guide
Page 94
muting 21 speaker jack 11 Standby mode 9 starting computer 9, 19 programs 25 static electricity 45 surge protector 18 system battery replacing 52 system identification label 9, 13 T technical support Technical Support 74 tips before contacting 73 telephone jack 11 telephone support 73 troubleshooting add-...against 39 removing with Norton AntiVirus 39 voltage switch 11 volume adjusting 21 adjusting modem 67 controls 21 muting 21 troubleshooting 72 W Web site eMachines 3 Windows Product Key Code 13 Windows key 23 Windows Media Player 35 Windows Update 38 working safely 16 Z Zip drive port 9, 11 ...
muting 21 speaker jack 11 Standby mode 9 starting computer 9, 19 programs 25 static electricity 45 surge protector 18 system battery replacing 52 system identification label 9, 13 T technical support Technical Support 74 tips before contacting 73 telephone jack 11 telephone support 73 troubleshooting add-...against 39 removing with Norton AntiVirus 39 voltage switch 11 volume adjusting 21 adjusting modem 67 controls 21 muting 21 troubleshooting 72 W Web site eMachines 3 Windows Product Key Code 13 Windows key 23 Windows Media Player 35 Windows Update 38 working safely 16 Z Zip drive port 9, 11 ...


