
User Guide
Page 3
... 3 Help and Support 3 Searching for a topic 4 BigFix 4 Online help 5 eMachines contact information 6 2 Checking Out Your eMachines Computer 7 Desktop PC Front 8 Desktop PC Back 10 Identifying your model 13 eMachines model and serial number 13 Microsoft Certificate of Authenticity 13 3 Getting Started 15 Working...17 Protecting from power source problems 18 Checking the voltage selection 18 Starting your computer 19 Waking up your computer 20 Turning off your computer 20 Restarting (rebooting) your computer 21 Adjusting the volume 21 Using the keyboard 22 Enhanced keyboard 22...
... 3 Help and Support 3 Searching for a topic 4 BigFix 4 Online help 5 eMachines contact information 6 2 Checking Out Your eMachines Computer 7 Desktop PC Front 8 Desktop PC Back 10 Identifying your model 13 eMachines model and serial number 13 Microsoft Certificate of Authenticity 13 3 Getting Started 15 Working...17 Protecting from power source problems 18 Checking the voltage selection 18 Starting your computer 19 Waking up your computer 20 Turning off your computer 20 Restarting (rebooting) your computer 21 Adjusting the volume 21 Using the keyboard 22 Enhanced keyboard 22...
User Guide
Page 15
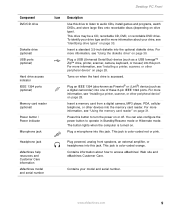
..., or other peripheral device" on page 28. For more information about how to turn the power on . Plug a microphone into this port. Headphone jack eMachines help resources and Customer Care information eMachines model and serial number Plug powered, analog front speakers, an external amplifier, or headphones...depending on page 31. This jack is accessed. Contains your drive, see "Using the memory card reader" on drive type). www.eMachines.com 9 For more information, see "Identifying drive types" on page 30. To identify your drive type and for more information, see...
..., or other peripheral device" on page 28. For more information about how to turn the power on . Plug a microphone into this port. Headphone jack eMachines help resources and Customer Care information eMachines model and serial number Plug powered, analog front speakers, an external amplifier, or headphones...depending on page 31. This jack is accessed. Contains your drive, see "Using the memory card reader" on drive type). www.eMachines.com 9 For more information, see "Identifying drive types" on page 30. To identify your drive type and for more information, see...
User Guide
Page 17
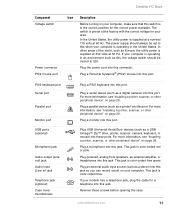
... printer, scanner, or other peripheral device" on page 28. Desktop PC Back Component Voltage switch Power connector PS/2 mouse port Icon Description Before turning on your area. Plug a parallel device (such as Europe, the utility power is preset at the factory with the correct voltage for the correct... is color-coded red or pink. Plug a monitor into this port. This jack is supplied at a nominal 115 volts at 50 Hz. www.eMachines.com 11 For more information, see "Installing a printer, scanner, or other peripheral device" on page 28. Remove these ports. The switch is ...
... printer, scanner, or other peripheral device" on page 28. Desktop PC Back Component Voltage switch Power connector PS/2 mouse port Icon Description Before turning on your area. Plug a parallel device (such as Europe, the utility power is preset at the factory with the correct voltage for the correct... is color-coded red or pink. Plug a monitor into this port. This jack is supplied at a nominal 115 volts at 50 Hz. www.eMachines.com 11 For more information, see "Installing a printer, scanner, or other peripheral device" on page 28. Remove these ports. The switch is ...

User Guide
Page 21
Chapter 3 Getting Started • Using your computer safely • Protecting your computer from power source problems • Turning your computer on and off • Adjusting the volume • Using the keyboard and the mouse • Using the computer display • Installing peripheral devices 15
Chapter 3 Getting Started • Using your computer safely • Protecting your computer from power source problems • Turning your computer on and off • Adjusting the volume • Using the keyboard and the mouse • Using the computer display • Installing peripheral devices 15

User Guide
Page 24
..., use a surge protector that has a modem jack. The voltage selection for your location before turning on the back of time with a UPS, a UPS lets you set the voltage selection switch incorrectly, your computer to 230. 18 www.eMachines.com Make sure this when your computer during a power failure. Chapter 3: Getting Started Protecting...
..., use a surge protector that has a modem jack. The voltage selection for your location before turning on the back of time with a UPS, a UPS lets you set the voltage selection switch incorrectly, your computer to 230. 18 www.eMachines.com Make sure this when your computer during a power failure. Chapter 3: Getting Started Protecting...
User Guide
Page 25
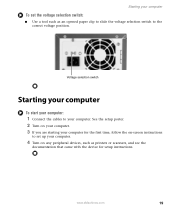
Voltage selection switch Starting your computer To start your computer: 1 Connect the cables to your computer. 4 Turn on -screen instructions to the correct voltage position. See the setup poster. 2 Turn on your computer. 3 If you are starting your computer for the first time, follow the on any peripheral devices, such as an opened... the voltage selection switch: ■ Use a tool such as printers or scanners, and see the documentation that came with the device for setup instructions. www.eMachines.com 19 Starting your computer To set up your computer.
Voltage selection switch Starting your computer To start your computer: 1 Connect the cables to your computer. 4 Turn on -screen instructions to the correct voltage position. See the setup poster. 2 Turn on your computer. 3 If you are starting your computer for the first time, follow the on any peripheral devices, such as an opened... the voltage selection switch: ■ Use a tool such as printers or scanners, and see the documentation that came with the device for setup instructions. www.eMachines.com 19 Starting your computer To set up your computer.

User Guide
Page 26
... indicator flashes. In order to remove all electrical power from your computer. The Turn Off Computer dialog box opens. 2 Click Turn Off. Important If for about five seconds, then release it. 20 www.eMachines.com Windows shuts down and turns off your computer, unplug the power cord and modem cable from the wall outlets...
... indicator flashes. In order to remove all electrical power from your computer. The Turn Off Computer dialog box opens. 2 Click Turn Off. Important If for about five seconds, then release it. 20 www.eMachines.com Windows shuts down and turns off your computer, unplug the power cord and modem cable from the wall outlets...
User Guide
Page 27
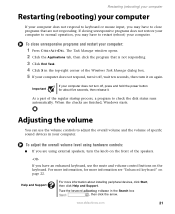
...operation, you may have to close unresponsive programs and restart your computer does not respond, turn it off , press and hold the power button for more information about five seconds,...As a part of the regular startup process, a program to restart (reboot) your computer does not turn the knob on the keyboard. When the checks are not responding. For more information, for about ... 1 Press CTRL+ALT+DEL. To adjust the overall volume level using external speakers, turn off , wait ten seconds, then turn it . The Task Manager window opens. 2 Click the Applications tab, then click the...
...operation, you may have to close unresponsive programs and restart your computer does not respond, turn it off , press and hold the power button for more information about five seconds,...As a part of the regular startup process, a program to restart (reboot) your computer does not turn the knob on the keyboard. When the checks are not responding. For more information, for about ... 1 Press CTRL+ALT+DEL. To adjust the overall volume level using external speakers, turn off , wait ten seconds, then turn it . The Task Manager window opens. 2 Click the Applications tab, then click the...
User Guide
Page 29
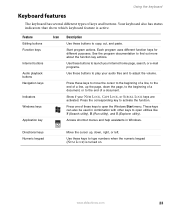
... indicators that show which keyboard feature is turned on. Use these keys to type numbers when the numeric keypad (NUM LOCK) is active. Each program uses different function keys for different purposes. These keys can also be used in Windows. Start program actions. www.eMachines.com 23 Directional keys Numeric keypad Move...
... indicators that show which keyboard feature is turned on. Use these keys to type numbers when the numeric keypad (NUM LOCK) is active. Each program uses different function keys for different purposes. These keys can also be used in Windows. Start program actions. www.eMachines.com 23 Directional keys Numeric keypad Move...
User Guide
Page 38
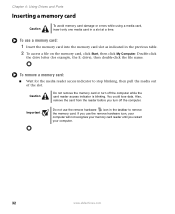
You could lose data. Caution Do not remove the memory card or turn off the computer while the card reader access indicator is blinking. To use a memory card: 1 Insert the memory card into the memory card slot as .... Important Do not use the remove hardware icon, your computer will not recognize your memory card reader until you restart your computer. 32 www.eMachines.com If you turn off the computer. Chapter 4: Using Drives and Ports Inserting a memory card Caution To avoid memory card damage or errors while using a media card...
You could lose data. Caution Do not remove the memory card or turn off the computer while the card reader access indicator is blinking. To use a memory card: 1 Insert the memory card into the memory card slot as .... Important Do not use the remove hardware icon, your computer will not recognize your memory card reader until you restart your computer. 32 www.eMachines.com If you turn off the computer. Chapter 4: Using Drives and Ports Inserting a memory card Caution To avoid memory card damage or errors while using a media card...
User Guide
Page 46
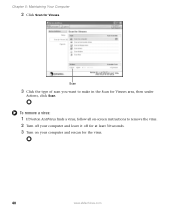
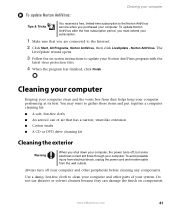
Chapter 5: Maintaining Your Computer 2 Click Scan for Viruses area, then under Actions, click Scan. Scan 3 Click the type of scan you want to remove the virus. 2 Turn off your computer and rescan for the virus. 40 www.eMachines.com To remove a virus: 1 If Norton AntiVirus finds a virus, follow all on your computer and leave it off for at least 30 seconds. 3 Turn on -screen instructions to make in the Scan for Viruses.
Chapter 5: Maintaining Your Computer 2 Click Scan for Viruses area, then under Actions, click Scan. Scan 3 Click the type of scan you want to remove the virus. 2 Turn off your computer and rescan for the virus. 40 www.eMachines.com To remove a virus: 1 If Norton AntiVirus finds a virus, follow all on your computer and leave it off for at least 30 seconds. 3 Turn on -screen instructions to make in the Scan for Viruses.
User Guide
Page 47
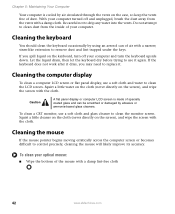
...9632; Cotton swabs ■ A CD or DVD drive cleaning kit Cleaning the exterior Warning When you shut down your computer, the power turns off your computer and other parts of air that you purchased your computer. Cleaning your computer Keeping your computer performing at its best. ...the wall outlets. Do not use abrasive or solvent cleaners because they can of your system. www.eMachines.com 41 The LiveUpdate wizard opens. 3 Follow the on components. Always turn off , but some electrical current still flows through your Norton AntiVirus program with the latest virus protection ...
...9632; Cotton swabs ■ A CD or DVD drive cleaning kit Cleaning the exterior Warning When you shut down your computer, the power turns off your computer and other parts of air that you purchased your computer. Cleaning your computer Keeping your computer performing at its best. ...the wall outlets. Do not use abrasive or solvent cleaners because they can of your system. www.eMachines.com 41 The LiveUpdate wizard opens. 3 Follow the on components. Always turn off , but some electrical current still flows through your Norton AntiVirus program with the latest virus protection ...
User Guide
Page 48
.... If the keyboard does not work after it dries, you spill liquid on the case, so keep the vents free of dust. With your computer turned off your computer. If you may need to remove dust and lint trapped under the keys. Caution A flat panel display or computer LCD screen is... into the vents. Squirt a little water on the cloth (never directly on the screen), and wipe the screen with a damp lint-free cloth 42 www.eMachines.com To clean a CRT monitor, use a soft cloth and water to clean dust from the vents with the cloth. Do not attempt to clean the...
.... If the keyboard does not work after it dries, you spill liquid on the case, so keep the vents free of dust. With your computer turned off your computer. If you may need to remove dust and lint trapped under the keys. Caution A flat panel display or computer LCD screen is... into the vents. Squirt a little water on the cloth (never directly on the screen), and wipe the screen with a damp lint-free cloth 42 www.eMachines.com To clean a CRT monitor, use a soft cloth and water to clean dust from the vents with the cloth. Do not attempt to clean the...
User Guide
Page 49
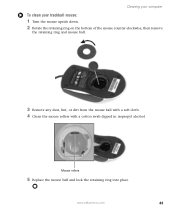
www.eMachines.com 43 Cleaning your computer To clean your trackball mouse: 1 Turn the mouse upside down. 2 Rotate the retaining ring on the bottom of the mouse counter-clockwise, then remove the retaining ring and mouse ball. 3 Remove any dust, lint, or dirt from the mouse ball with a soft cloth. 4 Clean the mouse rollers with a cotton swab dipped in isopropyl alcohol. Mouse rollers 5 Replace the mouse ball and lock the retaining ring into place.
www.eMachines.com 43 Cleaning your computer To clean your trackball mouse: 1 Turn the mouse upside down. 2 Rotate the retaining ring on the bottom of the mouse counter-clockwise, then remove the retaining ring and mouse ball. 3 Remove any dust, lint, or dirt from the mouse ball with a soft cloth. 4 Clean the mouse rollers with a cotton swab dipped in isopropyl alcohol. Mouse rollers 5 Replace the mouse ball and lock the retaining ring into place.
User Guide
Page 51
... the inside your computer. www.eMachines.com 45 Caution ESD can permanently damage electrostatic discharge-sensitive components in your computer and unplug the power cord and modem and network cables before opening the computer case, follow these guidelines: ■ Turn off your computer. ■...packing foam. ■ Remove components from their metal mounting brackets. Warning To avoid exposure to dangerous electrical voltages and moving parts, turn off your computer. Avoid touching the edge connectors and components on the back of the computer. ■ Unplug the power cord...
... the inside your computer. www.eMachines.com 45 Caution ESD can permanently damage electrostatic discharge-sensitive components in your computer and unplug the power cord and modem and network cables before opening the computer case, follow these guidelines: ■ Turn off your computer. ■...packing foam. ■ Remove components from their metal mounting brackets. Warning To avoid exposure to dangerous electrical voltages and moving parts, turn off your computer. Avoid touching the edge connectors and components on the back of the computer. ■ Unplug the power cord...
User Guide
Page 52
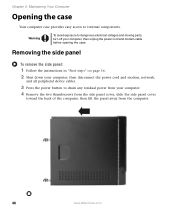
... computer, then disconnect the power cord and modem, network, and all peripheral device cables. 3 Press the power button to dangerous electrical voltages and moving parts, turn off your computer. 4 Remove the two thumbscrews from the side panel cover, slide the side panel cover toward the back of the computer, then lift...
... computer, then disconnect the power cord and modem, network, and all peripheral device cables. 3 Press the power button to dangerous electrical voltages and moving parts, turn off your computer. 4 Remove the two thumbscrews from the side panel cover, slide the side panel cover toward the back of the computer, then lift...
User Guide
Page 57
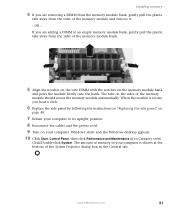
OR If you are adding a DIMM to its upright position. 8 Reconnect the cables and the power cord. 9 Turn on your computer to an empty memory module bank, gently pull the plastic tabs away from the sides of the memory module and remove it. - ... the module is shown at the bottom of the System Properties dialog box in "Replacing the side panel" on page 48. 7 Return your computer. www.eMachines.com 51 The amount of memory in your computer is secure, you hear a click. 6 Replace the side panel by following the instructions in the General...
OR If you are adding a DIMM to its upright position. 8 Reconnect the cables and the power cord. 9 Turn on your computer to an empty memory module bank, gently pull the plastic tabs away from the sides of the memory module and remove it. - ... the module is shown at the bottom of the System Properties dialog box in "Replacing the side panel" on page 48. 7 Return your computer. www.eMachines.com 51 The amount of memory in your computer is secure, you hear a click. 6 Replace the side panel by following the instructions in the General...
User Guide
Page 58
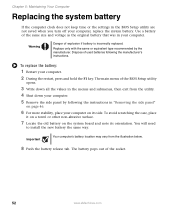
... and voltage as the original battery that was in the BIOS Setup utility are not saved when you turn off your computer, replace the system battery. Warning Danger of the socket. 52 www.eMachines.com The battery pops out of explosion if battery is incorrectly replaced. To replace the battery: 1 Restart your...
... and voltage as the original battery that was in the BIOS Setup utility are not saved when you turn off your computer, replace the system battery. Warning Danger of the socket. 52 www.eMachines.com The battery pops out of explosion if battery is incorrectly replaced. To replace the battery: 1 Restart your...
User Guide
Page 59
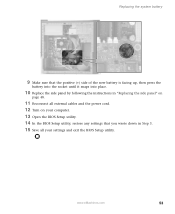
Replacing the system battery 9 Make sure that the positive (+) side of the new battery is facing up, then press the battery into the socket until it snaps into place. 10 Replace the side panel by following the instructions in "Replacing the side panel" on page 48. 11 Reconnect all external cables and the power cord. 12 Turn on your computer. 13 Open the BIOS Setup utility. 14 In the BIOS Setup utility, restore any settings that you wrote down in Step 3. 15 Save all your settings and exit the BIOS Setup utility. www.eMachines.com 53
Replacing the system battery 9 Make sure that the positive (+) side of the new battery is facing up, then press the battery into the socket until it snaps into place. 10 Replace the side panel by following the instructions in "Replacing the side panel" on page 48. 11 Reconnect all external cables and the power cord. 12 Turn on your computer. 13 Open the BIOS Setup utility. 14 In the BIOS Setup utility, restore any settings that you wrote down in Step 3. 15 Save all your settings and exit the BIOS Setup utility. www.eMachines.com 53
User Guide
Page 62
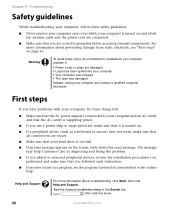
...Instead, unplug your computer and contact a qualified computer technician. Warning To avoid bodily injury, do not attempt to your computer is turned on page 56. For more information about preventing damage from static electricity, see the program's printed documentation or the online help Customer ...Care in the Search box , then click the arrow. 56 www.eMachines.com First steps If you are connected. ■ Make sure that you have problems with your computer, try these safety guidelines: &#...
...Instead, unplug your computer and contact a qualified computer technician. Warning To avoid bodily injury, do not attempt to your computer is turned on page 56. For more information about preventing damage from static electricity, see the program's printed documentation or the online help Customer ...Care in the Search box , then click the arrow. 56 www.eMachines.com First steps If you are connected. ■ Make sure that you have problems with your computer, try these safety guidelines: &#...

