
User Guide
Page 18
...17 Setting passwords 17 Expanding through options 18 Connectivity options 18 Built-in network feature 18 Universal Serial Bus (USB) 18 Installing memory 19 BIOS utility 20 Boot sequence 20 Enable disk-to RF fields (RSS-102) 36 LCD panel ergonomic specifications 36 Low-...-210) 36 Exposure of humans to -disk recovery 20 Password 20 Using software 21 Playing DVD movies 21 Power management 22 eMachines Recovery Management 23 Burn backup discs 24 Restore 25 Restore Windows from backup discs 26 Troubleshooting 29 Troubleshooting tips 29 Error messages 29...
...17 Setting passwords 17 Expanding through options 18 Connectivity options 18 Built-in network feature 18 Universal Serial Bus (USB) 18 Installing memory 19 BIOS utility 20 Boot sequence 20 Enable disk-to RF fields (RSS-102) 36 LCD panel ergonomic specifications 36 Low-...-210) 36 Exposure of humans to -disk recovery 20 Password 20 Using software 21 Playing DVD movies 21 Power management 22 eMachines Recovery Management 23 Burn backup discs 24 Restore 25 Restore Windows from backup discs 26 Troubleshooting 29 Troubleshooting tips 29 Error messages 29...
User Guide
Page 37
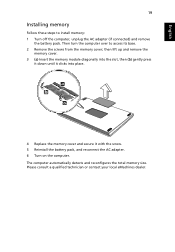
Please consult a qualified technician or contact your local eMachines dealer. English 19 Installing memory Follow these steps to access its base. 2 Remove the screws from the memory cover; Then turn the computer over to install memory: 1 Turn off the computer, unplug the AC adapter (if connected) ... The computer automatically detects and reconfigures the total memory size. then lift up and remove the memory cover. 3 (a) Insert the memory module diagonally into the slot, then (b) gently press it down until it clicks into place. 4 Replace the memory cover and secure it with the screw. ...
Please consult a qualified technician or contact your local eMachines dealer. English 19 Installing memory Follow these steps to access its base. 2 Remove the screws from the memory cover; Then turn the computer over to install memory: 1 Turn off the computer, unplug the AC adapter (if connected) ... The computer automatically detects and reconfigures the total memory size. then lift up and remove the memory cover. 3 (a) Insert the memory module diagonally into the slot, then (b) gently press it down until it clicks into place. 4 Replace the memory cover and secure it with the screw. ...

User Guide
Page 40
... configuration and power interface (ACPI), which allows for your computer. English 22 Power management This computer has a built-in order to the computer, and video memory. If no activity is detected for a period of the following devices: keyboard, mouse, hard disk, peripherals connected to conserve energy. System activity refers to any...
... configuration and power interface (ACPI), which allows for your computer. English 22 Power management This computer has a built-in order to the computer, and video memory. If no activity is detected for a period of the following devices: keyboard, mouse, hard disk, peripherals connected to conserve energy. System activity refers to any...
User Guide
Page 47
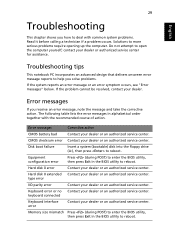
... action CMOS battery bad Contact your dealer or authorized service center for assistance. Keyboard error or no Contact your dealer or an authorized service center. Memory size mismatch Press (during POST) to enter the BIOS utility, then press Exit in the BIOS utility to open the computer yourself; CMOS checksum error...
... action CMOS battery bad Contact your dealer or authorized service center for assistance. Keyboard error or no Contact your dealer or an authorized service center. Memory size mismatch Press (during POST) to enter the BIOS utility, then press Exit in the BIOS utility to open the computer yourself; CMOS checksum error...


