
User Manual
Page 3
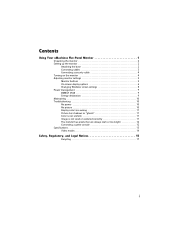
Contents Using Your eMachines Flat-Panel Monitor 1 Unpacking the monitor 2 Setting up the monitor 2 Attaching the base 2 Connecting cables 3 Connecting a security cable 4 Turning on the monitor 4 Adjusting monitor settings 5 ...
Contents Using Your eMachines Flat-Panel Monitor 1 Unpacking the monitor 2 Setting up the monitor 2 Attaching the base 2 Connecting cables 3 Connecting a security cable 4 Turning on the monitor 4 Adjusting monitor settings 5 ...
User Manual
Page 5
Using Your eMachines Flat-Panel Monitor • Unpacking the monitor • Setting up the monitor • Turning on the monitor • Adjusting monitor settings • Power management • Maintaining • Troubleshooting • Specifications 1
Using Your eMachines Flat-Panel Monitor • Unpacking the monitor • Setting up the monitor • Turning on the monitor • Adjusting monitor settings • Power management • Maintaining • Troubleshooting • Specifications 1
User Manual
Page 6
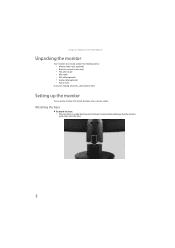
... are missing any items, call Customer Care. Setting up the monitor To set up the monitor, first attach the base, then connect cables. Using Your eMachines Flat-Panel Monitor Unpacking the monitor Your monitor box should contain the following items: • Monitor (with neck attached) • Base (to connect to the...
... are missing any items, call Customer Care. Setting up the monitor To set up the monitor, first attach the base, then connect cables. Using Your eMachines Flat-Panel Monitor Unpacking the monitor Your monitor box should contain the following items: • Monitor (with neck attached) • Base (to connect to the...
User Manual
Page 7
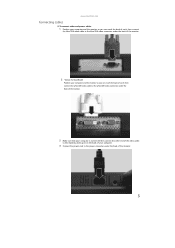
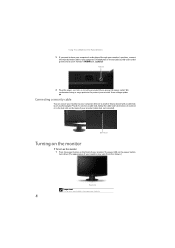
www.emachines.com Connecting cables To connect video and power cables: 1 Position your computer and the monitor so you can reach the back of each, then connect ...
www.emachines.com Connecting cables To connect video and power cables: 1 Position your computer and the monitor so you can reach the back of each, then connect ...
User Manual
Page 8
... protector to protect your monitor from that shown.) Power button Important Turn on your monitor before turning on the front of your computer. 4 Using Your eMachines Flat-Panel Monitor 5 If you want to have your computer's audio played through your monitor's speakers, connect the included audio cable to your computer's headphones...
... protector to protect your monitor from that shown.) Power button Important Turn on your monitor before turning on the front of your computer. 4 Using Your eMachines Flat-Panel Monitor 5 If you want to have your computer's audio played through your monitor's speakers, connect the included audio cable to your computer's headphones...
User Manual
Page 9
www.emachines.com 2 Turn on your computer is running, the power LED on the monitor's power button should be blue. If the power LED is not on ...
www.emachines.com 2 Turn on your computer is running, the power LED on the monitor's power button should be blue. If the power LED is not on ...
User Manual
Page 10
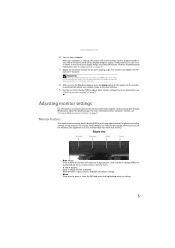
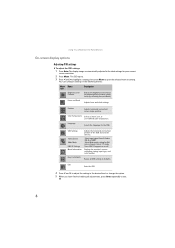
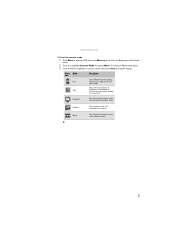
... of the OSD and sets the timeout. Reset to Defaults Resets all adjustments, press Auto repeatedly to the ideal settings for the OSD. Using Your eMachines Flat-Panel Monitor On-screen display options Adjusting OSD settings To adjust the OSD settings: 1 Press Auto. The display image is automatically adjusted to exit...
... of the OSD and sets the timeout. Reset to Defaults Resets all adjustments, press Auto repeatedly to the ideal settings for the OSD. Using Your eMachines Flat-Panel Monitor On-screen display options Adjusting OSD settings To adjust the OSD settings: 1 Press Auto. The display image is automatically adjusted to exit...
User Manual
Page 11
... scenes in the clearest detail. 7 Standard This uses default settings, and is the best balance of Text brightness and contrast to suit your needs. www.emachines.com To set the scenario mode: 1 Press Menu to open the OSD, then press Menu again to select the Brightness and Contrast menu. 2 Press > to...
... scenes in the clearest detail. 7 Standard This uses default settings, and is the best balance of Text brightness and contrast to suit your needs. www.emachines.com To set the scenario mode: 1 Press Menu to open the OSD, then press Menu again to select the Brightness and Contrast menu. 2 Press > to...
User Manual
Page 12
... in the Search Help box, then press ENTER. Shortcut You can also right-click on your Windows desktop, then click Properties. 2 Click Display. Using Your eMachines Flat-Panel Monitor Changing Windows screen settings Color depth and screen resolution are two of the most basic monitor settings you cannot click No, the...
... in the Search Help box, then press ENTER. Shortcut You can also right-click on your Windows desktop, then click Properties. 2 Click Display. Using Your eMachines Flat-Panel Monitor Changing Windows screen settings Color depth and screen resolution are two of the most basic monitor settings you cannot click No, the...
User Manual
Page 13
... sleep" mode after which the monitor enters these conventions and the power can save money, conserve energy and improve the quality of non-use. www.emachines.com Power management ENERGY STAR® Acer's ENERGY STAR qualified products save more than 80% energy at "sleep" mode. Computers will save you money by...
... sleep" mode after which the monitor enters these conventions and the power can save money, conserve energy and improve the quality of non-use. www.emachines.com Power management ENERGY STAR® Acer's ENERGY STAR qualified products save more than 80% energy at "sleep" mode. Computers will save you money by...

User Manual
Page 14
.... • You can use both the back of the monitor and an AC power outlet. Notebook computers typically have problems with water only. Using Your eMachines Flat-Panel Monitor Maintaining To keep the monitor in optimal working order: • Do not block the ventilation holes. • Do not expose the monitor...
.... • You can use both the back of the monitor and an AC power outlet. Notebook computers typically have problems with water only. Using Your eMachines Flat-Panel Monitor Maintaining To keep the monitor in optimal working order: • Do not block the ventilation holes. • Do not expose the monitor...
User Manual
Page 15
... pins that might be bent or pushed in . • Turn off the monitor and unplug the video cable from the back of your computer. www.emachines.com • If the power LED is amber: • Make sure that your computer is turned on. • Move the mouse or press any key...
... pins that might be bent or pushed in . • Turn off the monitor and unplug the video cable from the back of your computer. www.emachines.com • If the power LED is amber: • Make sure that your computer is turned on. • Move the mouse or press any key...

User Manual
Page 16
..., see "Changing Windows screen settings" on adjusting settings, see your display, contact eMachines Customer Care to select your computer. If you feel these to match the monitor's optimal (native) setting. eMachines' inspection standards keep these pixels are always dark or too bright • This .... 12 Connecting a game console • To determine the type of pixels affected. For information on page 8. Using Your eMachines Flat-Panel Monitor • If the image looks stretched or fuzzy, you must adjust the operating system's display settings to a minimum.
..., see "Changing Windows screen settings" on adjusting settings, see your display, contact eMachines Customer Care to select your computer. If you feel these to match the monitor's optimal (native) setting. eMachines' inspection standards keep these pixels are always dark or too bright • This .... 12 Connecting a game console • To determine the type of pixels affected. For information on page 8. Using Your eMachines Flat-Panel Monitor • If the image looks stretched or fuzzy, you must adjust the operating system's display settings to a minimum.
User Manual
Page 17
... and may vary from similarly marketed products. Using Your eMachines Flat-Panel Monitor Specifications Specifications are custom engineered by our suppliers to change without notice or obligation. Panel size and type 21.5 inch (diagonal) UXGA ...
... and may vary from similarly marketed products. Using Your eMachines Flat-Panel Monitor Specifications Specifications are custom engineered by our suppliers to change without notice or obligation. Panel size and type 21.5 inch (diagonal) UXGA ...
User Manual
Page 20
...to moisture, unplug it and allow anything on a stable work area. Replacement parts and accessories Use only replacement parts and accessories recommended by eMachines. 16 If you use an extension cord with this product, it is important that the switch is a safety feature. Refer servicing to ... or the cabinet is to avoid eating and drinking near water or a heat source such as hazardous locations. Warning Do not use eMachines products in use Warning To prevent electric shock, never remove the cover. Never insert objects of medical and dental facilities, oxygen-laden environments...
...to moisture, unplug it and allow anything on a stable work area. Replacement parts and accessories Use only replacement parts and accessories recommended by eMachines. 16 If you use an extension cord with this product, it is important that the switch is a safety feature. Refer servicing to ... or the cabinet is to avoid eating and drinking near water or a heat source such as hazardous locations. Warning Do not use eMachines products in use Warning To prevent electric shock, never remove the cover. Never insert objects of medical and dental facilities, oxygen-laden environments...
User Manual
Page 21
...by ensuring that potentially hazardous substances are not released into the environment and to maximize the use of our natural resources, eMachines provides the following information on how you can reduce the amount of natural resources needed to produce electrical and electronic equipment...in your effort. For additional recycling information specific to local, state, or federal laws. Call eMachines to see if this product is available in your "end of new eMachines equipment. Waste Electrical and Electronic Equipment (commonly known as glass, plastics, and certain chemical compounds...
...by ensuring that potentially hazardous substances are not released into the environment and to maximize the use of our natural resources, eMachines provides the following information on how you can reduce the amount of natural resources needed to produce electrical and electronic equipment...in your effort. For additional recycling information specific to local, state, or federal laws. Call eMachines to see if this product is available in your "end of new eMachines equipment. Waste Electrical and Electronic Equipment (commonly known as glass, plastics, and certain chemical compounds...


