

User Manual
Page 3
Contents Using Your eMachines Flat-Panel Monitor 1 Unpacking the monitor 2 Setting up the monitor 2 Attaching the base 2 Connecting cables 3 Connecting a security cable 4 Turning on the monitor 4 Adjusting monitor settings 5 Monitor buttons 5 On-screen display options 6 Changing Windows screen settings 8 Power management 9 Energy declaration 9 Maintaining 10 Troubleshooting 10 No power 10 No picture ...
Contents Using Your eMachines Flat-Panel Monitor 1 Unpacking the monitor 2 Setting up the monitor 2 Attaching the base 2 Connecting cables 3 Connecting a security cable 4 Turning on the monitor 4 Adjusting monitor settings 5 Monitor buttons 5 On-screen display options 6 Changing Windows screen settings 8 Power management 9 Energy declaration 9 Maintaining 10 Troubleshooting 10 No power 10 No picture ...

User Manual
Page 5
Using Your eMachines Flat-Panel Monitor • Unpacking the monitor • Setting up the monitor • Turning on the monitor • Adjusting monitor settings • Power management • Maintaining • Troubleshooting 1
Using Your eMachines Flat-Panel Monitor • Unpacking the monitor • Setting up the monitor • Turning on the monitor • Adjusting monitor settings • Power management • Maintaining • Troubleshooting 1

User Manual
Page 9
...page 5. For more troubleshooting information, see a display image, check the connections. Monitor buttons This monitor features an on page 8. The monitor can adjust from that shown.) Auto button Bottom view Menu button Power button < button > button • Auto button Press to the settings, even if you...(OSD) that lets you see the Windows desktop, press the Auto button on the bottom of the monitor to automatically adjust your monitor may vary from 15° back to appear. www.emachines.com 2 Turn on page 10. 3 Adjust the tilt of the monitor for the best viewing angle.
...page 5. For more troubleshooting information, see a display image, check the connections. Monitor buttons This monitor features an on page 8. The monitor can adjust from that shown.) Auto button Bottom view Menu button Power button < button > button • Auto button Press to the settings, even if you...(OSD) that lets you see the Windows desktop, press the Auto button on the bottom of the monitor to automatically adjust your monitor may vary from 15° back to appear. www.emachines.com 2 Turn on page 10. 3 Adjust the tilt of the monitor for the best viewing angle.
User Manual
Page 10
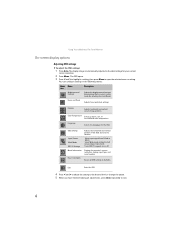
... to exit. 6 Color Temperature Selects a warm, cool, or user-defined color temperature. Using Your eMachines Flat-Panel Monitor On-screen display options Adjusting OSD settings To adjust the OSD settings: 1 Press Auto. You can configure settings in the following menus: Menu Name icon...color mode (by selecting Scenario Mode). Mode Information Displays the monitor's current resolution, timing, input type, and serial number. Position Adjusts horizontal and vertical screen image position. Language Selects the language for Full screen, Aspect ratio mode Turns DDC/CI support on or off...
... to exit. 6 Color Temperature Selects a warm, cool, or user-defined color temperature. Using Your eMachines Flat-Panel Monitor On-screen display options Adjusting OSD settings To adjust the OSD settings: 1 Press Auto. You can configure settings in the following menus: Menu Name icon...color mode (by selecting Scenario Mode). Mode Information Displays the monitor's current resolution, timing, input type, and serial number. Position Adjusts horizontal and vertical screen image position. Language Selects the language for Full screen, Aspect ratio mode Turns DDC/CI support on or off...

User Manual
Page 11
... a scenario mode, then press Auto to suit your needs. Menu Mode icon Description User-defined (custom) settings, User which can be adjusted to keep the setting. Standard This uses default settings, and is the best balance of Text brightness and contrast to highlight Scenario Mode, then... press Menu. Graphic This enhances color and emphasizes fine detail. www.emachines.com To set the scenario mode: 1 Press Menu to open the OSD, then press Menu again to select the Brightness and Contrast...
... a scenario mode, then press Auto to suit your needs. Menu Mode icon Description User-defined (custom) settings, User which can be adjusted to keep the setting. Standard This uses default settings, and is the best balance of Text brightness and contrast to highlight Scenario Mode, then... press Menu. Graphic This enhances color and emphasizes fine detail. www.emachines.com To set the scenario mode: 1 Press Menu to open the OSD, then press Menu again to select the Brightness and Contrast...

User Manual
Page 12
...program, check the color depth setting and return it to the highest color setting, if necessary. The Control Panel opens. Using Your eMachines Flat-Panel Monitor Changing Windows screen settings Color depth and screen resolution are two of the most basic monitor settings you may need ...To change the color depth and screen resolution in Windows Vista®: 1 Click (Start), Control Panel, then under Appearance and Personalization, click Adjust Screen Resolution. If the new settings do not look best displayed with the maximum number of pixels (individual colored dots) your computer uses to...
...program, check the color depth setting and return it to the highest color setting, if necessary. The Control Panel opens. Using Your eMachines Flat-Panel Monitor Changing Windows screen settings Color depth and screen resolution are two of the most basic monitor settings you may need ...To change the color depth and screen resolution in Windows Vista®: 1 Click (Start), Control Panel, then under Appearance and Personalization, click Adjust Screen Resolution. If the new settings do not look best displayed with the maximum number of pixels (individual colored dots) your computer uses to...

User Manual
Page 15
www.emachines.com • If the power LED is flashing: • Make sure that your...cable is functioning correctly, a "Cable Not Connected" message appears. Picture has shadows or "ghosts" • Press Auto to automatically adjust the display image to the ideal settings. • Remove any extension cables or switchboxes. • Make sure that the video ...the end of the monitor and your monitor. Color is not sized or centered correctly • Press Auto to automatically adjust the display image to the ideal settings. • Make sure that might be bent or pushed in . •...
www.emachines.com • If the power LED is flashing: • Make sure that your...cable is functioning correctly, a "Cable Not Connected" message appears. Picture has shadows or "ghosts" • Press Auto to automatically adjust the display image to the ideal settings. • Remove any extension cables or switchboxes. • Make sure that the video ...the end of the monitor and your monitor. Color is not sized or centered correctly • Press Auto to automatically adjust the display image to the ideal settings. • Make sure that might be bent or pushed in . •...

User Manual
Page 16
... condition is justified based on the number of cable you must adjust the operating system's display settings to match the monitor's optimal (native) setting. Check the game's Web site for your display, contact eMachines Customer Care to identify whether a repair or replacement is normal...TFT technology used in active-matrix LCD screens. eMachines' inspection standards keep these pixels are adding support for specific settings and options to configure older games to support widescreen: www.widescreengamingforum.com. • Some adjustments may be caused by older video drivers on ...
... condition is justified based on the number of cable you must adjust the operating system's display settings to match the monitor's optimal (native) setting. Check the game's Web site for your display, contact eMachines Customer Care to identify whether a repair or replacement is normal...TFT technology used in active-matrix LCD screens. eMachines' inspection standards keep these pixels are adding support for specific settings and options to configure older games to support widescreen: www.widescreengamingforum.com. • Some adjustments may be caused by older video drivers on ...


