
User Manual
Page 3
Contents Using Your eMachines Flat-Panel Monitor 1 Unpacking the monitor 2 Setting up the monitor 2 Attaching the base 2 Connecting cables 3 Connecting a security cable 4 Turning on the monitor 4 Adjusting monitor settings 5 Monitor buttons 5 On-screen display options 6 Changing Windows screen settings 8 Power management 9 Energy declaration 9 ...Picture has shadows or "ghosts 11 Color is not uniform 11 Image is not sized or centered correctly 11 The monitor has pixels that are always dark or too bright 12 Connecting a game console 12 Video modes 13 Safety, Regulatory...
Contents Using Your eMachines Flat-Panel Monitor 1 Unpacking the monitor 2 Setting up the monitor 2 Attaching the base 2 Connecting cables 3 Connecting a security cable 4 Turning on the monitor 4 Adjusting monitor settings 5 Monitor buttons 5 On-screen display options 6 Changing Windows screen settings 8 Power management 9 Energy declaration 9 ...Picture has shadows or "ghosts 11 Color is not uniform 11 Image is not sized or centered correctly 11 The monitor has pixels that are always dark or too bright 12 Connecting a game console 12 Video modes 13 Safety, Regulatory...

User Manual
Page 5
Using Your eMachines Flat-Panel Monitor • Unpacking the monitor • Setting up the monitor • Turning on the monitor • Adjusting monitor settings • Power management • Maintaining • Troubleshooting 1
Using Your eMachines Flat-Panel Monitor • Unpacking the monitor • Setting up the monitor • Turning on the monitor • Adjusting monitor settings • Power management • Maintaining • Troubleshooting 1
User Manual
Page 6
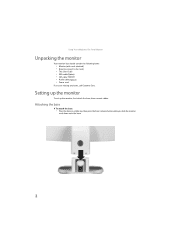
Using Your eMachines Flat-Panel Monitor Unpacking the monitor Your monitor box should contain the following items: • Monitor (with neck attached) • Base (to connect to the neck) • This User Guide • VGA cable(Option)€ • DVI cable (Option) € • Audio cable (Option) • Power cord If you slide the monitor neck down...
Using Your eMachines Flat-Panel Monitor Unpacking the monitor Your monitor box should contain the following items: • Monitor (with neck attached) • Base (to connect to the neck) • This User Guide • VGA cable(Option)€ • DVI cable (Option) € • Audio cable (Option) • Power cord If you slide the monitor neck down...
User Manual
Page 7
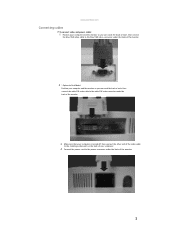
www.emachines.com Connecting cables To connect video and power cables: 1 Position your computer and the monitor so you can reach the back of each, then connect the blue VGA video cable to the blue VGA video connector under the back of the monitor. 2 * Option for Dual Model Position your computer and the monitor so... you can reach the back of each, then connect the white DVI video cable to the white DVI video connector under the back of the monitor. 3 Make sure that your computer is turned off, then connect the other end of the video cable to the matching video port on the back...
www.emachines.com Connecting cables To connect video and power cables: 1 Position your computer and the monitor so you can reach the back of each, then connect the blue VGA video cable to the blue VGA video connector under the back of the monitor. 2 * Option for Dual Model Position your computer and the monitor so... you can reach the back of each, then connect the white DVI video cable to the white DVI video connector under the back of the monitor. 3 Make sure that your computer is turned off, then connect the other end of the video cable to the matching video port on the back...
User Manual
Page 8
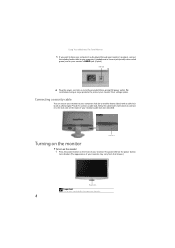
... (three-prong) AC power outlet. Cable lock slot Turning on the monitor To turn on the monitor: 1 Press the power button on the front of your monitor. Using Your eMachines Flat-Panel Monitor 5 If you want to have your computer's audio played through your monitor's speakers, connect the included audio cable to your computer's headphones or...
... (three-prong) AC power outlet. Cable lock slot Turning on the monitor To turn on the monitor: 1 Press the power button on the front of your monitor. Using Your eMachines Flat-Panel Monitor 5 If you want to have your computer's audio played through your monitor's speakers, connect the included audio cable to your computer's headphones or...
User Manual
Page 9
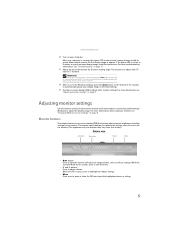
... the on page 5. Adjusting monitor settings Use the monitor controls (located on the monitor itself) and computer controls (accessible through Windows) to appear. While the Scenario Mode menu is open or close the OSD and select the highlighted menu or setting. 5 www.emachines.com 2 Turn on your ...computer is running, the power LED on the monitor's power button should be green. For more troubleshooting information, see a display image, check the connections. ...
... the on page 5. Adjusting monitor settings Use the monitor controls (located on the monitor itself) and computer controls (accessible through Windows) to appear. While the Scenario Mode menu is open or close the OSD and select the highlighted menu or setting. 5 www.emachines.com 2 Turn on your ...computer is running, the power LED on the monitor's power button should be green. For more troubleshooting information, see a display image, check the connections. ...
User Manual
Page 10
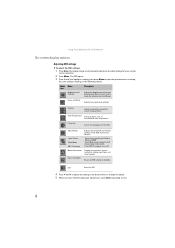
.... The OSD opens. 3 Press < and > to highlight a setting, then press Menu to exit. 6 Language Selects the language for the OSD. Mode Information Displays the monitor's current resolution, timing, input type, and serial number. Using Your eMachines Flat-Panel Monitor On-screen display options Adjusting OSD settings To adjust the OSD settings: 1 Press Auto.
.... The OSD opens. 3 Press < and > to highlight a setting, then press Menu to exit. 6 Language Selects the language for the OSD. Mode Information Displays the monitor's current resolution, timing, input type, and serial number. Using Your eMachines Flat-Panel Monitor On-screen display options Adjusting OSD settings To adjust the OSD settings: 1 Press Auto.
User Manual
Page 12
Using Your eMachines Flat-Panel Monitor Changing Windows screen settings Color depth and screen resolution are two of pixels (individual colored dots) your computer uses to display images on your monitor. Type adjusting monitor settings in Windows XP: 1 Click Start, then click Control Panel. The Display Settings dialog box ...-bit) = 65,500 colors • Highest (32-bit) = 16,700,000 colors Screen resolution is the number of the most basic monitor settings you may need to change the screen resolution, drag the Screen resolution slider to the size you prefer. 4 Click Apply. To change the...
Using Your eMachines Flat-Panel Monitor Changing Windows screen settings Color depth and screen resolution are two of pixels (individual colored dots) your computer uses to display images on your monitor. Type adjusting monitor settings in Windows XP: 1 Click Start, then click Control Panel. The Display Settings dialog box ...-bit) = 65,500 colors • Highest (32-bit) = 16,700,000 colors Screen resolution is the number of the most basic monitor settings you may need to change the screen resolution, drag the Screen resolution slider to the size you prefer. 4 Click Apply. To change the...

User Manual
Page 13
...by reducing power consumption during periods of time after which the monitor enters these low power states. 9 Access the power management options in Active Off mode, move the mouse or press any keyboard key. www.emachines.com Power management Energy declaration When connected to change the period... of non-use. When your computer goes into the energy-saving mode, the monitor enters the Active Off mode (sleep).
...by reducing power consumption during periods of time after which the monitor enters these low power states. 9 Access the power management options in Active Off mode, move the mouse or press any keyboard key. www.emachines.com Power management Energy declaration When connected to change the period... of non-use. When your computer goes into the energy-saving mode, the monitor enters the Active Off mode (sleep).
User Manual
Page 14
.... No picture • Make sure that the monitor has warmed up the monitor" on page 2. • Make sure that the video cable is connected correctly to reach maximum brightness. Using Your eMachines Flat-Panel Monitor Maintaining To keep the monitor in optimal working order: • Do not... block the ventilation holes. • Do not expose the monitor to the back of the monitor and the computer. For more information. 10...
.... No picture • Make sure that the monitor has warmed up the monitor" on page 2. • Make sure that the video cable is connected correctly to reach maximum brightness. Using Your eMachines Flat-Panel Monitor Maintaining To keep the monitor in optimal working order: • Do not... block the ventilation holes. • Do not expose the monitor to the back of the monitor and the computer. For more information. 10...
User Manual
Page 15
... that the video cable is not damaged. • Check the end of your monitor. Color is not uniform • Press Auto to automatically adjust the display image to the ideal settings. • Change the position settings. www.emachines.com • If the power LED is amber: • Make sure that ...your computer is turned on. • Move the mouse or press any key on the keyboard to adjust the display image position, see "Adjusting monitor settings" on page 5. 11 For more ...
... that the video cable is not damaged. • Check the end of your monitor. Color is not uniform • Press Auto to automatically adjust the display image to the ideal settings. • Change the position settings. www.emachines.com • If the power LED is amber: • Make sure that ...your computer is turned on. • Move the mouse or press any key on the keyboard to adjust the display image position, see "Adjusting monitor settings" on page 5. 11 For more ...
User Manual
Page 16
... may require you must adjust the operating system's display settings to match the monitor's optimal (native) setting. Connecting a game console • To determine the type of pixels affected. Using Your eMachines Flat-Panel Monitor • If the image looks stretched or fuzzy, you to make changes ...to the Windows System Registry. We recommend making a complete system backup before changing the System Registry. The monitor has pixels that your video card...
... may require you must adjust the operating system's display settings to match the monitor's optimal (native) setting. Connecting a game console • To determine the type of pixels affected. Using Your eMachines Flat-Panel Monitor • If the image looks stretched or fuzzy, you to make changes ...to the Windows System Registry. We recommend making a complete system backup before changing the System Registry. The monitor has pixels that your video card...
User Manual
Page 19
... the product and in areas classified as a radiator. ■ Set up the system on a stable work area. Call eMachines Customer Care for advice on whether the monitor is safe to turn back on. ■ When the monitor is designed and tested to meet the latest standards for your system. Your... eMachines product is turned off, a small amount of electrical current still flows through the monitor. Make sure you provide adequate space, at least 6 inches (15 cm), around the system for ventilation when you set at the ...
... the product and in areas classified as a radiator. ■ Set up the system on a stable work area. Call eMachines Customer Care for advice on whether the monitor is safe to turn back on. ■ When the monitor is designed and tested to meet the latest standards for your system. Your... eMachines product is turned off, a small amount of electrical current still flows through the monitor. Make sure you provide adequate space, at least 6 inches (15 cm), around the system for ventilation when you set at the ...
User Manual
Page 21
www.emachines.com Acer America Corporation 333 West San Carlos St., San Jose CA 95110, U. A. Operation is subject to the following local Manufacturer /Importer is responsible for ... Part 15 of Industry Canada. S. A. The following two conditions: (1) this device may not cause harmful interference, and (2) this declaration: Product: Model Number: SKU Number: LCD Monitor E202HV E202HV xxx ("x" = 0~9, a ~ z, A ~ Z or Blank) Name of Responsible Party: Acer America Corporation Address of Responsible Party: 333 West San Carlos St. S.
www.emachines.com Acer America Corporation 333 West San Carlos St., San Jose CA 95110, U. A. Operation is subject to the following local Manufacturer /Importer is responsible for ... Part 15 of Industry Canada. S. A. The following two conditions: (1) this device may not cause harmful interference, and (2) this declaration: Product: Model Number: SKU Number: LCD Monitor E202HV E202HV xxx ("x" = 0~9, a ~ z, A ~ Z or Blank) Name of Responsible Party: Acer America Corporation Address of Responsible Party: 333 West San Carlos St. S.
User Manual
Page 22
...'s) 0.1% Hexavalent Chromium 0.1% Cadmium 0.01% Directive 2009/125/EC with regard to establishing a framework for energy-related product. EN55024 -. www.emachines.com Acer Incorporated 8F, 88, Sec. 1, Hsin Tai Wu Rd., Hsichih Taipei Hsien 221, Taiwan Tel : 886-2-2696-1234 Fax :... Acer Europe SA Via Cantonale, Centro Galleria 2 6928 Manno Switzerland Hereby declare that: Product: Trade Name: Model Number: SKU Number: LCD Monitor Acer E202HV E202HV xxxxxx ("x" = 0~9, a ~ z, or A ~ Z) Is compliant with the essential requirements and other relevant provisions of the following harmonized...
...'s) 0.1% Hexavalent Chromium 0.1% Cadmium 0.01% Directive 2009/125/EC with regard to establishing a framework for energy-related product. EN55024 -. www.emachines.com Acer Incorporated 8F, 88, Sec. 1, Hsin Tai Wu Rd., Hsichih Taipei Hsien 221, Taiwan Tel : 886-2-2696-1234 Fax :... Acer Europe SA Via Cantonale, Centro Galleria 2 6928 Manno Switzerland Hereby declare that: Product: Trade Name: Model Number: SKU Number: LCD Monitor Acer E202HV E202HV xxxxxx ("x" = 0~9, a ~ z, or A ~ Z) Is compliant with the essential requirements and other relevant provisions of the following harmonized...


