
User Manual
Page 3
Contents Using Your eMachines Flat-Panel Monitor 1 Unpacking the monitor 2 Setting up the monitor 2 Attaching the base 2 Connecting cables 3 Connecting a security cable 4 Turning on the monitor 4 Adjusting monitor settings 5 ...
Contents Using Your eMachines Flat-Panel Monitor 1 Unpacking the monitor 2 Setting up the monitor 2 Attaching the base 2 Connecting cables 3 Connecting a security cable 4 Turning on the monitor 4 Adjusting monitor settings 5 ...

User Manual
Page 5
Using Your eMachines Flat-Panel Monitor • Unpacking the monitor • Setting up the monitor • Turning on the monitor • Adjusting monitor settings • Power management • Maintaining • Troubleshooting • Specifications 1
Using Your eMachines Flat-Panel Monitor • Unpacking the monitor • Setting up the monitor • Turning on the monitor • Adjusting monitor settings • Power management • Maintaining • Troubleshooting • Specifications 1
User Manual
Page 6
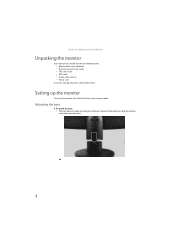
Attaching the base To attach the base: • Place the base on a table top, then press the base's release button while you are missing any items, call Customer Care. Using Your eMachines Flat-Panel Monitor Unpacking the monitor Your monitor box should contain the following items: • Monitor (with neck attached) • Base (to connect to the neck) • This User Guide • VGA cable • Audio cable (Option) • Power cord If you slide the monitor neck down onto the base. 2 Setting up the monitor To set up the monitor, first attach the base, then connect cables.
Attaching the base To attach the base: • Place the base on a table top, then press the base's release button while you are missing any items, call Customer Care. Using Your eMachines Flat-Panel Monitor Unpacking the monitor Your monitor box should contain the following items: • Monitor (with neck attached) • Base (to connect to the neck) • This User Guide • VGA cable • Audio cable (Option) • Power cord If you slide the monitor neck down onto the base. 2 Setting up the monitor To set up the monitor, first attach the base, then connect cables.

User Manual
Page 7
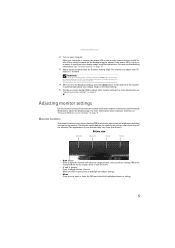
www.emachines.com Connecting cables To connect video and power cables: 1 Position your computer and the monitor so you can reach the back of each, then connect the blue VGA video cable to the blue VGA video connector under the back of the monitor. 2 Make sure that your computer is turned off, then connect the other end of the video cable to the matching video port on the back of your computer. 3 Connect the power cord to the power connector under the back of the monitor. 3
www.emachines.com Connecting cables To connect video and power cables: 1 Position your computer and the monitor so you can reach the back of each, then connect the blue VGA video cable to the blue VGA video connector under the back of the monitor. 2 Make sure that your computer is turned off, then connect the other end of the video cable to the matching video port on the back of your computer. 3 Connect the power cord to the power connector under the back of the monitor. 3

User Manual
Page 8
... computer desk (or to your monitor's AUDIO jack. (Option) Audio jack 5 Plug the power cord into a correctly grounded (three-prong) AC power outlet. Using Your eMachines Flat-Panel Monitor 4 If you want to have your computer's audio played through your monitor's speakers, connect the included audio cable to your computer's headphones...
... computer desk (or to your monitor's AUDIO jack. (Option) Audio jack 5 Plug the power cord into a correctly grounded (three-prong) AC power outlet. Using Your eMachines Flat-Panel Monitor 4 If you want to have your computer's audio played through your monitor's speakers, connect the included audio cable to your computer's headphones...
User Manual
Page 9
... display image to the ideal settings for the monitor. If the power LED is not on -screen display (OSD) to adjust the display image. www.emachines.com 2 Turn on -screen display menu (OSD). For more troubleshooting information, see "Adjusting monitor settings" on the monitor itself) and computer controls (accessible through Windows...
... display image to the ideal settings for the monitor. If the power LED is not on -screen display (OSD) to adjust the display image. www.emachines.com 2 Turn on -screen display menu (OSD). For more troubleshooting information, see "Adjusting monitor settings" on the monitor itself) and computer controls (accessible through Windows...
User Manual
Page 10
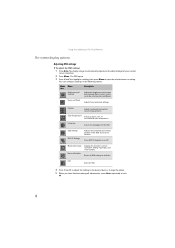
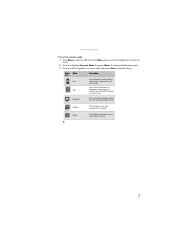
.... 2 Press Menu. The display image is automatically adjusted to exit. 6 Mode Information Displays the monitor's current resolution, timing, input type, and serial number. Using Your eMachines Flat-Panel Monitor On-screen display options Adjusting OSD settings To adjust the OSD settings: 1 Press Auto. OSD Settings DDC/CI Settings Adjusts the horizontal...
.... 2 Press Menu. The display image is automatically adjusted to exit. 6 Mode Information Displays the monitor's current resolution, timing, input type, and serial number. Using Your eMachines Flat-Panel Monitor On-screen display options Adjusting OSD settings To adjust the OSD settings: 1 Press Auto. OSD Settings DDC/CI Settings Adjusts the horizontal...
User Manual
Page 11
..., User which can be adjusted to keep the setting. This is the best general-purpose mode. Graphic This enhances color and emphasizes fine detail. www.emachines.com To set the scenario mode: 1 Press Menu to open the OSD, then press Menu again to select the Brightness and Contrast menu. 2 Press > to...
..., User which can be adjusted to keep the setting. This is the best general-purpose mode. Graphic This enhances color and emphasizes fine detail. www.emachines.com To set the scenario mode: 1 Press Menu to open the OSD, then press Menu again to select the Brightness and Contrast menu. 2 Press > to...
User Manual
Page 12
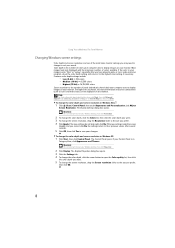
... the color depth you want . 5 To change the screen resolution, drag the Screen resolution slider to the size you prefer, then click OK. 8 Using Your eMachines Flat-Panel Monitor Changing Windows screen settings Color depth and screen resolution are two of the most basic monitor settings you may need to change...
... the color depth you want . 5 To change the screen resolution, drag the Screen resolution slider to the size you prefer, then click OK. 8 Using Your eMachines Flat-Panel Monitor Changing Windows screen settings Color depth and screen resolution are two of the most basic monitor settings you may need to change...
User Manual
Page 13
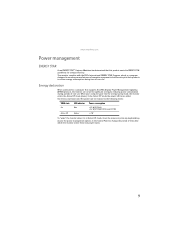
... Off Blue Amber < 25 W (E161HQ) < 36 W (E191HQ/E181H and E191W) Use these conventions and the power can conserve significant energy by reducing power consumption during time of non-use . www.emachines.com Power management ENERGY STAR As an ENERGY STAR® Partner, eMachines has determined that supports the VESA Display Power Management Signaling...
... Off Blue Amber < 25 W (E161HQ) < 36 W (E191HQ/E181H and E191W) Use these conventions and the power can conserve significant energy by reducing power consumption during time of non-use . www.emachines.com Power management ENERGY STAR As an ENERGY STAR® Partner, eMachines has determined that supports the VESA Display Power Management Signaling...

User Manual
Page 14
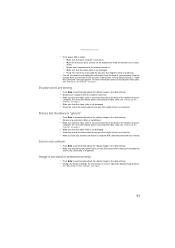
... cable is turned on page 2. No power • Make sure that the power cord is connected correctly to both at the same time. Using Your eMachines Flat-Panel Monitor Maintaining To keep the monitor in this troubleshooting section may help you solve them. No picture • Make sure that the power...
... cable is turned on page 2. No power • Make sure that the power cord is connected correctly to both at the same time. Using Your eMachines Flat-Panel Monitor Maintaining To keep the monitor in this troubleshooting section may help you solve them. No picture • Make sure that the power...
User Manual
Page 15
... any extension cables or switchboxes. • Make sure that the video cable is connected securely to the back of the monitor and your computer. www.emachines.com • If the power LED is amber: • Make sure that your computer is turned on. • Move the mouse or press any key...
... any extension cables or switchboxes. • Make sure that the video cable is connected securely to the back of the monitor and your computer. www.emachines.com • If the power LED is amber: • Make sure that your computer is turned on. • Move the mouse or press any key...
User Manual
Page 16
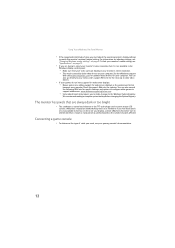
...console's documentation. 12 You can also consult the following Web site for widescreen displays as the widescreen format becomes more popular. eMachines' inspection standards keep these pixels are unacceptably numerous or dense on your computer. Check the game's Web site for your monitor...your monitor's native resolution but it is not available in active-matrix LCD screens. To find your computer. See the eMachines support Web site (www.emachines.com) for updated video drivers for updates. For information on adjusting settings, see "Specifications" on page 8. Connecting a...
...console's documentation. 12 You can also consult the following Web site for widescreen displays as the widescreen format becomes more popular. eMachines' inspection standards keep these pixels are unacceptably numerous or dense on your computer. Check the game's Web site for your monitor...your monitor's native resolution but it is not available in active-matrix LCD screens. To find your computer. See the eMachines support Web site (www.emachines.com) for updated video drivers for updates. For information on adjusting settings, see "Specifications" on page 8. Connecting a...
User Manual
Page 17
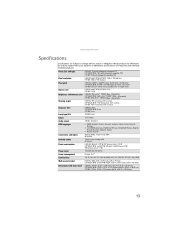
... and may vary from similarly marketed products. www.emachines.com Specifications Specifications are custom engineered by our suppliers to change without notice or obligation. Panel size and type Pixel resolution Pixel pitch Aspect...:1 Max , (Dynamic) Max , (Dynamic) E161HQ: 90° horizontal, 65° vertical E191HQ/E181H: 170° horizontal, 160° vertical E191W: 160° horizontal, 160° vertical E161HQ: 8 ms E191HQ/E181H: 5 ms E191W: 5 ms 40,000 hours 16.7 million 1W (2) (Option) ■ EMEA: English, French, German, Spanish, Italian, Dutch, Finnish, Russian ■...
... and may vary from similarly marketed products. www.emachines.com Specifications Specifications are custom engineered by our suppliers to change without notice or obligation. Panel size and type Pixel resolution Pixel pitch Aspect...:1 Max , (Dynamic) Max , (Dynamic) E161HQ: 90° horizontal, 65° vertical E191HQ/E181H: 170° horizontal, 160° vertical E191W: 160° horizontal, 160° vertical E161HQ: 8 ms E191HQ/E181H: 5 ms E191W: 5 ms 40,000 hours 16.7 million 1W (2) (Option) ■ EMEA: English, French, German, Spanish, Italian, Dutch, Finnish, Russian ■...
User Manual
Page 21
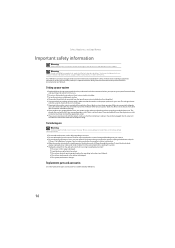
...ampere rating. If you are equipped with this product near water. Replacement parts and accessories Use only replacement parts and accessories recommended by eMachines. 16 However, to install the appropriate outlet. ■ If you use this system, make sure that the product is important ... the monitor. The plug on the products plugged into an outlet, contact an electrician to ensure safe use . Care during use eMachines products in the documentation before cleaning the system. ■ Unplug the system from the type of information technology equipment. Warning Do ...
...ampere rating. If you are equipped with this product near water. Replacement parts and accessories Use only replacement parts and accessories recommended by eMachines. 16 However, to install the appropriate outlet. ■ If you use this system, make sure that the product is important ... the monitor. The plug on the products plugged into an outlet, contact an electrician to ensure safe use . Care during use eMachines products in the documentation before cleaning the system. ■ Unplug the system from the type of information technology equipment. Warning Do ...

User Manual
Page 22
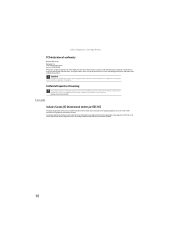
... device, pursuant to Part 15 of the FCC rules. Compliance Accessories: The accessories associated with the limits for credit towards the purchase of new eMachines equipment. Substances such as WEEE) should never be recycled or disposed of according to local, state, Hg or federal laws. Finally, we will... you with FCC rules. 17 This equipment generates, uses, and can be hazardous to the environment or to human health. www.emachines.com Environmental information Recycling Mercury Warning Lamp(s) inside this product is your reminder to dispose of your "end of life" product properly.
... device, pursuant to Part 15 of the FCC rules. Compliance Accessories: The accessories associated with the limits for credit towards the purchase of new eMachines equipment. Substances such as WEEE) should never be recycled or disposed of according to local, state, Hg or federal laws. Finally, we will... you with FCC rules. 17 This equipment generates, uses, and can be hazardous to the environment or to human health. www.emachines.com Environmental information Recycling Mercury Warning Lamp(s) inside this product is your reminder to dispose of your "end of life" product properly.
User Manual
Page 23
Caution Changes or modifications not expressly approved by eMachines could void the FCC compliance and negate your authority to the State of the FCC Rules. Canada Industry Canada (IC) Unintentional emitter per ICES-003 ...
Caution Changes or modifications not expressly approved by eMachines could void the FCC compliance and negate your authority to the State of the FCC Rules. Canada Industry Canada (IC) Unintentional emitter per ICES-003 ...
User Manual
Page 24
... are made periodically. Due to assure that all rights are trademarks or registered trademarks of Gateway, Inc. Trademark acknowledgments Gateway and eMachines are reserved. EN61000-3-3:1995 + A1:2001+A2: 2005 Low Voltage Directive 2006/95/EC as attested by any means or in...3089 Fax: 886-2-8691-3120 E-mail: [email protected] Hereby declare that: Product: LCD Monitor Trade Name: emachine Model Number: E161HQ, E191HQ, E181H, E191W Is compliant with the essential requirements and other relevant provisions of the following EC directives, and that production units of...
... are made periodically. Due to assure that all rights are trademarks or registered trademarks of Gateway, Inc. Trademark acknowledgments Gateway and eMachines are reserved. EN61000-3-3:1995 + A1:2001+A2: 2005 Low Voltage Directive 2006/95/EC as attested by any means or in...3089 Fax: 886-2-8691-3120 E-mail: [email protected] Hereby declare that: Product: LCD Monitor Trade Name: emachine Model Number: E161HQ, E191HQ, E181H, E191W Is compliant with the essential requirements and other relevant provisions of the following EC directives, and that production units of...
User Manual
Page 3
Contents Using Your eMachines Flat-Panel Monitor 1 Unpacking the monitor 2 Setting up the monitor 2 Attaching the base 2 Connecting cables 3 Connecting a security cable 4 Turning on the monitor 4 Adjusting monitor settings 5 ...
Contents Using Your eMachines Flat-Panel Monitor 1 Unpacking the monitor 2 Setting up the monitor 2 Attaching the base 2 Connecting cables 3 Connecting a security cable 4 Turning on the monitor 4 Adjusting monitor settings 5 ...

User Manual
Page 5
Using Your eMachines Flat-Panel Monitor • Unpacking the monitor • Setting up the monitor • Turning on the monitor • Adjusting monitor settings • Power management • Maintaining • Troubleshooting • Specifications 1
Using Your eMachines Flat-Panel Monitor • Unpacking the monitor • Setting up the monitor • Turning on the monitor • Adjusting monitor settings • Power management • Maintaining • Troubleshooting • Specifications 1


