
eMachines D720/D520 Series Service Guide
Page 9
... Locations 129 Top View 129 Bottom View 130 Clearing Password Check and BIOS Recovery 131 Clearing Password Check 131 BIOS Recovery by Crisis Disk 132 FRU (Field Replaceable Unit) List 133 eMachines D720/D520 Exploded Diagrams 134 Main Assembly 134 LCD Panel 135 eMachines D720/D520 FRU List 136 Screw List 140 Model Definition and Configuration 142...
... Locations 129 Top View 129 Bottom View 130 Clearing Password Check and BIOS Recovery 131 Clearing Password Check 131 BIOS Recovery by Crisis Disk 132 FRU (Field Replaceable Unit) List 133 eMachines D720/D520 Exploded Diagrams 134 Main Assembly 134 LCD Panel 135 eMachines D720/D520 FRU List 136 Screw List 140 Model Definition and Configuration 142...

eMachines D720/D520 Series Service Guide
Page 125
...that CD/DVD drive is virus free. 3. For more information see Windows Help and Support. 10. The System Recovery Options screen displays. Run Windows Check Disk by entering chkdsk /r from a known good date using up-to-date software to the operating system DVD. For...preceding steps and select an earlier time and date. 11. Restart the computer and press F2 to correct the problem. 1. Run the Windows Disk Defragmenter. When prompted, press any recently added hardware and associated software. 8. g. Run a complete virus scan using System Restore. d. f. Startup...
...that CD/DVD drive is virus free. 3. For more information see Windows Help and Support. 10. The System Recovery Options screen displays. Run Windows Check Disk by entering chkdsk /r from a known good date using up-to-date software to the operating system DVD. For...preceding steps and select an earlier time and date. 11. Restart the computer and press F2 to correct the problem. 1. Run the Windows Disk Defragmenter. When prompted, press any recently added hardware and associated software. 8. g. Run a complete virus scan using System Restore. d. f. Startup...
eMachines D720/D520 Series Service Guide
Page 142
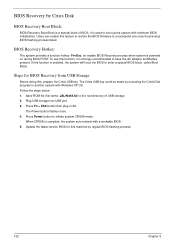
... storage into USB port. 3. The Power button flashes once. 4. Follow the steps below: 1. Update the latest version BIOS for BIOS Recovery from USB Storage: Before doing this machine by regular BIOS flashing process. 132 Chapter 5 To use this function is complete, the system ...to enter a special BIOS block, called Boot Block. BIOS Recovery by Crisis Disk BIOS Recovery Boot Block: BIOS Recovery Boot Block is powered on during BIOS POST. BIOS Recovery Hotkey: The system provides a function hotkey: Fn+Esc, for enable BIOS Recovery process when system is a special block of USB storage....
... storage into USB port. 3. The Power button flashes once. 4. Follow the steps below: 1. Update the latest version BIOS for BIOS Recovery from USB Storage: Before doing this machine by regular BIOS flashing process. 132 Chapter 5 To use this function is complete, the system ...to enter a special BIOS block, called Boot Block. BIOS Recovery by Crisis Disk BIOS Recovery Boot Block: BIOS Recovery Boot Block is powered on during BIOS POST. BIOS Recovery Hotkey: The system provides a function hotkey: Fn+Esc, for enable BIOS Recovery process when system is a special block of USB storage....
eMachines Notebook User Guide (All Series)
Page 16
... panel ergonomic specifications 39 Low-power license-exempt radio communication devices (RSS-210) 38 Exposure of humans to -disk recovery 21 Password 21 Using software 22 Playing DVD movies 22 Power management 23 eMachines Recovery Management 24 Burn backup discs 25 Restore 26 Restore Windows Vista from backup discs 27 Troubleshooting 30 Troubleshooting tips...
... panel ergonomic specifications 39 Low-power license-exempt radio communication devices (RSS-210) 38 Exposure of humans to -disk recovery 21 Password 21 Using software 22 Playing DVD movies 22 Power management 23 eMachines Recovery Management 24 Burn backup discs 25 Restore 26 Restore Windows Vista from backup discs 27 Troubleshooting 30 Troubleshooting tips...
eMachines Notebook User Guide (All Series)
Page 24
... and push to the line- Note: If your notebook. Before performing a restore operation, please check the BIOS settings. 1 Check to see if eMachines Disk-to back up all data will be loose. If it is turned on. • Make sure that the printer cable is connected securely to the... computer's parallel port or a USB port and the corresponding port on the optical drive. This recovery process helps you purchase your system is a mechanical eject hole on the printer. There is the multilingual version, the operating system and language ...
... and push to the line- Note: If your notebook. Before performing a restore operation, please check the BIOS settings. 1 Check to see if eMachines Disk-to back up all data will be loose. If it is turned on. • Make sure that the printer cable is connected securely to the... computer's parallel port or a USB port and the corresponding port on the optical drive. This recovery process helps you purchase your system is a mechanical eject hole on the printer. There is the multilingual version, the operating system and language ...

eMachines Notebook User Guide (All Series)
Page 25
Important! This feature occupies 15 GB in a hidden partition on your hard disk. English 8 To start the recovery process: 1 Restart the system. 2 While the eMachines logo is showing, press + at the same time to enter the recovery process. 3 Refer to the onscreen instructions to perform system recovery.
Important! This feature occupies 15 GB in a hidden partition on your hard disk. English 8 To start the recovery process: 1 Restart the system. 2 While the eMachines logo is showing, press + at the same time to enter the recovery process. 3 Refer to the onscreen instructions to perform system recovery.
eMachines Notebook User Guide (All Series)
Page 38
Enable disk-to-disk recovery To enable disk-to run it. Password To set a password on boot: and use the and keys to set the boot sequence in the BIOS utility, activate the ... select Boot from the categories listed at the top of the screen. Your computer is already properly configured and optimized, and you may need to -disk recovery (hard disk recovery), activate the BIOS utility, then select Main from the categories listed at the bottom of the screen. To activate the BIOS utility, press during...
Enable disk-to-disk recovery To enable disk-to run it. Password To set a password on boot: and use the and keys to set the boot sequence in the BIOS utility, activate the ... select Boot from the categories listed at the top of the screen. Your computer is already properly configured and optimized, and you may need to -disk recovery (hard disk recovery), activate the BIOS utility, then select Main from the categories listed at the bottom of the screen. To activate the BIOS utility, press during...


