

Quick Start Guide
Page 3
Package Contents Single-Unit Package • One NWA1300-NJ • One Quick Start Guide • One Support CD • One Ethernet Cable • One Telephone Cable • One In-wall Installation Kit • Two Brackets • Two M3 Tapping Screws and Washers • One Wall Faceplate • One Cover Faceplate Eco Package • Ten NWA1300-NJs • One Quick Start Guide • One Support CD • Ten In-wall Installation Kits ENGLISH 3
Package Contents Single-Unit Package • One NWA1300-NJ • One Quick Start Guide • One Support CD • One Ethernet Cable • One Telephone Cable • One In-wall Installation Kit • Two Brackets • Two M3 Tapping Screws and Washers • One Wall Faceplate • One Cover Faceplate Eco Package • Ten NWA1300-NJs • One Quick Start Guide • One Support CD • Ten In-wall Installation Kits ENGLISH 3

Quick Start Guide
Page 4
Slide the included brackets to align with the faceplate's screw holes. There are three screw holes on the top and bottom of the faceplate is 60 mm. . 4 Slide the NWA1300-NJ into 2 the wall faceplate. Align the screw holes on the brackets with 1 screw holes on the bracket, which allow you to the NWA1300-NJ. The distance between the two screw holes of the NWA1300-NJ. Use the included M3 tapping screws and washers to secure the brackets to adjust the NWA1300-NJ's depth in the wall. 2. Hardware Installation 1.
Slide the included brackets to align with the faceplate's screw holes. There are three screw holes on the top and bottom of the faceplate is 60 mm. . 4 Slide the NWA1300-NJ into 2 the wall faceplate. Align the screw holes on the brackets with 1 screw holes on the bracket, which allow you to the NWA1300-NJ. The distance between the two screw holes of the NWA1300-NJ. Use the included M3 tapping screws and washers to secure the brackets to adjust the NWA1300-NJ's depth in the wall. 2. Hardware Installation 1.

Quick Start Guide
Page 5
Remove the outlet from a telephone switchboard (if available) to the RJ-11 port on the back of the NWA1300-NJ. Through the wall, connect the Ethernet cable from a PoE switch to the RJ-45 port and the telephone cable from the wall. The recommended telephone wall outlet dimensions are 72.60 mm by 72.60 mm by 48.40 mm. 4. ENGLISH 3 4 5 Unplug the phone or networking device from the existing wall outlet if any. 3.
Remove the outlet from a telephone switchboard (if available) to the RJ-11 port on the back of the NWA1300-NJ. Through the wall, connect the Ethernet cable from a PoE switch to the RJ-45 port and the telephone cable from the wall. The recommended telephone wall outlet dimensions are 72.60 mm by 72.60 mm by 48.40 mm. 4. ENGLISH 3 4 5 Unplug the phone or networking device from the existing wall outlet if any. 3.

Quick Start Guide
Page 6
Attach the cover faceplate. Fasten two screws to secure the NWA1300-NJ onto the wall or baseboard with screws. 6. 5. Press 6 gently but firmly until the faceplate clicks into place. 6 Install the NWA1300-NJ in 5 the wall outlet box.
Attach the cover faceplate. Fasten two screws to secure the NWA1300-NJ onto the wall or baseboard with screws. 6. 5. Press 6 gently but firmly until the faceplate clicks into place. 6 Install the NWA1300-NJ in 5 the wall outlet box.

Quick Start Guide
Page 7
ENGLISH Check the LEDs Look at the LEDs (lights) on . The PWR/SYS and ETHN LEDs stay on during start-up , check your local vendor. 7 Make sure the NWA1300-NJ is ready. If the LEDs are on when the system starts up and turn it back on the front panel of the NWA1300-NJ. Turn the NWA1300-NJ off by disconnecting the Enternet cable to the PoE switch, wait for a few seconds and connect the Ethernet cable to turn off , contact your connections. If no lights are still off once the NWA1300-NJ is receiving power from a PoE switch.
ENGLISH Check the LEDs Look at the LEDs (lights) on . The PWR/SYS and ETHN LEDs stay on during start-up , check your local vendor. 7 Make sure the NWA1300-NJ is ready. If the LEDs are on when the system starts up and turn it back on the front panel of the NWA1300-NJ. Turn the NWA1300-NJ off by disconnecting the Enternet cable to the PoE switch, wait for a few seconds and connect the Ethernet cable to turn off , contact your connections. If no lights are still off once the NWA1300-NJ is receiving power from a PoE switch.

Quick Start Guide
Page 8
...Web Configurator or an Enterprise Network Center (ENC) to configure the NWA1300-NJ. To use the Enterprise Network Center (ENC) to provision and manage the NWA1300NJ. Managing Your NWA1300-NJ After you have installed the NWA1300-NJ in the wall and connected it to a PoE switch, you ...use the Web Configurator, attach a computer (A) to the Ethernet port on the NWA1300-NJ's front panel or wirelessly connect to (B) each NWA1300-NJ for detailed instructions. 8 The NWA1300-NJ's WAN port is set to assign the NWA1300NJ an IP address. Connect a router with DHCP server enabled...
...Web Configurator or an Enterprise Network Center (ENC) to configure the NWA1300-NJ. To use the Enterprise Network Center (ENC) to provision and manage the NWA1300NJ. Managing Your NWA1300-NJ After you have installed the NWA1300-NJ in the wall and connected it to a PoE switch, you ...use the Web Configurator, attach a computer (A) to the Ethernet port on the NWA1300-NJ's front panel or wirelessly connect to (B) each NWA1300-NJ for detailed instructions. 8 The NWA1300-NJ's WAN port is set to assign the NWA1300NJ an IP address. Connect a router with DHCP server enabled...
Quick Start Guide
Page 9
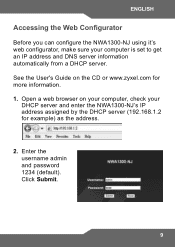
See the User's Guide on your computer, check your computer is set to get an IP address and DNS server information automatically from a DHCP server. Enter the username admin and password 1234 (default). Open a web browser on the CD or www.zyxel.com for example) as the address. 2. Click Submit. 9 ENGLISH Accessing the Web Configurator Before you can configure the NWA1300-NJ using it's web configurator, make sure your DHCP server and enter the NWA1300-NJ's IP address assigned by the DHCP server (192.168.1.2 for more information. 1.
See the User's Guide on your computer, check your computer is set to get an IP address and DNS server information automatically from a DHCP server. Enter the username admin and password 1234 (default). Open a web browser on the CD or www.zyxel.com for example) as the address. 2. Click Submit. 9 ENGLISH Accessing the Web Configurator Before you can configure the NWA1300-NJ using it's web configurator, make sure your DHCP server and enter the NWA1300-NJ's IP address assigned by the DHCP server (192.168.1.2 for more information. 1.

Quick Start Guide
Page 10
... does not open, make sure you do not set wireless security, anyone within transmission range could use the default wireless SSID (network name) "ZyXEL". 10 Connecting to the NWA1300-NJ Wirelessly Manually configure wireless clients to configure wireless security settings. If you allow web browser pop-up windows, JavaScripts and Java permissions. 3. The...
... does not open, make sure you do not set wireless security, anyone within transmission range could use the default wireless SSID (network name) "ZyXEL". 10 Connecting to the NWA1300-NJ Wirelessly Manually configure wireless clients to configure wireless security settings. If you allow web browser pop-up windows, JavaScripts and Java permissions. 3. The...