Operation Manual
Page 4
...TV High-definition television. To Reduce The Risk Of Fire Or Electric Shock, Do Not Expose This Appliance To Rain Or Moisture. 17. Servicing is incorporated under license from physical or mechanical abuse, such as being twisted, kinked, pinched, closed in a door, or walked upon ...a dedicated circuit; Unplug this owner's manual to be placed upon . Do not overload wall outlets. Safety Instructions 13. Wet Location Marking : Apparatus shall not be placed on the ...
...TV High-definition television. To Reduce The Risk Of Fire Or Electric Shock, Do Not Expose This Appliance To Rain Or Moisture. 17. Servicing is incorporated under license from physical or mechanical abuse, such as being twisted, kinked, pinched, closed in a door, or walked upon ...a dedicated circuit; Unplug this owner's manual to be placed upon . Do not overload wall outlets. Safety Instructions 13. Wet Location Marking : Apparatus shall not be placed on the ...
Operation Manual
Page 9
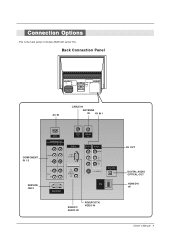
Back Connection Panel AC IN CABLE IN ANTENNA IN AV IN 1 COMPONENT IN 1/2 SERVICE ONLY AC IN COMPONENT IN 1 2 Y VIDEO PB PR (L) AUDIO (R) SERVICE ONLY CABLE IN ANTENNA IN RGB IN RGB (PC/DTV) (L) AUDIO RGB/DVI (R) AV IN 1 AV OUT VIDEO MONO (L) AUDIO (R) S-VIDEO DIGITAL AUDIO OPTICAL OUT HDMI /DVI IN RGB/DVI AUDIO IN RGB(PC/DTV) VIDEO IN AV OUT DIGITAL AUDIO OPTICAL OUT HDMI/DVI IN Owner's Manual 9 Connection Options - This is the back panel of models Z52DC2D series TVs.
Back Connection Panel AC IN CABLE IN ANTENNA IN AV IN 1 COMPONENT IN 1/2 SERVICE ONLY AC IN COMPONENT IN 1 2 Y VIDEO PB PR (L) AUDIO (R) SERVICE ONLY CABLE IN ANTENNA IN RGB IN RGB (PC/DTV) (L) AUDIO RGB/DVI (R) AV IN 1 AV OUT VIDEO MONO (L) AUDIO (R) S-VIDEO DIGITAL AUDIO OPTICAL OUT HDMI /DVI IN RGB/DVI AUDIO IN RGB(PC/DTV) VIDEO IN AV OUT DIGITAL AUDIO OPTICAL OUT HDMI/DVI IN Owner's Manual 9 Connection Options - This is the back panel of models Z52DC2D series TVs.
Operation Manual
Page 14
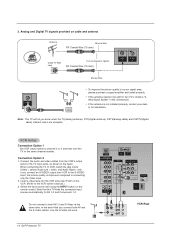
... output jacks to the TV input jacks, as shown in the connections. • If the antenna is improved; Do not connect to the VCR owner's manual.) 3. Analog and Digital TV signals provided on the VCR. (Refer to both AV and the S-Video cables, only the S-Video will let you connect ...both AV1-2 and S-Video at the same time. Note: The TV will work. 14 DLP Projection TV AC IN COMPONENT IN 1 2 Y VIDEO PB PR (L) AUDIO (R) SERVICE ONLY 1 CABLE IN ANTENNA IN RGB IN RGB (PC/DTV) (L) AUDIO RGB/DVI (R) AV IN 1 AV OUT VIDEO MONO (L) AUDIO (R) S-VIDEO DIGITAL AUDIO OPTICAL OUT...
... output jacks to the TV input jacks, as shown in the connections. • If the antenna is improved; Do not connect to the VCR owner's manual.) 3. Analog and Digital TV signals provided on the VCR. (Refer to both AV and the S-Video cables, only the S-Video will let you connect ...both AV1-2 and S-Video at the same time. Note: The TV will work. 14 DLP Projection TV AC IN COMPONENT IN 1 2 Y VIDEO PB PR (L) AUDIO (R) SERVICE ONLY 1 CABLE IN ANTENNA IN RGB IN RGB (PC/DTV) (L) AUDIO RGB/DVI (R) AV IN 1 AV OUT VIDEO MONO (L) AUDIO (R) S-VIDEO DIGITAL AUDIO OPTICAL OUT...

Operation Manual
Page 15
...Select the input source by using the INPUT button on DVD player Y Pb Pr Y B-Y R-Y Y Cb Cr Y PB PR G-LINK ANTENNA DIGITAL AUDIO OPTICAL OUT SERVICE RGB IN(PC/DTV) C DIGITAL AUDIO a OPTICAL IN 1 b (COMPONENT2) l e CABLE DIGITAL AUDIO C A OPTICAL IN 2 (DVI) COMPONENT IN XGA/ ... (L) (MONO) AUDIO (R) HDMI IN 2 (L) AUDIO (R) (L) AUDIO (R) B R (R) AUDIO (L) DIGITAL AUDIO OPTICAL or DVD S-VIDEO (R) AUDIO (L) Owner's Manual 15 Refer to the component input ports as shown in the figure. 2. If your DVD player does not have component video output, use 1. How to...
...Select the input source by using the INPUT button on DVD player Y Pb Pr Y B-Y R-Y Y Cb Cr Y PB PR G-LINK ANTENNA DIGITAL AUDIO OPTICAL OUT SERVICE RGB IN(PC/DTV) C DIGITAL AUDIO a OPTICAL IN 1 b (COMPONENT2) l e CABLE DIGITAL AUDIO C A OPTICAL IN 2 (DVI) COMPONENT IN XGA/ ... (L) (MONO) AUDIO (R) HDMI IN 2 (L) AUDIO (R) (L) AUDIO (R) B R (R) AUDIO (L) DIGITAL AUDIO OPTICAL or DVD S-VIDEO (R) AUDIO (L) Owner's Manual 15 Refer to the component input ports as shown in the figure. 2. If your DVD player does not have component video output, use 1. How to...

Operation Manual
Page 19
...the screen Position of HDMI/DVI Source Devices or contact your service center. - As shown the picture below, press the ADJUST button to the Manual of TV SET and contact an PC graphics card service center. - Monitor Display Specifications (RGB-PC or HDMI/....00 56.25 60.31 72.18 75.00 60.00 70.06 75.02 RGB-PC Mode Only Owner's Manual 19 If not, refer to Screen. In case HDMI/DVI Source Devices is not supported TV SET output in use...(480p, 720p, 1080i) and TV SET Display fit EIA/CEA-861-B Specification to the Manual of HDMI/DVI Source Devices or contact your service center.
...the screen Position of HDMI/DVI Source Devices or contact your service center. - As shown the picture below, press the ADJUST button to the Manual of TV SET and contact an PC graphics card service center. - Monitor Display Specifications (RGB-PC or HDMI/....00 56.25 60.31 72.18 75.00 60.00 70.06 75.02 RGB-PC Mode Only Owner's Manual 19 If not, refer to Screen. In case HDMI/DVI Source Devices is not supported TV SET output in use...(480p, 720p, 1080i) and TV SET Display fit EIA/CEA-861-B Specification to the Manual of HDMI/DVI Source Devices or contact your service center.

Operation Manual
Page 35
...Press EXIT button to return to TV viewing or press MENU button to return to the previous menu. Once selected, use D / E button to select Manual Clock . 3. Press EXIT button to return to TV viewing or press MENU button to return to the previous menu. Date - - / - Press the... provided by the auto clock function through Digital Channel Service problem. Manual Clock Setup If current time setting is set incorrectly by the broadcasting station. Auto Clock Manual Clock Off Timer On Timer Sleep Timer Auto Off Auto Clock Manual Clock Off Timer On Timer Sleep Timer Auto Off ...
...Press EXIT button to return to TV viewing or press MENU button to return to the previous menu. Once selected, use D / E button to select Manual Clock . 3. Press EXIT button to return to TV viewing or press MENU button to return to the previous menu. Date - - / - Press the... provided by the auto clock function through Digital Channel Service problem. Manual Clock Setup If current time setting is set incorrectly by the broadcasting station. Auto Clock Manual Clock Off Timer On Timer Sleep Timer Auto Off Auto Clock Manual Clock Off Timer On Timer Sleep Timer Auto Off ...

Operation Manual
Page 39
... use the OPTION menu to select Caption/Text. 3. Caption/Text, if provided by the broadcaster. 4. Owner's Manual 39 Press EXIT button to save and return to TV viewing. • You can be available for a data service, generally not program related. Languages can also use D / E button to select Caption/Text. Press the G button...
... use the OPTION menu to select Caption/Text. 3. Caption/Text, if provided by the broadcaster. 4. Owner's Manual 39 Press EXIT button to save and return to TV viewing. • You can be available for a data service, generally not program related. Languages can also use D / E button to select Caption/Text. Press the G button...
Operation Manual
Page 43
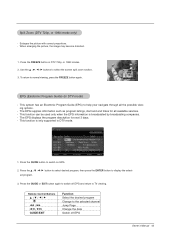
... button to select desired program, then press the ENTER button to TV viewing. Press the GUIDE or EXIT button again to switch off EPG Owner's Manual 43 Split Zoom (DTV 720p, or 1080i mode only) - This system has an Electronic Program Guide (EPG) to normal viewing, press the FREEZE... button again. ing options. - To return to help your navigate through all available services. - Remote Control Buttons D /E /F /G FF / GG IFF / GGI GUIDE/EXIT Function Select the desired program Change to select the screen ...
... button to select desired program, then press the ENTER button to TV viewing. Press the GUIDE or EXIT button again to switch off EPG Owner's Manual 43 Split Zoom (DTV 720p, or 1080i mode only) - This system has an Electronic Program Guide (EPG) to normal viewing, press the FREEZE... button again. ing options. - To return to help your navigate through all available services. - Remote Control Buttons D /E /F /G FF / GG IFF / GGI GUIDE/EXIT Function Select the desired program Change to select the screen ...
Operation Manual
Page 47
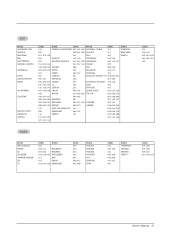
... 016 PERSONAL CABLE 117 VIEWSTAR 050 029 031 059 PHILIPS 071 WINEGARD 051 126 129 101 PICO 105 ZENITH 053 HITACHI 139 140 PRESIDENT 019 102 053 HOUSTON TRACKER 033 037 039 PRIMESTAR 030 110 111 013 ...106 008 009 012 HYTEK 053 REALISTIC 043 074 077 JANIEL 060 147 SAMSUNG 123 054 JERROLD 061 SATELLITE SERVICE CO 028 035 047 050 145 KATHREIN 108 057 085 005 006 007 LEGEND 057 SCIENTIFIC ATLANTA 032 ... 013 004 026 021 005 006 005 006 011 015 007 Brand THOMPSON TOSHIBA YAMAHA ZENITH Codes 115 128 146 001 081 082 083 084 091 120 Codes 005 006 019 008 009 018 ...
... 016 PERSONAL CABLE 117 VIEWSTAR 050 029 031 059 PHILIPS 071 WINEGARD 051 126 129 101 PICO 105 ZENITH 053 HITACHI 139 140 PRESIDENT 019 102 053 HOUSTON TRACKER 033 037 039 PRIMESTAR 030 110 111 013 ...106 008 009 012 HYTEK 053 REALISTIC 043 074 077 JANIEL 060 147 SAMSUNG 123 054 JERROLD 061 SATELLITE SERVICE CO 028 035 047 050 145 KATHREIN 108 057 085 005 006 007 LEGEND 057 SCIENTIFIC ATLANTA 032 ... 013 004 026 021 005 006 005 006 011 015 007 Brand THOMPSON TOSHIBA YAMAHA ZENITH Codes 115 128 146 001 081 082 083 084 091 120 Codes 005 006 019 008 009 018 ...
Operation Manual
Page 49
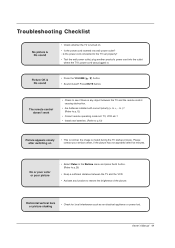
... normal, the image is muted during the TV startup process. Picture OK & No sound • Press the VOLUME (D / E) button. • Sound muted? Please contact your service center, if the picture has not appeared after switching on . • Is the power cord inserted into the outlet where the TV's power cord was... the brightness of the picture. Horizontal/vertical bars or picture shaking • Check for local interference such as an electrical appliance or power tool. Owner's Manual 49
... normal, the image is muted during the TV startup process. Picture OK & No sound • Press the VOLUME (D / E) button. • Sound muted? Please contact your service center, if the picture has not appeared after switching on . • Is the power cord inserted into the outlet where the TV's power cord was... the brightness of the picture. Horizontal/vertical bars or picture shaking • Check for local interference such as an electrical appliance or power tool. Owner's Manual 49