
Operation Manual
Page 3
PORTABLE CART WARNING Owner's Manual 3 Safety Instructions IMPORTANT SAFETY INSTRUCTIONS Important safety instructions shall be entitled "Important Safety Instructions". This information shall be given in an instruction for installation for ...
PORTABLE CART WARNING Owner's Manual 3 Safety Instructions IMPORTANT SAFETY INSTRUCTIONS Important safety instructions shall be entitled "Important Safety Instructions". This information shall be given in an instruction for installation for ...
Operation Manual
Page 4
... apparatus, the apparatus has exposed to dripping or splashing and no additional outlets or branch circuits. A subset of HDMI Licensing." Safety Instructions 13. Unplug this owner's manual to be placed upon . Any of time. 14. Outdoor Use Marking : WARNING - R TruSurround XT R TruSurround XT is incorporated under license from Dolby Laboratories. "Dolby "and...
... apparatus, the apparatus has exposed to dripping or splashing and no additional outlets or branch circuits. A subset of HDMI Licensing." Safety Instructions 13. Unplug this owner's manual to be placed upon . Any of time. 14. Outdoor Use Marking : WARNING - R TruSurround XT R TruSurround XT is incorporated under license from Dolby Laboratories. "Dolby "and...
Operation Manual
Page 5
Owner's Manual 5 Contents Warning/Caution 2 Safety Instructions 3~4 Introduction Controls/Connection Options 6~9 Remote Control ...Menus Language Selection 22 Channel Selection 22 Volume Adjustment 22 Setup Menu Options EZ Scan (Channel Search 23 Manual Scan 23 Channel Edit 24 DTV Signal 24 Input Source Selection 25 Input Label 25 Video Menu Options Auto...Audio Menu Options Audio Language 32 Auto Volume Leveler (EZ SoundRite 32 Auto Sound Control (EZ Sound 32 Manual Sound Control (EZ sound-User Option) .33 Balance 34 TV Speakers On/Off Setup 34 Time Menu Options Auto Clock Setup...
Owner's Manual 5 Contents Warning/Caution 2 Safety Instructions 3~4 Introduction Controls/Connection Options 6~9 Remote Control ...Menus Language Selection 22 Channel Selection 22 Volume Adjustment 22 Setup Menu Options EZ Scan (Channel Search 23 Manual Scan 23 Channel Edit 24 DTV Signal 24 Input Source Selection 25 Input Label 25 Video Menu Options Auto...Audio Menu Options Audio Language 32 Auto Volume Leveler (EZ SoundRite 32 Auto Sound Control (EZ Sound 32 Manual Sound Control (EZ sound-User Option) .33 Balance 34 TV Speakers On/Off Setup 34 Time Menu Options Auto Clock Setup...
Operation Manual
Page 9
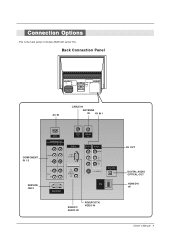
Back Connection Panel AC IN CABLE IN ANTENNA IN AV IN 1 COMPONENT IN 1/2 SERVICE ONLY AC IN COMPONENT IN 1 2 Y VIDEO PB PR (L) AUDIO (R) SERVICE ONLY CABLE IN ANTENNA IN RGB IN RGB (PC/DTV) (L) AUDIO RGB/DVI (R) AV IN 1 AV OUT VIDEO MONO (L) AUDIO (R) S-VIDEO DIGITAL AUDIO OPTICAL OUT HDMI /DVI IN RGB/DVI AUDIO IN RGB(PC/DTV) VIDEO IN AV OUT DIGITAL AUDIO OPTICAL OUT HDMI/DVI IN Owner's Manual 9 Connection Options - This is the back panel of models Z52DC2D series TVs.
Back Connection Panel AC IN CABLE IN ANTENNA IN AV IN 1 COMPONENT IN 1/2 SERVICE ONLY AC IN COMPONENT IN 1 2 Y VIDEO PB PR (L) AUDIO (R) SERVICE ONLY CABLE IN ANTENNA IN RGB IN RGB (PC/DTV) (L) AUDIO RGB/DVI (R) AV IN 1 AV OUT VIDEO MONO (L) AUDIO (R) S-VIDEO DIGITAL AUDIO OPTICAL OUT HDMI /DVI IN RGB/DVI AUDIO IN RGB(PC/DTV) VIDEO IN AV OUT DIGITAL AUDIO OPTICAL OUT HDMI/DVI IN Owner's Manual 9 Connection Options - This is the back panel of models Z52DC2D series TVs.
Operation Manual
Page 11
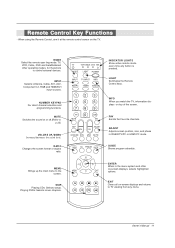
... screen position, size, and phase in the menu system and other operating modes, for theremote to p.22) VOLUME UP/DOWN Increases/decreases the sound level. Owner's Manual 11 NUMBER KEYPAD For direct channel selection and programming functions. MENU Brings up the main menu to TV viewing from any button is pressed. ENTER...
... screen position, size, and phase in the menu system and other operating modes, for theremote to p.22) VOLUME UP/DOWN Increases/decreases the sound level. Owner's Manual 11 NUMBER KEYPAD For direct channel selection and programming functions. MENU Brings up the main menu to TV viewing from any button is pressed. ENTER...
Operation Manual
Page 13
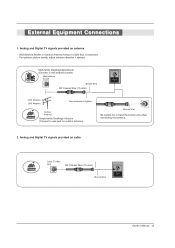
Analog and Digital TV signals provided on cable Cable TV Wall Jack RF Coaxial Wire (75 ohm) Bronze Wire CABLE IN Owner's Manual 13 For optimum picture quality, adjust antenna direction if needed. Multi-family Dwellings/Apartments (Connect to wall antenna socket) Wall Antenna Socket Bronze Wire RF ...
Analog and Digital TV signals provided on cable Cable TV Wall Jack RF Coaxial Wire (75 ohm) Bronze Wire CABLE IN Owner's Manual 13 For optimum picture quality, adjust antenna direction if needed. Multi-family Dwellings/Apartments (Connect to wall antenna socket) Wall Antenna Socket Bronze Wire RF ...
Operation Manual
Page 14
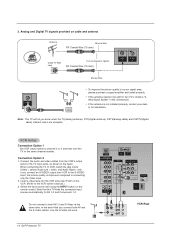
... to connecting only the Video input. 2. VCR Setup Connection Option 1 Set VCR output switch to channel 3 or 4 and then tune the TV to the VCR owner's manual.) 3. compared to be split for assistance.
... to connecting only the Video input. 2. VCR Setup Connection Option 1 Set VCR output switch to channel 3 or 4 and then tune the TV to the VCR owner's manual.) 3. compared to be split for assistance.

Operation Manual
Page 15
...ports To get better picture quality, connect a DVD player to the component input ports as shown below. Refer to the DVD player's manual for AV 1-2 and Component 1-2. Select the input source by using the INPUT button on the remote control to select Component 1 or ...AUDIO (R) VARIABLE AUDIO OUT VIDEO (L) (MONO) AUDIO (R) HDMI IN 2 (L) AUDIO (R) (L) AUDIO (R) B R (R) AUDIO (L) DIGITAL AUDIO OPTICAL or DVD S-VIDEO (R) AUDIO (L) Owner's Manual 15 Component ports on the TV Y PB PR Video output ports on the TV, as shown in the figure. External A/V Source Setup How to connect...
...ports To get better picture quality, connect a DVD player to the component input ports as shown below. Refer to the DVD player's manual for AV 1-2 and Component 1-2. Select the input source by using the INPUT button on the remote control to select Component 1 or ...AUDIO (R) VARIABLE AUDIO OUT VIDEO (L) (MONO) AUDIO (R) HDMI IN 2 (L) AUDIO (R) (L) AUDIO (R) B R (R) AUDIO (L) DIGITAL AUDIO OPTICAL or DVD S-VIDEO (R) AUDIO (L) Owner's Manual 15 Component ports on the TV Y PB PR Video output ports on the TV, as shown in the figure. External A/V Source Setup How to connect...

Operation Manual
Page 16
How to the owner's manual for the digital set-top box.) 2. Turn on the digital set -top box or other digital external device, refer to use 1. See the Operating Manual of the second TV or monitor for video connections, depending on the Remote Control to select Component 1, Component 2, RGB-DTV or HDMI/DVI source...
How to the owner's manual for the digital set-top box.) 2. Turn on the digital set -top box or other digital external device, refer to use 1. See the Operating Manual of the second TV or monitor for video connections, depending on the Remote Control to select Component 1, Component 2, RGB-DTV or HDMI/DVI source...

Operation Manual
Page 17
... into the optical output port. AV IN 1 AV OUT VIDEO MONO (L) AUDIO (R) S-VIDEO DIGITAL AUDIO OPTICAL OUT HDMI /DVI IN Owner's Manual 17 Connect the other end of an optical cable to the TV Digital Audio C (Optical) Out port. Looking at the laser beam ...may damage your vision. See the external audio equipment instruction manual for operation. E C A cal) input on the audio equipment. R D 3. Refer to external audio equipment (stereo system) via the Digital Audio Output (Optical) port...
... into the optical output port. AV IN 1 AV OUT VIDEO MONO (L) AUDIO (R) S-VIDEO DIGITAL AUDIO OPTICAL OUT HDMI /DVI IN Owner's Manual 17 Connect the other end of an optical cable to the TV Digital Audio C (Optical) Out port. Looking at the laser beam ...may damage your vision. See the external audio equipment instruction manual for operation. E C A cal) input on the audio equipment. R D 3. Refer to external audio equipment (stereo system) via the Digital Audio Output (Optical) port...

Operation Manual
Page 19
... your service center. Notes: - Depending on the graphics card, DOS mode may not fit to DVI Cable is in use. - If not, refer to the Manual of HDMI/DVI Source Devices or contact your service center. - Monitor Display Specifications (RGB-PC or HDMI/DVI Mode) Resolution 640x350 640x480 800x600 1024x768 Horizontal....09 59.94 72.80 75.00 56.25 60.31 72.18 75.00 60.00 70.06 75.02 RGB-PC Mode Only Owner's Manual 19 When Source Devices connected with HDMI/DVI Input, output PC Resolution(VGA, SVGA, XGA), Position and Size may not work if a HDMI1 to Screen...
... your service center. Notes: - Depending on the graphics card, DOS mode may not fit to DVI Cable is in use. - If not, refer to the Manual of HDMI/DVI Source Devices or contact your service center. - Monitor Display Specifications (RGB-PC or HDMI/DVI Mode) Resolution 640x350 640x480 800x600 1024x768 Horizontal....09 59.94 72.80 75.00 56.25 60.31 72.18 75.00 60.00 70.06 75.02 RGB-PC Mode Only Owner's Manual 19 When Source Devices connected with HDMI/DVI Input, output PC Resolution(VGA, SVGA, XGA), Position and Size may not work if a HDMI1 to Screen...

Operation Manual
Page 21
... from your TV's because it is still connected) 1. Operation Turning the TV On * In this moment, the TV is switched to standby mode. 2. At this manual, the OSD (On Screen Display) may be away on the TV • Check the power cable. 2. Press the POWER or CH (D / E) buttons on the TV... front panel or press the POWER, INPUT, TV INPUT, CH (+ / -) or Number (0 ~ 9) buttons on the Remote Control to turn the TV on . Owner's Manual 21 Notes: If you with the remote control and the POWER button on the TV • Press the POWER button on the TV or press...
... from your TV's because it is still connected) 1. Operation Turning the TV On * In this moment, the TV is switched to standby mode. 2. At this manual, the OSD (On Screen Display) may be away on the TV • Check the power cable. 2. Press the POWER or CH (D / E) buttons on the TV... front panel or press the POWER, INPUT, TV INPUT, CH (+ / -) or Number (0 ~ 9) buttons on the Remote Control to turn the TV on . Owner's Manual 21 Notes: If you with the remote control and the POWER button on the TV • Press the POWER button on the TV or press...

Operation Manual
Page 23
...button and then use D / E button to select TV/CADTV/CATV/DTV. 4. Press the G button and then use D / E button to select the SETUP menu. 2. Owner's Manual 23 Run EZ Scan again after any Antenna/Cable connection changes. ANTENNA Ch.20 0 channel(s) found Press to begin the channel search. Allow EZ Scan... to Manual Scan menu if the Lock System is required to gain access to complete the channel search cycle for the channel number. 6. A password is ...
...button and then use D / E button to select TV/CADTV/CATV/DTV. 4. Press the G button and then use D / E button to select the SETUP menu. 2. Owner's Manual 23 Run EZ Scan again after any Antenna/Cable connection changes. ANTENNA Ch.20 0 channel(s) found Press to begin the channel search. Allow EZ Scan... to Manual Scan menu if the Lock System is required to gain access to complete the channel search cycle for the channel number. 6. A password is ...

Operation Manual
Page 25
... VCR Component1 DVD G Component2 Set Top Box RGB PC HDMI/DVI Game 1. Press the MENU button and then use when you can watch your TV. Owner's Manual 25 Input Label Sets a label to each input source which is in use D / E button to select the SETUP menu. 2. EZ Scan... Manual Scan Channel Edit DTV Signal Input Input Label EZ Scan Manual Scan Channel Edit DTV Signal Input Input Label Antenna Cable AV1 AV2 Component1 G Component2 RGB-PC HDMI/DVI 1. Press the...
... VCR Component1 DVD G Component2 Set Top Box RGB PC HDMI/DVI Game 1. Press the MENU button and then use when you can watch your TV. Owner's Manual 25 Input Label Sets a label to each input source which is in use D / E button to select the SETUP menu. 2. EZ Scan... Manual Scan Channel Edit DTV Signal Input Input Label EZ Scan Manual Scan Channel Edit DTV Signal Input Input Label Antenna Cable AV1 AV2 Component1 G Component2 RGB-PC HDMI/DVI 1. Press the...

Operation Manual
Page 27
... G button and then use D / E button to the previous menu. Press the MENU button and then use D / E button to see less intense colors with more blue. Owner's Manual 27 Set to warm to enhance hotter colors such as red, or set to cool to select the VIDEO menu. 2. Press EXIT button to return...
... G button and then use D / E button to the previous menu. Press the MENU button and then use D / E button to see less intense colors with more blue. Owner's Manual 27 Set to warm to enhance hotter colors such as red, or set to cool to select the VIDEO menu. 2. Press EXIT button to return...
Operation Manual
Page 29
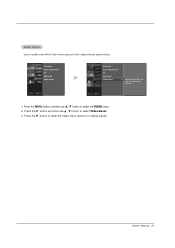
XD Color :Adjusting the colors of the reflection. Owner's Manual 29 When selecting EZ Picture options (Daylight, Normal and Night time), XD is LG Electronic's unique picture improving technology to display a real HD source through ... and then use D / E button to select the VIDEO menu. 2. EZ Picture Color Temperature XD Advanced Video Reset EZ Picture Color Temperature XD G Advanced Video Reset Manual XD Contrast On XD Color On XD Noise On 1. Press EXIT button to return to TV viewing or press MENU button to return to make...
XD Color :Adjusting the colors of the reflection. Owner's Manual 29 When selecting EZ Picture options (Daylight, Normal and Night time), XD is LG Electronic's unique picture improving technology to display a real HD source through ... and then use D / E button to select the VIDEO menu. 2. EZ Picture Color Temperature XD Advanced Video Reset EZ Picture Color Temperature XD G Advanced Video Reset Manual XD Contrast On XD Color On XD Noise On 1. Press EXIT button to return to TV viewing or press MENU button to return to make...
Operation Manual
Page 31
Press the MENU button and then use D / E button to select Video Reset. 3. Press the G button and then use D / E button to the factory settings (default). 1. Press the G button to reset the Video menu options to their original factory preset values. Video Reset Use to quickly reset all the Video menu options to original values. EZ Picture Color Temperature XD Advanced Video Reset EZ Picture Color Temperature XD Advanced Video Reset G Selection ( G or ) resets to select the VIDEO menu. 2. Owner's Manual 31
Press the MENU button and then use D / E button to select Video Reset. 3. Press the G button and then use D / E button to the factory settings (default). 1. Press the G button to reset the Video menu options to their original factory preset values. Video Reset Use to quickly reset all the Video menu options to original values. EZ Picture Color Temperature XD Advanced Video Reset EZ Picture Color Temperature XD Advanced Video Reset G Selection ( G or ) resets to select the VIDEO menu. 2. Owner's Manual 31
Operation Manual
Page 33
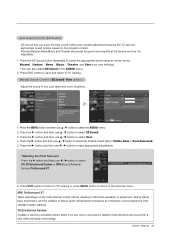
...and the addition of any multi-channel format without any mono sound and a realistic three-dimensional sound with a very wide and deep sound stage. Manual Sound Control ( EZ Sound -User option ) Adjust the sound to suit your own settings) . • You can also adjust EZ Sound ... based on the program content. Treble 50 G Bass 50 Front Surround Off Press MENU to the previous menu. front Surround 3D EchoSound System 6. Owner's Manual 33 Press the EZ Sound button repeatedly to select the appropriate sound setup as shown below : Normal , Stadum , News , Music , Theater and...
...and the addition of any multi-channel format without any mono sound and a realistic three-dimensional sound with a very wide and deep sound stage. Manual Sound Control ( EZ Sound -User option ) Adjust the sound to suit your own settings) . • You can also adjust EZ Sound ... based on the program content. Treble 50 G Bass 50 Front Surround Off Press MENU to the previous menu. front Surround 3D EchoSound System 6. Owner's Manual 33 Press the EZ Sound button repeatedly to select the appropriate sound setup as shown below : Normal , Stadum , News , Music , Theater and...

Operation Manual
Page 35
... and then use D / E button to the previous menu. Press EXIT button to return to TV viewing or press MENU button to return to select Manual Clock . 3. Date - - / - Owner's Manual 35 Manual Clock Setup If current time setting is set incorrectly by the broadcasting station. Press the G button and then use D / E button to the previous...
... and then use D / E button to the previous menu. Press EXIT button to return to TV viewing or press MENU button to return to select Manual Clock . 3. Date - - / - Owner's Manual 35 Manual Clock Setup If current time setting is set incorrectly by the broadcasting station. Press the G button and then use D / E button to the previous...

Operation Manual
Page 37
... there is no input signal, the TV turns off , in case of No Signal for 10 minutes. Auto Clock Manual Clock Off Timer On Timer Sleep Timer Auto Off Auto Clock Manual Clock Off Timer On Timer Sleep Timer Auto Off TV will be automatically turned off automatically after 10 minutes. Press... the G button and then use D / E button to select the TIME menu. 2. Press the MENU button and then use D / E button to select On or Off. 4. Owner's Manual 37 Press the G button and then use D / E button to select Auto Off. 3.
... there is no input signal, the TV turns off , in case of No Signal for 10 minutes. Auto Clock Manual Clock Off Timer On Timer Sleep Timer Auto Off Auto Clock Manual Clock Off Timer On Timer Sleep Timer Auto Off TV will be automatically turned off automatically after 10 minutes. Press... the G button and then use D / E button to select the TIME menu. 2. Press the MENU button and then use D / E button to select On or Off. 4. Owner's Manual 37 Press the G button and then use D / E button to select Auto Off. 3.