

Operating Guide
Page 5
CONTENTS INDEX Before operating the TV, please read this manual carefully. 1 Safety Warnings 2 Important Safety Instructions 3 Controls 6 Remote Control: Installing Batteries/ Operation 10 TV Overview 11 2 Antenna/Cable Connections VCR Connection and Viewing Setup 13 15 ... Timer Setup 31 5 Video/Picture Setup 32 Audio/Sound Setup 35 Closed Captions 41 6 Parental Control 44 Auto Off 47 Key lock 48 7 Maintenance Product Specifications Troubleshooting CheckList Your Zenith Limited Warranty 49 50 51 Back cover 5 MISC. SPECIAL FEATURES VIDEO / AUDIO CLOCK/ TIMERS...
CONTENTS INDEX Before operating the TV, please read this manual carefully. 1 Safety Warnings 2 Important Safety Instructions 3 Controls 6 Remote Control: Installing Batteries/ Operation 10 TV Overview 11 2 Antenna/Cable Connections VCR Connection and Viewing Setup 13 15 ... Timer Setup 31 5 Video/Picture Setup 32 Audio/Sound Setup 35 Closed Captions 41 6 Parental Control 44 Auto Off 47 Key lock 48 7 Maintenance Product Specifications Troubleshooting CheckList Your Zenith Limited Warranty 49 50 51 Back cover 5 MISC. SPECIAL FEATURES VIDEO / AUDIO CLOCK/ TIMERS...

Operating Guide
Page 6
On/Off Button on . Controls Front of the TV Side Control Panel ch vol enter menu tv/video Channel Buttons Volume Buttons Enter Button Menu Button TV/Video Button Remote Control Sensor Power/Standby indicator Illuminates red in standby mode, Illuminates green when the TV is turned on /off 6
On/Off Button on . Controls Front of the TV Side Control Panel ch vol enter menu tv/video Channel Buttons Volume Buttons Enter Button Menu Button TV/Video Button Remote Control Sensor Power/Standby indicator Illuminates red in standby mode, Illuminates green when the TV is turned on /off 6

Operating Guide
Page 8
Controls Remote Control Buttons POWER NUMBERS PAGE 32 APC MENU PAGE 39 CHANNEL (DE) MTS PAGE 27 PAGE 25 FCR AUTO PROGRAM q Press the FLASHBK button to view the last program you were watching. power tv/video 1 2 3 4 5 6 7 8 9 apc cc 0 menu mute ch vol enter vol mts ch sleep fcr flashbk dasp a.prog memory/erase 8
Controls Remote Control Buttons POWER NUMBERS PAGE 32 APC MENU PAGE 39 CHANNEL (DE) MTS PAGE 27 PAGE 25 FCR AUTO PROGRAM q Press the FLASHBK button to view the last program you were watching. power tv/video 1 2 3 4 5 6 7 8 9 apc cc 0 menu mute ch vol enter vol mts ch sleep fcr flashbk dasp a.prog memory/erase 8
Operating Guide
Page 9
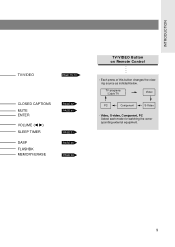
INTRODUCTION TV/VIDEO PAGE 15~19 CLOSED CAPTIONS MUTE ENTER VOLUME (F G) SLEEP TIMER DASP FLASHBK MEMORY/ERASE PAGE 42 PAGE 40 PAGE 31 PAGE 35 PAGE 26 TV/VIDEO Button on Remote Control - TV programs /Cable TV Video PC Component S-Video - Video, S-video, Component, PC Select each mode for watching the corresponding external equipment. 9 Each press of this button changes the viewing source as indicted below.
INTRODUCTION TV/VIDEO PAGE 15~19 CLOSED CAPTIONS MUTE ENTER VOLUME (F G) SLEEP TIMER DASP FLASHBK MEMORY/ERASE PAGE 42 PAGE 40 PAGE 31 PAGE 35 PAGE 26 TV/VIDEO Button on Remote Control - TV programs /Cable TV Video PC Component S-Video - Video, S-video, Component, PC Select each mode for watching the corresponding external equipment. 9 Each press of this button changes the viewing source as indicted below.
Operating Guide
Page 10
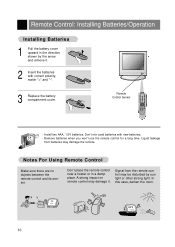
Install two AAA, 1.5V batteries. Notes For Using Remote Control Make sure there are no objects between the remote control and its sensor. Remove batteries when you won't use the remote control for a long time. Remote Control Sensor power tv/video 1 2 3 4 5 6 7 8 9 apc cc 0 menu mute ch vol ...sleep fcr flashbk dasp a.prog memory/erase - A strong impact on remote control may damage it . 2 Insert the batteries with new batteries. - Liquid leakage from the remote control may damage the remote. Signal from batteries may be disturbed by the arrow and remove it...
Install two AAA, 1.5V batteries. Notes For Using Remote Control Make sure there are no objects between the remote control and its sensor. Remove batteries when you won't use the remote control for a long time. Remote Control Sensor power tv/video 1 2 3 4 5 6 7 8 9 apc cc 0 menu mute ch vol ...sleep fcr flashbk dasp a.prog memory/erase - A strong impact on remote control may damage it . 2 Insert the batteries with new batteries. - Liquid leakage from the remote control may damage the remote. Signal from batteries may be disturbed by the arrow and remove it...

Operating Guide
Page 11
Arrange the wires with the tie band. If you intend to mount the TV to a wall, attach this plate to the back of the TV. 11 INTRODUCTION TV Overview Accessories power tv/video 1 2 3 4 5 6 7 8 9 apc cc 0 menu mute ch vol enter vol mts ch sleep fcr flashbk dasp a.prog memory/erase Remote control 1.5V 1.5V AAA Batteries Operating guide Power cord PC signal cable PC sound cable Tie bands - VESA standard mounting interface -
Arrange the wires with the tie band. If you intend to mount the TV to a wall, attach this plate to the back of the TV. 11 INTRODUCTION TV Overview Accessories power tv/video 1 2 3 4 5 6 7 8 9 apc cc 0 menu mute ch vol enter vol mts ch sleep fcr flashbk dasp a.prog memory/erase Remote control 1.5V 1.5V AAA Batteries Operating guide Power cord PC signal cable PC sound cable Tie bands - VESA standard mounting interface -
Operating Guide
Page 14
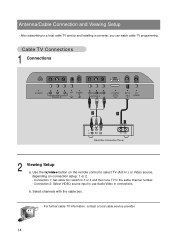
b. After subscribing to select TV (Ant In.) or Video source, depending on the remote control to a local cable TV service and installing a converter, you can watch cable TV programming. Use the tv/video button on connection setup: 1 or 2. - Connection 1: Set ...
b. After subscribing to select TV (Ant In.) or Video source, depending on the remote control to a local cable TV service and installing a converter, you can watch cable TV programming. Use the tv/video button on connection setup: 1 or 2. - Connection 1: Set ...

Operating Guide
Page 15
... equipment to input jacks on and tune to select TV (Ant In.) or Video source, depending on the TV. Use tv/video button on the remote control to a channel. Connecting a VCR 1 Connections q Connect the audio/video output jacks on VCR to use Audio/Video In connections. Connection 2: Select VIDEO source input to...
... equipment to input jacks on and tune to select TV (Ant In.) or Video source, depending on the TV. Use tv/video button on the remote control to a channel. Connecting a VCR 1 Connections q Connect the audio/video output jacks on VCR to use Audio/Video In connections. Connection 2: Select VIDEO source input to...
Operating Guide
Page 16
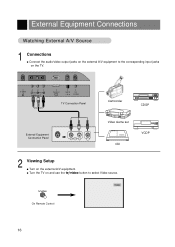
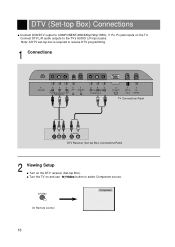
S-VIDEO VIDEO(MONO) L AUDIO R VIDEO IN PC INPUT ANT IN +75 Ω PC SOUND TV Connection Panel Camcorder CDGP External Equipment Connection Panel R AUDIO L VIDEO Video Game set CDI VCDP 2 Viewing Setup q Turn on the external A/V equipment. q Turn the TV on and use the tv/video button to the corresponding input jacks on the TV. tv/video Video On Remote Control 16 External Equipment Connections Watching External A/V Source 1 Connections q Connect the audio/video output jacks on the external A/V equipment to select Video source.
S-VIDEO VIDEO(MONO) L AUDIO R VIDEO IN PC INPUT ANT IN +75 Ω PC SOUND TV Connection Panel Camcorder CDGP External Equipment Connection Panel R AUDIO L VIDEO Video Game set CDI VCDP 2 Viewing Setup q Turn on the external A/V equipment. q Turn the TV on and use the tv/video button to the corresponding input jacks on the TV. tv/video Video On Remote Control 16 External Equipment Connections Watching External A/V Source 1 Connections q Connect the audio/video output jacks on the external A/V equipment to select Video source.
Operating Guide
Page 18
tv/video Component On Remote Control 18 Connect DTV L/R audio outputs to select Component source. q Turn the TV on and use tv/video button to the TV's AUDIO L/R input jacks. DTV (...
tv/video Component On Remote Control 18 Connect DTV L/R audio outputs to select Component source. q Turn the TV on and use tv/video button to the TV's AUDIO L/R input jacks. DTV (...

Operating Guide
Page 19
.... After setup, be sure to select RGB-PC to select PC source. q Connect the TV to the TV's PC SOUND input. PC tv/video On Remote Control 19 q Connect the PC audio output to the PC with the PC cable. PC/Computer Connections (using TV as a Monitor) - q Turn the TV on and...
.... After setup, be sure to select RGB-PC to select PC source. q Connect the TV to the TV's PC SOUND input. PC tv/video On Remote Control 19 q Connect the PC audio output to the PC with the PC cable. PC/Computer Connections (using TV as a Monitor) - q Turn the TV on and...

Operating Guide
Page 22
...25 if you will be away on the TV side panel. q Volume (F) button decreases the sound level. Watching TV Programs 1 Press power on the remote control to turn it reverts to standby mode. Turning the TV On TV Operation Overview 1 First, connect antenna cable and power cord correctly. q In standby ...mode, press the power, ch (D,E), tv/video or number buttons on the remote control or ch (D,E), tv/video or on/off on the TV side panel to turn the TV on. 2 Use the channel (D,E) or number buttons to select...
...25 if you will be away on the TV side panel. q Volume (F) button decreases the sound level. Watching TV Programs 1 Press power on the remote control to turn it reverts to standby mode. Turning the TV On TV Operation Overview 1 First, connect antenna cable and power cord correctly. q In standby ...mode, press the power, ch (D,E), tv/video or number buttons on the remote control or ch (D,E), tv/video or on/off on the TV side panel to turn the TV on. 2 Use the channel (D,E) or number buttons to select...

Operating Guide
Page 25
Channel Search (Auto Programming) 1 Press the a.prog button on the remote control. 2 Press the a.prog or volume (F, G) buttons to complete the channel search cycle before choosing a channel. Auto program Stop : A TV 63 34% BASIC FEATURES - If you ...
Channel Search (Auto Programming) 1 Press the a.prog button on the remote control. 2 Press the a.prog or volume (F, G) buttons to complete the channel search cycle before choosing a channel. Auto program Stop : A TV 63 34% BASIC FEATURES - If you ...

Operating Guide
Page 26
... Channels Memorizing/Erasing Channels - Select Memory (to add the channel) or Erase (to Memory or Erased from memory). 1 Press the memory/erase button on the remote control. q The current channel is displayed.
... Channels Memorizing/Erasing Channels - Select Memory (to add the channel) or Erase (to Memory or Erased from memory). 1 Press the memory/erase button on the remote control. q The current channel is displayed.

Operating Guide
Page 32
Video/Picture Setup - APC Clear FG 2 Use the apc buttons or volume (F, G) button to save. 32 Clear Optimum User Soft 3 Press the enter (A) button to select your desired picture appearance. APC adjusts the TV for the best picture appearance. APC (Auto Picture Control) 1 Press the apc button on the remote control. q Each press of volume (F, G) button selects a different picture appearance.
Video/Picture Setup - APC Clear FG 2 Use the apc buttons or volume (F, G) button to save. 32 Clear Optimum User Soft 3 Press the enter (A) button to select your desired picture appearance. APC adjusts the TV for the best picture appearance. APC (Auto Picture Control) 1 Press the apc button on the remote control. q Each press of volume (F, G) button selects a different picture appearance.

Operating Guide
Page 35
User Flat Movie Sports Music 3 Press the enter (A) button to select the desired setting for your program. Audio/Sound Setup -DASP selects the sound appropriate for the sound. Audio Setup / DASP 1 Press the dasp button on the remote control. q Each press of volume (F, G) button changes the DASP sound option as shown. VIDEO / AUDIO 35 DASP User FG 2 Use the dasp button or volume (F, G) button to save.
User Flat Movie Sports Music 3 Press the enter (A) button to select the desired setting for your program. Audio/Sound Setup -DASP selects the sound appropriate for the sound. Audio Setup / DASP 1 Press the dasp button on the remote control. q Each press of volume (F, G) button changes the DASP sound option as shown. VIDEO / AUDIO 35 DASP User FG 2 Use the dasp button or volume (F, G) button to save.

Operating Guide
Page 39
.... - VIDEO / AUDIO - STEREO and SAP modes are primary and secondary language and stereo modes in stereo sound. q There are available only if included on the remote control. 2 Use the mts button to change the audio mode.
.... - VIDEO / AUDIO - STEREO and SAP modes are primary and secondary language and stereo modes in stereo sound. q There are available only if included on the remote control. 2 Use the mts button to change the audio mode.

Operating Guide
Page 40
Using mute is displayed on the remote control. q When muted sound is restored, current volume level is convenient if the user needs to sound through a headphone(s), TV speakers will not be heard. 40 Y ...
Using mute is displayed on the remote control. q When muted sound is restored, current volume level is convenient if the user needs to sound through a headphone(s), TV speakers will not be heard. 40 Y ...
Operating Guide
Page 42
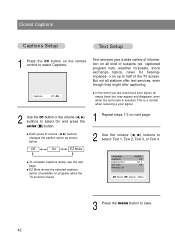
... Menu 3 Press the menu button to select On and press the enter (A) button. Closed Captions Captions Setup Text Setup 1 Press the cc button on the remote control to half of the TV screen. captioned program lists, weather forecasts, stock exchange topics, news for hearingimpaired---) on all stations offer text services, even though...
... Menu 3 Press the menu button to select On and press the enter (A) button. Closed Captions Captions Setup Text Setup 1 Press the cc button on the remote control to half of the TV screen. captioned program lists, weather forecasts, stock exchange topics, news for hearingimpaired---) on all stations offer text services, even though...

Operating Guide
Page 48
... DE Move FG Adjust Menu 2 Use the channel (D,E) buttons to even if you turn the TV off. 48 The TV can be used with the remote control. - This TV is programmed to remember which option it can prevent unauthorized viewing. 1 Use the menu button to select the menu shown. 3 Use the volume...
... DE Move FG Adjust Menu 2 Use the channel (D,E) buttons to even if you turn the TV off. 48 The TV can be used with the remote control. - This TV is programmed to remember which option it can prevent unauthorized viewing. 1 Use the menu button to select the menu shown. 3 Use the volume...