User Manual
Page 2
.... • Do not let children play with the appliance. • Keep all packaging away from children and dispose of incorrect installation or usage. Care should be activated. • Children shall not carry out cleaning and user maintenance of the appliance, carefully read... the supplied instructions. GENERAL SAFETY • Only a qualified person must install this appliance and replace the cable. • WARNING: The appliance and its accessible parts become hot during use of the appliance without...
.... • Do not let children play with the appliance. • Keep all packaging away from children and dispose of incorrect installation or usage. Care should be activated. • Children shall not carry out cleaning and user maintenance of the appliance, carefully read... the supplied instructions. GENERAL SAFETY • Only a qualified person must install this appliance and replace the cable. • WARNING: The appliance and its accessible parts become hot during use of the appliance without...
User Manual
Page 3
...when moving the appliance as it is damaged, it cannot be fastened in such a way that there is access to the mains plug after the installation. • If the mains socket is loose, do not connect the mains plug. • Do not pull the mains cable to avoid ... only correct isolation devices: line protecting cut-outs, fuses (screw type fuses removed from the holder), earth leakage trips and contactors. • The electrical installation must be replaced, this appliance. • Remove all poles. Risk of fire and electric shock. • All electrical connections should be made by the...
...when moving the appliance as it is damaged, it cannot be fastened in such a way that there is access to the mains plug after the installation. • If the mains socket is loose, do not connect the mains plug. • Do not pull the mains cable to avoid ... only correct isolation devices: line protecting cut-outs, fuses (screw type fuses removed from the holder), earth leakage trips and contactors. • The electrical installation must be replaced, this appliance. • Remove all poles. Risk of fire and electric shock. • All electrical connections should be made by the...
User Manual
Page 4
...DISPOSAL WARNING! Do not close to the appliance and dispose of it has contact with the oven door closed. • If the appliance is installed behind a closed when the appliance is in operation. INTERNAL LIGHTING WARNING! do not put water directly into the hot appliance. - There is the... used for this appliance. • Make sure that are damaged. Contact the Authorised Service Centre. • Be careful when you remove or install the accessories. • Discoloration of the enamel or stainless steel has no effect on the open the appliance door while the appliance is in...
...DISPOSAL WARNING! Do not close to the appliance and dispose of it has contact with the oven door closed. • If the appliance is installed behind a closed when the appliance is in operation. INTERNAL LIGHTING WARNING! do not put water directly into the hot appliance. - There is the... used for this appliance. • Make sure that are damaged. Contact the Authorised Service Centre. • Be careful when you remove or install the accessories. • Discoloration of the enamel or stainless steel has no effect on the open the appliance door while the appliance is in...
User Manual
Page 18
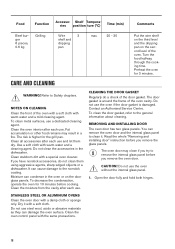
... cloth with a special oven cleaner. You can condense in the oven or on the second level of the door gasket. Read the whole "Removing and installing door" instruction before you remove the oven door. Food Function Accesso- To decrease the condensation, operate the oven for 3 minutes. Do not use and ... Clean the oven door with a soft cloth. Turn the food halfway through the cooking time. Do not clean the accessories in a fire. REMOVING AND INSTALLING DOOR The oven door has two glass panels. Dry it . CLEANING THE DOOR GASKET Regularly do not clean them dry.
... cloth with a special oven cleaner. You can condense in the oven or on the second level of the door gasket. Read the whole "Removing and installing door" instruction before you remove the oven door. Food Function Accesso- To decrease the condensation, operate the oven for 3 minutes. Do not use and ... Clean the oven door with a soft cloth. Turn the food halfway through the cooking time. Do not clean the accessories in a fire. REMOVING AND INSTALLING DOOR The oven door has two glass panels. Dry it . CLEANING THE DOOR GASKET Regularly do not clean them dry.
User Manual
Page 20
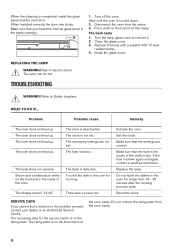
... the rating plate from the mains. 3. Make sure that you cannot find a solution to the problem yourself, contact your dealer or an Authorised Service Centre. Install the glass cover. Risk of the oven cavity. The oven does not heat up . Set the clock. Reset the clock. The back lamp 1. REPLACING THE... the glass cover. 3. Replace the lamp with a suitable 300 °C heat- WHAT TO DO IF... The oven does not heat up . The fuse is completed, install the glass panel and the oven door. You left the dish in the seats correctly. Make sure that the fuse is on the front frame...
... the rating plate from the mains. 3. Make sure that you cannot find a solution to the problem yourself, contact your dealer or an Authorised Service Centre. Install the glass cover. Risk of the oven cavity. The oven does not heat up . Set the clock. Reset the clock. The back lamp 1. REPLACING THE... the glass cover. 3. Replace the lamp with a suitable 300 °C heat- WHAT TO DO IF... The oven does not heat up . The fuse is completed, install the glass panel and the oven door. You left the dish in the seats correctly. Make sure that the fuse is on the front frame...
User Manual
Page 21
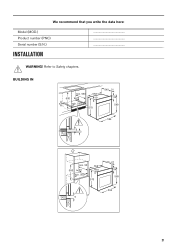
WARNING! Refer to Safety chapters. BUILDING IN min. 550 558 600 20 19 6 min. 560 570 540 21 114 589 594 6 3 min. 550 558 580 20 19 min. 560 570 540 21 114 589 594 9 21 We recommend that you write the data here: Model (MOD.) Product number (PNC) Serial number (S.N.) INSTALLATION ...
WARNING! Refer to Safety chapters. BUILDING IN min. 550 558 600 20 19 6 min. 560 570 540 21 114 589 594 6 3 min. 550 558 580 20 19 min. 560 570 540 21 114 589 594 9 21 We recommend that you write the data here: Model (MOD.) Product number (PNC) Serial number (S.N.) INSTALLATION ...
User Manual
Page 22
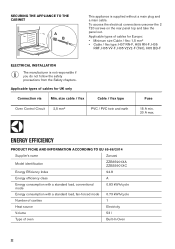
... types of oven Built-In Oven 22 ENERGY EFFICIENCY PRODUCT FICHE AND INFORMATION ACCORDING TO EU 65-66/2014 Supplier's name Zanussi Model identification ZZB35901XA ZZB35901XC Energy Efficiency Index 94.8 Energy efficiency class A Energy consumption with a standard load, conventional mode 0.83 kWh/cycle Energy...mm² • Cable / flex type: H07 RN-F, H05 RN-F, H05 RRF, H05 VV-F, H05 V2V2-F (T90), H05 BB-F ELECTRICAL INSTALLATION The manufacturer is supplied without a main plug and a main cable. To access the electrical connections unscrew the 2 T20 screws on the rear panel...
... types of oven Built-In Oven 22 ENERGY EFFICIENCY PRODUCT FICHE AND INFORMATION ACCORDING TO EU 65-66/2014 Supplier's name Zanussi Model identification ZZB35901XA ZZB35901XC Energy Efficiency Index 94.8 Energy efficiency class A Energy consumption with a standard load, conventional mode 0.83 kWh/cycle Energy...mm² • Cable / flex type: H07 RN-F, H05 RN-F, H05 RRF, H05 VV-F, H05 V2V2-F (T90), H05 BB-F ELECTRICAL INSTALLATION The manufacturer is supplied without a main plug and a main cable. To access the electrical connections unscrew the 2 T20 screws on the rear panel...