User Manual
Page 3
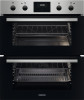
...colours of connectors, to avoid possible hazard. • The means for disconnection must be taken to avoid touching heating elements. • Always use oven gloves to remove or put in accessories or ovenware. • To remove the shelf supports first pull the front of the shelf support and ...then the rear end away from other appliances and units. • Before mounting the appliance, check if the oven door opens without restraint. • Parts of the appliance carry current. • Disconnect the appliance from the power supply before replacing the lamp...
...colours of connectors, to avoid possible hazard. • The means for disconnection must be taken to avoid touching heating elements. • Always use oven gloves to remove or put in accessories or ovenware. • To remove the shelf supports first pull the front of the shelf support and ...then the rear end away from other appliances and units. • Before mounting the appliance, check if the oven door opens without restraint. • Parts of the appliance carry current. • Disconnect the appliance from the power supply before replacing the lamp...

User Manual
Page 5
.... • Discoloration of injury, fire, or damage to prevent the deterioration of the surface material. • Clean the appliance with the oven door closed. They are not intended to prevent children or pets from the mains socket. • Make sure the appliance is for household ... Use a deep pan for example room heating. • Always cook with a moist soft cloth. CARE AND CLEANING WARNING! Do not use an oven spray, follow the safety instructions on the performance of the appliance. There is the risk that can break. • Replace immediately the door glass ...
.... • Discoloration of injury, fire, or damage to prevent the deterioration of the surface material. • Clean the appliance with the oven door closed. They are not intended to prevent children or pets from the mains socket. • Make sure the appliance is for household ... Use a deep pan for example room heating. • Always cook with a moist soft cloth. CARE AND CLEANING WARNING! Do not use an oven spray, follow the safety instructions on the performance of the appliance. There is the risk that can break. • Replace immediately the door glass ...
User Manual
Page 6
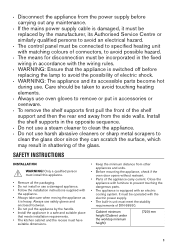
... OVERVIEW 1234567 8 4 3 12 2 9 1 11 8 9 4 3 12 2 10 1 11 1 Knob for the top oven functions 2 Knob for the top oven temperature 3 Temperature indicator / symbol for the top oven 4 Display 5 Knob for the main oven functions 6 Temperature indicator / symbol for the main oven 7 Knob for the main oven temperature 8 Heating element 9 Lamp 10 Fan 11 Shelf support, removable 12...
... OVERVIEW 1234567 8 4 3 12 2 9 1 11 8 9 4 3 12 2 10 1 11 1 Knob for the top oven functions 2 Knob for the top oven temperature 3 Temperature indicator / symbol for the top oven 4 Display 5 Knob for the main oven functions 6 Temperature indicator / symbol for the main oven 7 Knob for the main oven temperature 8 Heating element 9 Lamp 10 Fan 11 Shelf support, removable 12...
User Manual
Page 7
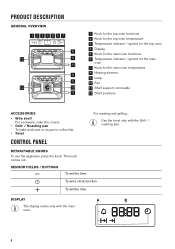
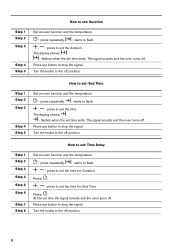
... WARNING! Light Step 2 Step 3 Turn the control knob to select a heating function. Clock functions BEFORE FIRST USE B. Turn off the oven. HOW TO SET: HEATING FUNCTION Step 1 Turn the knob for the heating functions to select the temperature. After approximately 5 sec., the flashing... stops and the display shows the time. 1. A. Heat up one oven at a time. Clean the oven and the accessories with a soft cloth, warm water and a mild detergent. 1. Time: 1 h. 2. Time: 15 min. press to ...
... WARNING! Light Step 2 Step 3 Turn the control knob to select a heating function. Clock functions BEFORE FIRST USE B. Turn off the oven. HOW TO SET: HEATING FUNCTION Step 1 Turn the knob for the heating functions to select the temperature. After approximately 5 sec., the flashing... stops and the display shows the time. 1. A. Heat up one oven at a time. Clean the oven and the accessories with a soft cloth, warm water and a mild detergent. 1. Time: 1 h. 2. Time: 15 min. press to ...

User Manual
Page 8
... the frozen food. To grill thin pieces of food in the cavity may be reduced. For more information refer to dry food. Fast Grilling MAIN OVEN FUNCTIONS Heating function Application To turn on : Moist Baking. 8 To roast large meat joints or poultry with crispy bottom and to toast bread. Heating function...
... the frozen food. To grill thin pieces of food in the cavity may be reduced. For more information refer to dry food. Fast Grilling MAIN OVEN FUNCTIONS Heating function Application To turn on : Moist Baking. 8 To roast large meat joints or poultry with crispy bottom and to toast bread. Heating function...

User Manual
Page 9
... "Hints and tips" chapter, Moist Baking. press to comply with the highest energy efficiency possible. The function works only for the main oven. The function works only for the main oven. This function has no effect on the operation of Day - Step 1 Step 2 How to change : Time of the... oven. press repeatedly to change the time of day. - The oven door should be closed during cooking so that the function is off . For general energy saving recommendations refer to flash. , -...
... "Hints and tips" chapter, Moist Baking. press to comply with the highest energy efficiency possible. The function works only for the main oven. The function works only for the main oven. This function has no effect on the operation of Day - Step 1 Step 2 How to change : Time of the... oven. press repeatedly to change the time of day. - The oven door should be closed during cooking so that the function is off . For general energy saving recommendations refer to flash. , -...
User Manual
Page 10
... off . press repeatedly. - starts to the off position. The display shows: . - The signal sounds and the oven turns off position. 10 press repeatedly. - Press: . , - press to set: Time Delay Set an oven function and the temperature. - Step 1 Step 2 Step 3 Step 4 Step 5 Step 6 Step 7 Step 8 How to set the time... ends. press repeatedly. - Press any button to set the time for : End Time. Turn the knobs to set: End Time Set an oven function and the temperature. - Step 1 Step 2 Step 3 Step 4 Step 5 How to the off . The display shows: . - press to set: Duration Set ...
... off . press repeatedly. - starts to the off position. The display shows: . - The signal sounds and the oven turns off position. 10 press repeatedly. - Press: . , - press to set: Time Delay Set an oven function and the temperature. - Step 1 Step 2 Step 3 Step 4 Step 5 Step 6 Step 7 Step 8 How to set the time... ends. press repeatedly. - Press any button to set the time for : End Time. Turn the knobs to set: End Time Set an oven function and the temperature. - Step 1 Step 2 Step 3 Step 4 Step 5 How to the off . The display shows: . - press to set: Duration Set ...

User Manual
Page 12
TRIVET AND GRILL- / ROASTING PAN Step 1 Put the trivet into a deep pan. If you turn off the oven, the cooling fan can continue to keep the surfaces of the oven cool. Step 2 Put the deep pan on the guide bars above. Make sure the supports of the shelf support and the wire...the recommended shelf position. Wire shelf, Deep pan: Push the tray between the guide bars of meat or poultry on automatically to operate until the oven cools down . Make sure the supports of food in large quantities. Roasting larger pieces of the shelf support. Grilling and toasting thin pieces of ...
TRIVET AND GRILL- / ROASTING PAN Step 1 Put the trivet into a deep pan. If you turn off the oven, the cooling fan can continue to keep the surfaces of the oven cool. Step 2 Put the deep pan on the guide bars above. Make sure the supports of the shelf support and the wire...the recommended shelf position. Wire shelf, Deep pan: Push the tray between the guide bars of meat or poultry on automatically to operate until the oven cools down . Make sure the supports of food in large quantities. Roasting larger pieces of the shelf support. Grilling and toasting thin pieces of ...
User Manual
Page 13
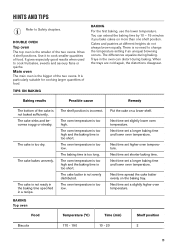
... flans or quiche. Baking results Possible cause Remedy The bottom of the two ovens. The oven temperature is too low. The baking time is incorrect. DOUBLE OVEN Top oven The top oven is the smaller of the cake is particularly suitable for cooking larger quantities of...the trays are cold again, the distortions disappear. BAKING Top oven The shelf position is too long. Next time set a slightly higher oven temperature. Next time set slightly lower oven temperature. Main oven The main oven is too low. There is not ready in the baking...
... flans or quiche. Baking results Possible cause Remedy The bottom of the two ovens. The oven temperature is too low. The baking time is incorrect. DOUBLE OVEN Top oven The top oven is the smaller of the cake is particularly suitable for cooking larger quantities of...the trays are cold again, the distortions disappear. BAKING Top oven The shelf position is too long. Next time set a slightly higher oven temperature. Next time set slightly lower oven temperature. Main oven The main oven is too low. There is not ready in the baking...

User Manual
Page 16
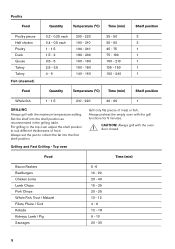
Baste meat joints with their own juice several times during roasting. MAIN OVEN Beef Turn the roast after 1/2 - 2/3 of thick- 180 - 190 6 - 8 2 medium, preheat the ness empty oven 16 Roast lean meat covered (you can use aluminium foil). Food Quantity Temperature (°C) Time (min) Shelf position... Roast beef or fillet: per cm of thick- 190 - 200 5 - 6 2 rare, preheat the ness empty oven Roast beef or fillet: per cm of the cooking time. baking tray or drip- 180 3 45 nean vegeta- (°C) Real cooking time (min) (...
Baste meat joints with their own juice several times during roasting. MAIN OVEN Beef Turn the roast after 1/2 - 2/3 of thick- 180 - 190 6 - 8 2 medium, preheat the ness empty oven 16 Roast lean meat covered (you can use aluminium foil). Food Quantity Temperature (°C) Time (min) Shelf position... Roast beef or fillet: per cm of thick- 190 - 200 5 - 6 2 rare, preheat the ness empty oven Roast beef or fillet: per cm of the cooking time. baking tray or drip- 180 3 45 nean vegeta- (°C) Real cooking time (min) (...

User Manual
Page 17
Food Quantity Temperature (°C) Time (min) Roast beef or fillet: well done, preheat the empty oven Pork per cm of thickness 170 - 180 8 - 10 Food Quantity Temperature (°C) Time (min) Shoulder, neck, ham Pork chop Meat loaf Knuckle of pork (precooked) ...
Food Quantity Temperature (°C) Time (min) Roast beef or fillet: well done, preheat the empty oven Pork per cm of thickness 170 - 180 8 - 10 Food Quantity Temperature (°C) Time (min) Shoulder, neck, ham Pork chop Meat loaf Knuckle of pork (precooked) ...
User Manual
Page 18
...grill with the grill functions for 5 minutes. Always preheat the empty oven with the oven door closed. Always set the pan to collect the fat into the shelf position as recommended in the top oven adjust the shelf position to suit different thicknesses of meat or fish.... Shelf position Whole fish 1 - 1.5 210 - 220 40 - 60 1 GRILLING Always grill with the maximum temperature setting. Grilling and Fast Grilling - Top oven Grill only flat pieces of food. Food Time (min) Bacon Rashers Beefburgers Chicken Joints Lamb Chops Pork Chops Whole Fish, Trout / Makarel Fillets, Plaice / ...
...grill with the grill functions for 5 minutes. Always preheat the empty oven with the oven door closed. Always set the pan to collect the fat into the shelf position as recommended in the top oven adjust the shelf position to suit different thicknesses of meat or fish.... Shelf position Whole fish 1 - 1.5 210 - 220 40 - 60 1 GRILLING Always grill with the maximum temperature setting. Grilling and Fast Grilling - Top oven Grill only flat pieces of food. Food Time (min) Bacon Rashers Beefburgers Chicken Joints Lamb Chops Pork Chops Whole Fish, Trout / Makarel Fillets, Plaice / ...

User Manual
Page 19
... not cover the food with a bowl or a plate, as this can extend the defrost time. Turn halfway through . Food Time (min) Toasted Sandwiches Steaks: - Main oven 3 - 4 4 - 6 6 - 8 12 - 15 Food Temperature (°C) Time (min) 1st side 2nd side Shelf position Roast beef Filet of beef Back of pork Back of veal Back...
... not cover the food with a bowl or a plate, as this can extend the defrost time. Turn halfway through . Food Time (min) Toasted Sandwiches Steaks: - Main oven 3 - 4 4 - 6 6 - 8 12 - 15 Food Temperature (°C) Time (min) 1st side 2nd side Shelf position Roast beef Filet of beef Back of pork Back of veal Back...
User Manual
Page 20
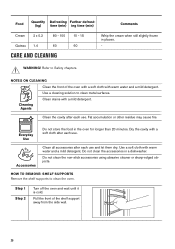
... not store the food in places. - Use a soft cloth with a mild detergent. Step 1 Step 2 Turn off the oven and wait until it is cold. Pull the front of the oven with a soft cloth with a soft cloth after each use . WARNING! Cleaning Agents Clean stains with warm water and a mild... time (min) Comments Cream 2 x 0.2 80 - 100 Gateau 1.4 60 CARE AND CLEANING 10 - 15 60 Whip the cream when still slightly frozen in the oven for longer than 20 minutes. Refer to Safety chapters. Fat accumulation or other residue may cause fire. Do not clean the accessories in a dishwasher.
... not store the food in places. - Use a soft cloth with a mild detergent. Step 1 Step 2 Turn off the oven and wait until it is cold. Pull the front of the oven with a soft cloth with a soft cloth after each use . WARNING! Cleaning Agents Clean stains with warm water and a mild... time (min) Comments Cream 2 x 0.2 80 - 100 Gateau 1.4 60 CARE AND CLEANING 10 - 15 60 Whip the cream when still slightly frozen in the oven for longer than 20 minutes. Refer to Safety chapters. Fat accumulation or other residue may cause fire. Do not clean the accessories in a dishwasher.
User Manual
Page 21
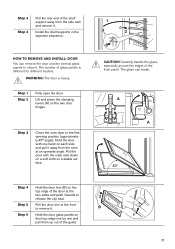
.... Carefully handle the glass, especially around the edges of the door at an upwards angle. The door is different for different models. Step 3 Close the oven door to remove it . WARNING! Put the door with one hand on their top edge one by one and pull them up out of the... can remove the door and the internal glass panels to clean it . Step 3 Step 4 Pull the rear end of the shelf support away from the oven at the two sides and push inwards to release the clip seal. 2 Step 5 Pull the door trim to the front to the first opening position...
.... Carefully handle the glass, especially around the edges of the door at an upwards angle. The door is different for different models. Step 3 Close the oven door to remove it . WARNING! Put the door with one hand on their top edge one by one and pull them up out of the... can remove the door and the internal glass panels to clean it . Step 3 Step 4 Pull the rear end of the shelf support away from the oven at the two sides and push inwards to release the clip seal. 2 Step 5 Pull the door trim to the front to the first opening position...
User Manual
Page 22
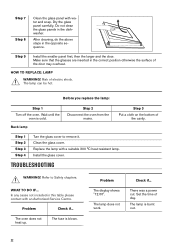
... the glass cover. The lamp does not work. Make sure that the glasses are inserted in the dishwasher. Back lamp Step 2 Disconnect the oven from the mains. Refer to remove it. Problem Check if... Step 1 Step 2 Step 3 Step 4 Turn the glass cover to Safety chapters.... TROUBLESHOOTING WARNING! Check if... Wait until the oven is blown. Replace the lamp with water and soap. The fuse is cold. Step 7 Step 8 Clean the glass panel with a suitable 300 °...
... the glass cover. The lamp does not work. Make sure that the glasses are inserted in the dishwasher. Back lamp Step 2 Disconnect the oven from the mains. Refer to remove it. Problem Check if... Step 1 Step 2 Step 3 Step 4 Turn the glass cover to Safety chapters.... TROUBLESHOOTING WARNING! Check if... Wait until the oven is blown. Replace the lamp with water and soap. The fuse is cold. Step 7 Step 8 Clean the glass panel with a suitable 300 °...
User Manual
Page 23
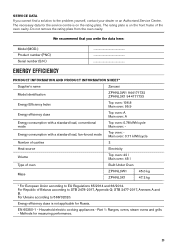
... for measuring performance. 23 PRODUCT INFORMATION AND PRODUCT INFORMATION SHEET* Supplier's name Zanussi Model identification ZPHNL3W1 944171732 ZPHNL3X1 944171733 Energy Efficiency Index Top oven: 106.8 Main oven: 95.9 Energy efficiency class Top oven: A Main oven: A Energy consumption with a standard load, fan-forced mode Top oven: Main oven: 0.71 kWh/cycle Number of cavities 2 Heat source Electricity Volume Top...
... for measuring performance. 23 PRODUCT INFORMATION AND PRODUCT INFORMATION SHEET* Supplier's name Zanussi Model identification ZPHNL3W1 944171732 ZPHNL3X1 944171733 Energy Efficiency Index Top oven: 106.8 Main oven: 95.9 Energy efficiency class Top oven: A Main oven: A Energy consumption with a standard load, fan-forced mode Top oven: Main oven: 0.71 kWh/cycle Number of cavities 2 Heat source Electricity Volume Top...

User Manual
Page 24
... waste. Use the residual heat to improve energy saving. Use metal cookware to warm up other dishes. The residual heat inside the oven will continue to use residual heat and keep a meal warm. Keep food warm Choose the lowest possible temperature setting to cook. ENERGY SAVING... The oven has features which help you save energy during cooking. Do not open the oven door too often during cooking. Moist Baking Function designed to minimum 3 - 10 min before cooking. Return...
... waste. Use the residual heat to improve energy saving. Use metal cookware to warm up other dishes. The residual heat inside the oven will continue to use residual heat and keep a meal warm. Keep food warm Choose the lowest possible temperature setting to cook. ENERGY SAVING... The oven has features which help you save energy during cooking. Do not open the oven door too often during cooking. Moist Baking Function designed to minimum 3 - 10 min before cooking. Return...
Specification Sheet
Page 1
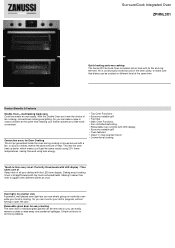
...'s individual glass panels can easily remove crumbs or wipe away any accidental spillages. SurroundCook Integrated Oven ZPHNL3X1 Quick heating and even cooking The Series 20 FanCook Oven circulates hot air heat with the LED timer display. Air is continuously moved around with a fan, so all your food is straightforward with LED display / ...
...'s individual glass panels can easily remove crumbs or wipe away any accidental spillages. SurroundCook Integrated Oven ZPHNL3X1 Quick heating and even cooking The Series 20 FanCook Oven circulates hot air heat with the LED timer display. Air is continuously moved around with a fan, so all your food is straightforward with LED display / ...

Specification Sheet
Page 2
... 715x594x568 720x600x550 5300 220-240 30 50 50°C - 275°C 0 45 1175 Stainless steel with antifingerprint A 0.94 0.78 0.71 All Open Top Oven Cooking Functions Cooking Function Bottom Oven Fan + light, Grill + top, Grill + top + fan, Light, Ring (10) + top (50) + fan (w/o Lamp), Ring + fan Bottom, Grill, Grill + top, Light, Top...
... 715x594x568 720x600x550 5300 220-240 30 50 50°C - 275°C 0 45 1175 Stainless steel with antifingerprint A 0.94 0.78 0.71 All Open Top Oven Cooking Functions Cooking Function Bottom Oven Fan + light, Grill + top, Grill + top + fan, Light, Ring (10) + top (50) + fan (w/o Lamp), Ring + fan Bottom, Grill, Grill + top, Light, Top...


