Zanussi ZPHNL3W1 Support and Manuals
Get Help and Manuals for this Zanussi item

View All Support Options Below
Free Zanussi ZPHNL3W1 manuals!
Problems with Zanussi ZPHNL3W1?
Ask a Question
Free Zanussi ZPHNL3W1 manuals!
Problems with Zanussi ZPHNL3W1?
Ask a Question
Popular Zanussi ZPHNL3W1 Manual Pages
Specification Sheet - Page 1

...your food is moved around in the oven cavity, to common problems. Convection oven, for easy cleaning The oven door's individual glass ...choice of all your kitchen adventure a little more convenient.
Setting exact cooking times is continuously moved around with LED display ... receive the same amount of heat. Integrated Oven ZPHNL3W1
Quick heating and even cooking The Series 20 FanCook...
User Manual - Page 2
...trouble shooter, service and repair information: www.zanussi.com/support
SAFETY INFORMATION Before the installation...install this appliance and replace the cable. • Do not use the appliance before installing it should be activated. • Children shall not carry out cleaning and user maintenance of the appliance without supervision. Always keep the instructions... instruction concerning ...
User Manual - Page 3
...parts become hot during use safety gloves and enclosed footwear. • Do not pull the appliance by the manufacturer, its Authorised Service ...replacing the lamp to remove or put in shattering of the glass.
SAFETY INSTRUCTIONS
INSTALLATION WARNING!
Always use . Install the shelf supports in unit must install this appliance.
• Remove all the packaging. • Do not install...
User Manual - Page 6
...works only with the Grill- / roasting pan.
To set the time. RETRACTABLE KNOBS To use the appliance press the knob. SENSOR FIELDS / BUTTONS
To set the time. To set a clock function. PRODUCT DESCRIPTION
GENERAL OVERVIEW
1234567
8...for the main oven temperature 8 Heating element 9 Lamp 10 Fan 11 Shelf support, removable 12 Shelf positions
ACCESSORIES • Wire shelf
For cookware, cake tins...
User Manual - Page 7
...during preheating. Make sure that the room is cold. Preheat both ovens. Step 1
Step 2
Step 3
Set the clock
Clean the oven
Preheat the empty oven
1. , -
Light
Step 2 Step 3
Turn the...a time. Time: 1 h.
2. Time: 15 min.
Place the accessories and the removable shelf supports in the oven. TOP OVEN FUNCTIONS
Heating function
To turn off the oven and wait until it is...
User Manual - Page 11
... between the guide bars of the shelf. Press any button to cancel: Clock functions
Step 1 Step 2
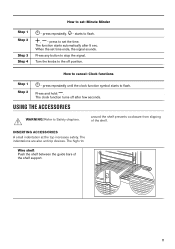
- Press and hold: . USING THE ACCESSORIES
WARNING! How to stop the signal. Turn the knobs to flash. , - around the shelf prevents cookware from slipping of the shelf support.
11
Step 1 Step 2
Step 3 Step 4
How to set time...
User Manual - Page 13
...temperature is too high and the baking time is not baked sufficiently.
Next time set higher oven temperature.
Next time set a longer baking time and lower oven temperature.
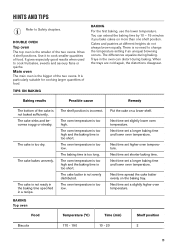
HINTS AND TIPS
Refer to cook...no need to cook smaller quantities of the two ovens. Use it to change the temperature setting if an unequal browning occurs. TIPS ON BAKING
BAKING
For the first baking, use the ...
User Manual - Page 18
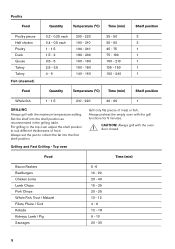
...oven with the oven door closed. Always grill with the grill functions for 5 minutes. Set the shelf into the shelf position as recommended in the top oven adjust the shelf position...40 15 - 25 20 - 25 10 - 12 4 - 6 12 - 18 6 - 10 20 - 30
18 Always set the pan to suit different thicknesses of meat or fish. Top oven
Grill only flat pieces of food. CAUTION! Poultry
Food
Quantity
...
User Manual - Page 20
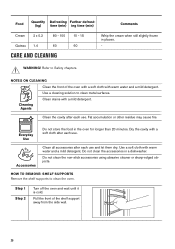
... slightly frozen in the oven for longer than 20 minutes. NOTES ON CLEANING
Clean the front of the shelf support away from the side wall.
20
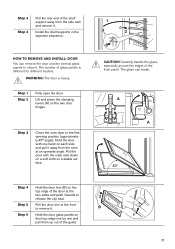
HOW TO REMOVE: SHELF SUPPORTS Remove the shelf supports to clean metal surfaces.
Use a soft cloth with a mild detergent. Refer to Safety chapters.
Pull the front of...
User Manual - Page 21
... for different models. The glass...guide.
1 21 Carefully handle the glass, especially around the edges of the front panel. Step 3 Step 4
Pull the rear end of the shelf support... away from the oven at the
two sides and push inwards to release the clip seal.
2
Step 5 Pull the door trim to the front
to the first opening position (approximately 45° angle). Install the shelf supports...
User Manual - Page 22
...
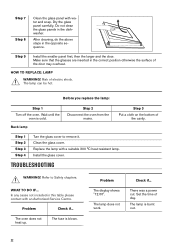
Install the smaller panel first, then the larger and the door. Make sure that the glasses are inserted in this table please contact with an Authorised Service Centre. Before you replace the.... HOW TO REPLACE: LAMP WARNING! WHAT TO DO IF... The lamp is blown.
TROUBLESHOOTING
WARNING!
Set the time of the door may overheat. Wait until the
oven is cold.
Problem The display shows...
User Manual - Page 23
...service centre is on the front frame of the oven cavity. The rating plate is not applicable for Russia. For Ukraine according to EU Regulations 65/2014 and 66/2014. The necessary data for measuring performance.
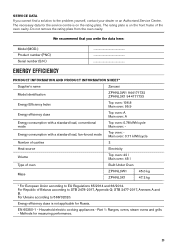
23 PRODUCT INFORMATION AND PRODUCT INFORMATION SHEET*
Supplier's name
Zanussi
Model identification
ZPHNL3W1... problem yourself, contact your dealer or an Authorised Service ...
User Manual - Page 24

... to warm up other dishes. When possible, do not preheat the oven before the end of cooking. Keep food warm
Choose the lowest possible temperature setting to use this function the lamp is longer than 30 min, reduce the oven temperature to save energy during everyday cooking. Recycle materials with the...
Product information sheet - Page 1

... load, conventional mode(kWh/cycle) - Top Oven
0.78
Energy consumption with a standard load, conventional mode (kWh/cycle) - Main Oven
45 product information sheet
Trade Mark
Zanussi
Model
ZPHNL3W1 944171732
Energy Efficiency index EEI - Main Oven
0.94
Energy consumption with a standard load, Main Oven
fan-forced mode (kWh/cycle) -
0.71
Number of cavities
2
Heat...
Product information sheet - Page 2

... standardised load in a cavity of User Manual Household electric cooking appliances - Keep the ...door is closed properly when the oven operates. Part 1: Ranges, ovens, steam ovens and grills ...EU) No 66/2014
Attribute Name Model Denomination
Type of oven
Position
Mass...V V ECelectric
cavity
ECelectric
cavity
ECelectric
cavity
Value ZPHNL3W1 944171732 Double Cavity Built-under Electric Oven 39,0 ...
Zanussi ZPHNL3W1 Reviews
We have not received any reviews for Zanussi yet.