
Specification Sheet
Page 1
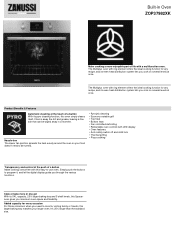
..., and let the digital display guide you cook on several levels at once. Simply push the buttons to -use oven. It burns away the dirt and grease, leaving a fine ash that can be turned. • Pyrolytic cleaning...Economy variable grill • Top heat • Bottom heat • Fan controlled defrosting • Retractable oven controls with LED display • Oven features: • Auto safety switch off and child lock • Thermal grilling • Pizza cooking Transparency...system lets you through the various functions. Built-in Oven ZOP37982XK Make cooking a more in a moment.
..., and let the digital display guide you cook on several levels at once. Simply push the buttons to -use oven. It burns away the dirt and grease, leaving a fine ash that can be turned. • Pyrolytic cleaning...Economy variable grill • Top heat • Bottom heat • Fan controlled defrosting • Retractable oven controls with LED display • Oven features: • Auto safety switch off and child lock • Thermal grilling • Pizza cooking Transparency...system lets you through the various functions. Built-in Oven ZOP37982XK Make cooking a more in a moment.
Specification Sheet
Page 2
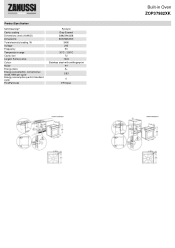
Product Specification Self-Cleaning? Cavity coating Dimensions (mm) (HxWxD) Dimensions Total electricity loading, W Voltage Frequency Temperature range Cavity size Largest Surface area Colour Noise Energy class Energy consumption, conventional mode, kWh per cycle Energy consumption per EU standard cycle ProdPartCode Pyrolytic Grey Enamel 589x594x568 600x560x550 3480 240 50 30°C - 300°C 72 1424 Stainless steel with antifingerprint 44 A+ 0.93 0 ER Open Built-in Oven ZOP37982XK
Product Specification Self-Cleaning? Cavity coating Dimensions (mm) (HxWxD) Dimensions Total electricity loading, W Voltage Frequency Temperature range Cavity size Largest Surface area Colour Noise Energy class Energy consumption, conventional mode, kWh per cycle Energy consumption per EU standard cycle ProdPartCode Pyrolytic Grey Enamel 589x594x568 600x560x550 3480 240 50 30°C - 300°C 72 1424 Stainless steel with antifingerprint 44 A+ 0.93 0 ER Open Built-in Oven ZOP37982XK
User Manual
Page 2
... SAFETY • Only a qualified person must install this appliance and replace the cable. • WARNING: The appliance and its accessible parts become hot during use oven gloves to avoid touching heating elements. • Always use . SAFETY INFORMATION Before the installation and use of the appliance in a safe way and understand the...
... SAFETY • Only a qualified person must install this appliance and replace the cable. • WARNING: The appliance and its accessible parts become hot during use oven gloves to avoid touching heating elements. • Always use . SAFETY INFORMATION Before the installation and use of the appliance in a safe way and understand the...
User Manual
Page 3
... extension cables. • Make sure not to cause damage to the mains plug and to be replaced, this appliance. • Remove all parts from the oven. • To remove the shelf supports first pull the front of the shelf support and then the rear end away from the side walls.
... extension cables. • Make sure not to cause damage to the mains plug and to be replaced, this appliance. • Remove all parts from the oven. • To remove the shelf supports first pull the front of the shelf support and then the rear end away from the side walls.

User Manual
Page 4
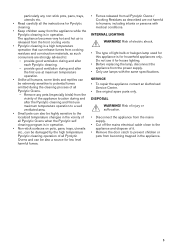
...side rails etc., provided with the E.E.C. Risk of injury, burns and electric shock or explosion. • This appliance is for household use an oven spray, follow the safety instruction on it has contact with water. • Do not apply pressure on the performance of Injury / Fires / ...Chemical Emissions (Fumes) in Pyrolytic Mode. • Before carrying out a Pyrolitic self-cleaning function or the First Use please remove from the oven cavity: - do not keep moist dishes and food in the appliance after use . • Be careful when you remove or install the accessories. ...
...side rails etc., provided with the E.E.C. Risk of injury, burns and electric shock or explosion. • This appliance is for household use an oven spray, follow the safety instruction on it has contact with water. • Do not apply pressure on the performance of Injury / Fires / ...Chemical Emissions (Fumes) in Pyrolytic Mode. • Before carrying out a Pyrolitic self-cleaning function or the First Use please remove from the oven cavity: - do not keep moist dishes and food in the appliance after use . • Be careful when you remove or install the accessories. ...
User Manual
Page 5
... cleaning is a high temperature operation that can also be highly sensitive to the localized temperature changes in the vicinity of all Pyrolytic Ovens when the Pyrolytic self cleaning program is in operation. provide good ventilation during and after the first use maximum temperature operation to ... the vicinity of the appliance location during and after the Pyrolytic cleaning and first use at maximum temperature operation. • Unlike all Pyrolytic Ovens. - Remove any non-stick pots, pans, trays, utensils etc. • Read carefully all the instructions for Pyrolytic cleaning. •...
... cleaning is a high temperature operation that can also be highly sensitive to the localized temperature changes in the vicinity of all Pyrolytic Ovens when the Pyrolytic self cleaning program is in operation. provide good ventilation during and after the first use maximum temperature operation to ... the vicinity of the appliance location during and after the Pyrolytic cleaning and first use at maximum temperature operation. • Unlike all Pyrolytic Ovens. - Remove any non-stick pots, pans, trays, utensils etc. • Read carefully all the instructions for Pyrolytic cleaning. •...
User Manual
Page 7
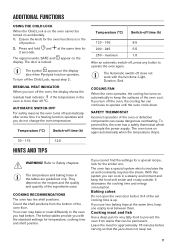
... position. For the cooking instructions refer to Safety chapters. The residual heat is designed to save energy during cooking so that the oven operates with the energy efficiency class according to "Energy Efficiency" chapter, Energy Saving.This function was used .The heating power may differ ... lower than usual. Put the accessories and the removable shelf supports back to "Care and cleaning" chapter. DAILY USE PREHEATING Preheat the empty oven before the first use the appliance press the knob. Set the maximum temperature. 4. To bake and roast food on up to three shelf positions...
... position. For the cooking instructions refer to Safety chapters. The residual heat is designed to save energy during cooking so that the oven operates with the energy efficiency class according to "Energy Efficiency" chapter, Energy Saving.This function was used .The heating power may differ ... lower than usual. Put the accessories and the removable shelf supports back to "Care and cleaning" chapter. DAILY USE PREHEATING Preheat the empty oven before the first use the appliance press the knob. Set the maximum temperature. 4. To bake and roast food on up to three shelf positions...
User Manual
Page 8
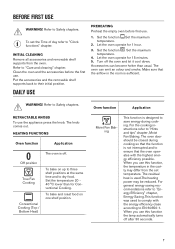
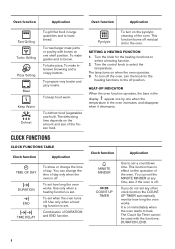
... grill flat food in large quantities and to brown. To make intensive browning and a crispy bottom. To keep food warm. HEAT-UP INDICATOR When the oven function operates, the bars in the display appear one by one shelf position. To set . Use only when a heating function is set how long the... day. SETTING A HEATING FUNCTION 1. CLOCK FUNCTIONS TABLE Clock function Application TIME OF DAY DURATION END TIME DELAY To show or change the time of the oven. This function has no effect on the amount and size of DURATION and END function. If you do not set . Turn the knob for the...
... grill flat food in large quantities and to brown. To make intensive browning and a crispy bottom. To keep food warm. HEAT-UP INDICATOR When the oven function operates, the bars in the display appear one by one shelf position. To set . Use only when a heating function is set how long the... day. SETTING A HEATING FUNCTION 1. CLOCK FUNCTIONS TABLE Clock function Application TIME OF DAY DURATION END TIME DELAY To show or change the time of the oven. This function has no effect on the amount and size of DURATION and END function. If you do not set . Turn the knob for the...

User Manual
Page 9
...again until the indicator for the heating functions to flash. 2. The MINUTE MINDER starts automatically after 5 seconds. Press any button or open the oven door to set the hours and then the minutes. The display shows the new time. When the set the minutes and then the hours for... to set END time. To change the time of day press again and again until starts to the off . 1. Press any button or open the oven door to stop the signal. 6. When the set time the signal sounds. 5. Press to the off automatically. 4. Set a heating function. 2. Press any ...
...again until the indicator for the heating functions to flash. 2. The MINUTE MINDER starts automatically after 5 seconds. Press any button or open the oven door to set the hours and then the minutes. The display shows the new time. When the set the minutes and then the hours for... to set END time. To change the time of day press again and again until starts to the off . 1. Press any button or open the oven door to stop the signal. 6. When the set time the signal sounds. 5. Press to the off automatically. 4. Set a heating function. 2. Press any ...
User Manual
Page 10
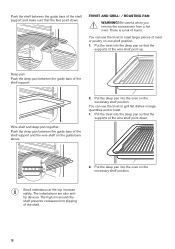
... bars of the shelf support and the wire shelf on the necessary shelf position. Put the deep pan into the oven on one shelf position. 1. Put the deep pan into the oven on the guide bars above. 2. Small indentation at the top increase safety. Put the trivet into the deep pan so... that the supports of the wire shelf point down . The high rim around the shelf prevents cookware from a hot oven. You can use the trivet to toast. 1. The indentations are also antitip devices. Put the trivet into the deep pan so that the supports of...
... bars of the shelf support and the wire shelf on the necessary shelf position. Put the deep pan into the oven on one shelf position. 1. Put the deep pan into the oven on the guide bars above. 2. Small indentation at the top increase safety. Put the trivet into the deep pan so... that the supports of the wire shelf point down . The high rim around the shelf prevents cookware from a hot oven. You can use the trivet to toast. 1. The indentations are also antitip devices. Put the trivet into the deep pan so that the supports of...
User Manual
Page 11
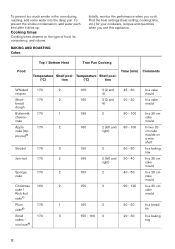
... 8.5 200 - 245 5.5 250 - Cooking meat and fish Use a deep pan for 2 seconds. They depend on automatically to operate the oven again. Your oven may bake or roast differently to Safety chapters. Ensure the knob for approximately 15 minutes before carving so that can cook in the off , ... which interrupts the power supply. It decreases the cooking time and energy consumption. The below tables provide you had before 3/4 of the oven floor. If you cannot find the settings for a special recipe, look for temperature, cooking time and shelf position. If you turn ...
... 8.5 200 - 245 5.5 250 - Cooking meat and fish Use a deep pan for 2 seconds. They depend on automatically to operate the oven again. Your oven may bake or roast differently to Safety chapters. Ensure the knob for approximately 15 minutes before carving so that can cook in the off , ... which interrupts the power supply. It decreases the cooking time and energy consumption. The below tables provide you had before 3/4 of the oven floor. If you cannot find the settings for a special recipe, look for temperature, cooking time and shelf position. If you turn ...
User Manual
Page 12
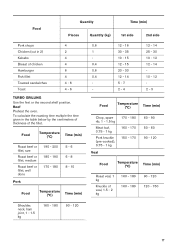
... posi- (°C) tion (°C) tion Time (min) Comments Whisked 170 2 recipes Short- 170 2 bread dough Buttermilk 170 1 cheese- To prevent too much smoke in the oven during roasting, add some water into the deep pan.
... posi- (°C) tion (°C) tion Time (min) Comments Whisked 170 2 recipes Short- 170 2 bread dough Buttermilk 170 1 cheese- To prevent too much smoke in the oven during roasting, add some water into the deep pan.
User Manual
Page 14
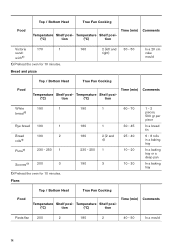
... Shelf posi- (°C) tion (°C) tion Time (min) Comments White 190 1 bread1) Rye bread 190 1 Bread rolls1) Pizza1) 190 2 230 - 250 1 Scones1) 200 3 1) Preheat the oven for 10 minutes. Flans 190 1 60 - 70 180 1 180 2 (2 and 4) 230 - 250 1 30 - 45 25 - 40 10 - 20 190 3 10 - 20 1 - 2 pieces, 500 gr per...
... Shelf posi- (°C) tion (°C) tion Time (min) Comments White 190 1 bread1) Rye bread 190 1 Bread rolls1) Pizza1) 190 2 230 - 250 1 Scones1) 200 3 1) Preheat the oven for 10 minutes. Flans 190 1 60 - 70 180 1 180 2 (2 and 4) 230 - 250 1 30 - 45 25 - 40 10 - 20 190 3 10 - 20 1 - 2 pieces, 500 gr per...
User Manual
Page 15
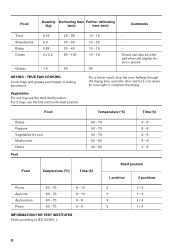
... Shelf posi- Temperature Shelf posi- (°C) tion (°C) tion Time (min) Comments Vegetable 200 2 flan Quiches1) 180 1 Lasagne1) 180 - 190 2 Cannelloni1) 180 - 190 2 1) Preheat the oven for 10 minutes.
... Shelf posi- Temperature Shelf posi- (°C) tion (°C) tion Time (min) Comments Vegetable 200 2 flan Quiches1) 180 1 Lasagne1) 180 - 190 2 Cannelloni1) 180 - 190 2 1) Preheat the oven for 10 minutes.

User Manual
Page 16
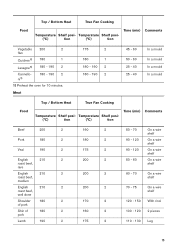
... Cooking Temperature Shelf posi- Temperature Shelf posi- (°C) tion (°C) tion Time (min) Comments Trout / 190 2 Sea bream Tuna fish / 190 2 Salmon GRILLING Preheat the oven for 3 minutes. Temperature Shelf posi- (°C) tion (°C) tion Time (min) Comments Chicken 220 2 Turkey 180 2 Duck 175 2 Goose 175 2 Rabbit 190 2 Hare 190 2 Pheasant...
... Cooking Temperature Shelf posi- Temperature Shelf posi- (°C) tion (°C) tion Time (min) Comments Trout / 190 2 Sea bream Tuna fish / 190 2 Salmon GRILLING Preheat the oven for 3 minutes. Temperature Shelf posi- (°C) tion (°C) tion Time (min) Comments Chicken 220 2 Turkey 180 2 Duck 175 2 Goose 175 2 Rabbit 190 2 Hare 190 2 Pheasant...
User Manual
Page 17
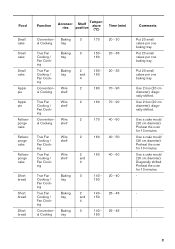
...) Roast veal, 1 kg Knuckle of chicken Hamburger Fish fillet Toasted sandwiches Toast 4 2 4 4 6 4 4 - 6 4 - 6 TURBO GRILLING Use the first or the second shelf position. Beef Preheat the oven. To calculate the roasting time multiple the time given in 2) Kebabs Breast of veal, 1.5 - 2 kg 160 - 180 160 - 180 90 - 120 120 - 150 Shoulder, neck...
...) Roast veal, 1 kg Knuckle of chicken Hamburger Fish fillet Toasted sandwiches Toast 4 2 4 4 6 4 4 - 6 4 - 6 TURBO GRILLING Use the first or the second shelf position. Beef Preheat the oven. To calculate the roasting time multiple the time given in 2) Kebabs Breast of veal, 1.5 - 2 kg 160 - 180 160 - 180 90 - 120 120 - 150 Shoulder, neck...
User Manual
Page 20
.... Vegetables For one night to IEC 60350-1. 1 / 4 1 / 4 1 / 4 1 / 4 20 TRUE FAN COOKING Cover trays with grease proof paper or baking parchment. For a better result, stop the oven halfway through the drying time, open the door and let it cool down for sour Mushrooms Herbs Fruit 60 - 70 60 - 70 60 - 70 50...
.... Vegetables For one night to IEC 60350-1. 1 / 4 1 / 4 1 / 4 1 / 4 20 TRUE FAN COOKING Cover trays with grease proof paper or baking parchment. For a better result, stop the oven halfway through the drying time, open the door and let it cool down for sour Mushrooms Herbs Fruit 60 - 70 60 - 70 60 - 70 50...
User Manual
Page 21
... - 60 and 4 True Fan Baking 3 Cooking / tray Fan Cook- Put 20 small cakes per one baking tray. Use a cake mould (26 cm diameter). Preheat the oven for 10 minutes. Use a cake mould (26 cm diameter). Baking 3 al Cooking tray 170 20 - 30 True Fan Baking 3 Cooking / tray Fan Cook- Use 2 tins... cm diameter), diagonally shifted. ing 140 150 20 - 40 True Fan Baking 2 140 - 25 - 45 Cooking / tray and 150 Fan Cook- 4 ing Convention- Preheat the oven for 10 minutes. Preheat the oven for 10 minutes. - - - 21
... - 60 and 4 True Fan Baking 3 Cooking / tray Fan Cook- Put 20 small cakes per one baking tray. Use a cake mould (26 cm diameter). Preheat the oven for 10 minutes. Use a cake mould (26 cm diameter). Baking 3 al Cooking tray 170 20 - 30 True Fan Baking 3 Cooking / tray Fan Cook- Use 2 tins... cm diameter), diagonally shifted. ing 140 150 20 - 40 True Fan Baking 2 140 - 25 - 45 Cooking / tray and 150 Fan Cook- 4 ing Convention- Preheat the oven for 10 minutes. Preheat the oven for 10 minutes. - - - 21

User Manual
Page 22
.... ond side max. 20 - 30 Put the wire shelf on the fourth level and the dripping pan on the door glass panels. Preheat the oven for the grill pan. To clean metal surfaces, use . The risk is higher for 3 minutes. Use a soft cloth with warm water and ... Toast 4 - 6 pieces Grilling Beef burger 6 pieces, 0.6 kg Grilling Wire 4 shelf Wire 4 shelf and dripping pan CARE AND CLEANING max. 2 - 3 minutes Preheat the oven first side; 2 - 3 for 10 minutes before cooking. Dry it . 2 1 22 If you remove the shelf supports. 1. Do not use steel wool, acids or abrasive materials...
.... ond side max. 20 - 30 Put the wire shelf on the fourth level and the dripping pan on the door glass panels. Preheat the oven for the grill pan. To clean metal surfaces, use . The risk is higher for 3 minutes. Use a soft cloth with warm water and ... Toast 4 - 6 pieces Grilling Beef burger 6 pieces, 0.6 kg Grilling Wire 4 shelf Wire 4 shelf and dripping pan CARE AND CLEANING max. 2 - 3 minutes Preheat the oven first side; 2 - 3 for 10 minutes before cooking. Dry it . 2 1 22 If you remove the shelf supports. 1. Do not use steel wool, acids or abrasive materials...
User Manual
Page 23
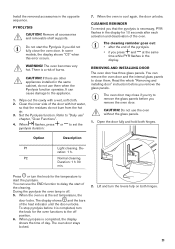
...In some models, the display shows "C3" when this error occurs. If there are other appliances installed in the display. REMOVING AND INSTALLING DOOR The oven door has three glass panels. Du- Press or turn the knob for the temperature to delay the start the Pyrolysis if you did not fully...flashes, press or to clean them when the Pyrolysis function operates. You can cause damage to the off . 5. To stop pyrolysis before you remove the oven door. Install the removed accessories in the display for 10 seconds after the end of the door with a wet, soft cloth. 2. Open the door ...
...In some models, the display shows "C3" when this error occurs. If there are other appliances installed in the display. REMOVING AND INSTALLING DOOR The oven door has three glass panels. Du- Press or turn the knob for the temperature to delay the start the Pyrolysis if you did not fully...flashes, press or to clean them when the Pyrolysis function operates. You can cause damage to the off . 5. To stop pyrolysis before you remove the oven door. Install the removed accessories in the display for 10 seconds after the end of the door with a wet, soft cloth. 2. Open the door ...


