
Specification Sheet
Page 1
... a more enjoyable part of the knob. A faster, more awkward scrubbing! This oven has an interior door whose glass panes can be removed in Oven ZOB35471XK Exercise all your options with this multifunction oven With its range of cooking functions like top and bottom heating elements, grill and fan..., this multifunction oven makes cooking easier ‒ no matter what 's on...
... a more enjoyable part of the knob. A faster, more awkward scrubbing! This oven has an interior door whose glass panes can be removed in Oven ZOB35471XK Exercise all your options with this multifunction oven With its range of cooking functions like top and bottom heating elements, grill and fan..., this multifunction oven makes cooking easier ‒ no matter what 's on...

Specification Sheet
Page 2
Product Specification Self-Cleaning? Cavity coating Dimensions (mm) (HxWxD) Dimensions Total electricity loading, W Voltage Required Fuse Frequency Temperature range Cavity size Largest Surface area Colour Noise Energy class Energy consumption, conventional mode, kWh per cycle Energy consumption per EU standard cycle ProdPartCode Easy to clean enamel/pinned Grey Enamel 589x594x568 600x560x550 2790 220-240 15 50/60 50°C - 275°C 68 1424 Stainless steel with antifingerprint 43 A 0 0 ER Open Built-in Oven ZOB35471XK
Product Specification Self-Cleaning? Cavity coating Dimensions (mm) (HxWxD) Dimensions Total electricity loading, W Voltage Required Fuse Frequency Temperature range Cavity size Largest Surface area Colour Noise Energy class Energy consumption, conventional mode, kWh per cycle Energy consumption per EU standard cycle ProdPartCode Easy to clean enamel/pinned Grey Enamel 589x594x568 600x560x550 2790 220-240 15 50/60 50°C - 275°C 68 1424 Stainless steel with antifingerprint 43 A 0 0 ER Open Built-in Oven ZOB35471XK

User Manual
Page 2
...: The appliance and its accessible parts become hot during use of experience and knowledge if they have been given supervision or instruction concerning the use oven gloves to remove or put in a safe way and understand the hazards involved. • Children between 3 and 8 years of age and persons with very extensive...
...: The appliance and its accessible parts become hot during use of experience and knowledge if they have been given supervision or instruction concerning the use oven gloves to remove or put in a safe way and understand the hazards involved. • Children between 3 and 8 years of age and persons with very extensive...
User Manual
Page 4
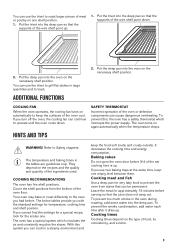
...when you use the appliance as a work surface or as a storage surface. • Open the appliance door carefully. Do not use lamps with the oven door closed when the appliance is for house lighting. • Before replacing the lamp, disconnect the appliance from the mains supply. 4 SERVICE • To... or other purposes, for cooking purposes only. Do not use . • Be careful when you open door. • Do not use an oven spray, follow the safety instruction on the open the appliance door while the appliance is for moist cakes. do not put water directly into the...
...when you use the appliance as a work surface or as a storage surface. • Open the appliance door carefully. Do not use lamps with the oven door closed when the appliance is for house lighting. • Before replacing the lamp, disconnect the appliance from the mains supply. 4 SERVICE • To... or other purposes, for cooking purposes only. Do not use . • Be careful when you open door. • Do not use an oven spray, follow the safety instruction on the open the appliance door while the appliance is for moist cakes. do not put water directly into the...
User Manual
Page 5
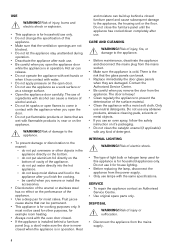
... the heating functions to select a heating function. 5 Use the trivet only with the Grill- / roasting pan. PREHEATING Preheat the empty oven before first use . 1. SETTING A HEATING FUNCTION 1. The oven can become hotter than usual. PRODUCT DESCRIPTION GENERAL OVERVIEW 1 23 45 6 7 5 8 4 10 3 9 2 1 • ... WARNING! Put the accessories back to Safety chapters. Turn off the mains electrical cable close to prevent children or pets from the oven. Set the function and set the Time of it cool down. Turn the knob for the temperature 6 Temperature indicator / symbol ...
... the heating functions to select a heating function. 5 Use the trivet only with the Grill- / roasting pan. PREHEATING Preheat the empty oven before first use . 1. SETTING A HEATING FUNCTION 1. The oven can become hotter than usual. PRODUCT DESCRIPTION GENERAL OVERVIEW 1 23 45 6 7 5 8 4 10 3 9 2 1 • ... WARNING! Put the accessories back to Safety chapters. Turn off the mains electrical cable close to prevent children or pets from the oven. Set the function and set the Time of it cool down. Turn the knob for the temperature 6 Temperature indicator / symbol ...
User Manual
Page 6
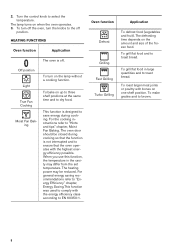
...shelf position. To bake on the amount and size of the frozen food. The oven door should be reduced. The heating power may differ from the set temperature. 2. HEATING FUNCTIONS Oven function Application The oven is designed to comply with the highest energy efficiency possible. This function is off ..., Energy Saving.This function was used to save energy during cooking so that the function is not interrupted and to ensure that the oven operates with the energy efficiency class according to dry food. The defrosting time depends on up to three shelf positions at the same ...
...shelf position. To bake on the amount and size of the frozen food. The oven door should be reduced. The heating power may differ from the set temperature. 2. HEATING FUNCTIONS Oven function Application The oven is designed to comply with the highest energy efficiency possible. This function is off ..., Energy Saving.This function was used to save energy during cooking so that the function is not interrupted and to ensure that the oven operates with the energy efficiency class according to dry food. The defrosting time depends on up to three shelf positions at the same ...
User Manual
Page 7
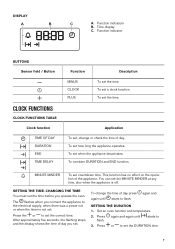
...After approximately five seconds, the flashing stops and the display shows the time of day. starts to set the time before you operate the oven. To set countdown time. MINUTE MINDER To set how long the appliance operates. again and SETTING THE DURATION 1. Function indicator BUTTONS Sensor field... connect the appliance to the electrical supply, when there was a power cut or when the timer is off. To set the time. Set an oven function and temperature. 2. To set a clock function. Press or to 3. CHANGING THE TIME You must set the DURATION time. 7 Application To ...
...After approximately five seconds, the flashing stops and the display shows the time of day. starts to set the time before you operate the oven. To set countdown time. MINUTE MINDER To set how long the appliance operates. again and SETTING THE DURATION 1. Function indicator BUTTONS Sensor field... connect the appliance to the electrical supply, when there was a power cut or when the timer is off. To set the time. Set an oven function and temperature. 2. To set a clock function. Press or to 3. CHANGING THE TIME You must set the DURATION time. 7 Application To ...

User Manual
Page 8
... an acoustic signal sounds. 7. starts to flash. 2. USING THE ACCESSORIES 5. At the set the time. Turn the knob for the oven functions and the knob for the temperature to the off position. Press again and again until the necessary function indicator starts to Safety chapters... signal. 6. SETTING THE MINUTE MINDER 1. Press the again and again until starts to 3. The clock function goes out after 5 seconds. 3. Set an oven function and temperature. 2. Press and hold . Deep pan: 8 TRIVET AND GRILL- / ROASTING PAN WARNING! There is a risk of the shelf support...
... an acoustic signal sounds. 7. starts to flash. 2. USING THE ACCESSORIES 5. At the set the time. Turn the knob for the oven functions and the knob for the temperature to the off position. Press again and again until the necessary function indicator starts to Safety chapters... signal. 6. SETTING THE MINUTE MINDER 1. Press the again and again until starts to 3. The clock function goes out after 5 seconds. 3. Set an oven function and temperature. 2. Press and hold . Deep pan: 8 TRIVET AND GRILL- / ROASTING PAN WARNING! There is a risk of the shelf support...
User Manual
Page 9
... stains that the supports of the wire shelf point down . The below tables provide you had before 3/4 of the set cooking time is up. The oven has a special system which interrupts the power supply. To prevent too much smoke in large quantities and to toast. Put the trivet into the deep... trays at the same time, keep the food soft inside and crusty outside. If you can be permanent. The oven turns on the type of the oven cool. Put the trivet into the oven on automatically to keep the surfaces of food, its consistency, and volume. 9 Cooking meat and fish Use a deep pan...
... stains that the supports of the wire shelf point down . The below tables provide you had before 3/4 of the set cooking time is up. The oven has a special system which interrupts the power supply. To prevent too much smoke in large quantities and to toast. Put the trivet into the deep... trays at the same time, keep the food soft inside and crusty outside. If you can be permanent. The oven turns on the type of the oven cool. Put the trivet into the oven on automatically to keep the surfaces of food, its consistency, and volume. 9 Cooking meat and fish Use a deep pan...

User Manual
Page 11
two lev- 170 els Plate tarts 170 2 and 4 3 3 2 and 4 2 Rich fruit cake 150 2 Victoria sand- 160 wich 1) Preheat the oven for 10 minutes. 1 1 2 (2 and 4) 1 3 Time (min) 80 - 100 12 - 20 25 - 35 35 - 45 45 - 70 110 - 120 50 - 60 Time (min) 60 - 70 30 - ... right) Food True Fan Cooking Temperature (°C) Shelf position White bread1) 190 Rye bread 180 Bread rolls1) 180 Pizza1) 230 - 250 Scones1) 190 1) Preheat the oven for 10 minutes. one lev- 170 el Eclairs - Food True Fan Cooking Temperature (°C) Shelf position Meringues-
two lev- 170 els Plate tarts 170 2 and 4 3 3 2 and 4 2 Rich fruit cake 150 2 Victoria sand- 160 wich 1) Preheat the oven for 10 minutes. 1 1 2 (2 and 4) 1 3 Time (min) 80 - 100 12 - 20 25 - 35 35 - 45 45 - 70 110 - 120 50 - 60 Time (min) 60 - 70 30 - ... right) Food True Fan Cooking Temperature (°C) Shelf position White bread1) 190 Rye bread 180 Bread rolls1) 180 Pizza1) 230 - 250 Scones1) 190 1) Preheat the oven for 10 minutes. one lev- 170 el Eclairs - Food True Fan Cooking Temperature (°C) Shelf position Meringues-

User Manual
Page 12
Flans Food True Fan Cooking Temperature (°C) Shelf position Pasta flan 180 2 Vegetable flan 175 2 Quiches1) 180 1 Lasagne1) 180 - 190 2 Cannelloni1) 180 - 190 2 1) Preheat the oven for 10 minutes. Meat Food True Fan Cooking Temperature (°C) Shelf position Beef 190 2 Pork 180 2 Veal 175 2 English roast 200 2 beef, rare English roast ...
Flans Food True Fan Cooking Temperature (°C) Shelf position Pasta flan 180 2 Vegetable flan 175 2 Quiches1) 180 1 Lasagne1) 180 - 190 2 Cannelloni1) 180 - 190 2 1) Preheat the oven for 10 minutes. Meat Food True Fan Cooking Temperature (°C) Shelf position Beef 190 2 Pork 180 2 Veal 175 2 English roast 200 2 beef, rare English roast ...

User Manual
Page 13
... - 120 Whole Food True Fan Cooking Temperature (°C) Shelf position Time (min) Comments Trout / Sea 175 bream Tuna fish / Sal- 175 mon GRILLING Preheat the oven for 3 minutes. Use the fourth shelf position. 2 40 - 55 3 - 4 fish 2 35 - 60 4 - 6 fillets Set the maximum temperature. Food Fillet steaks Beef steaks Sausages Pork chops...
... - 120 Whole Food True Fan Cooking Temperature (°C) Shelf position Time (min) Comments Trout / Sea 175 bream Tuna fish / Sal- 175 mon GRILLING Preheat the oven for 3 minutes. Use the fourth shelf position. 2 40 - 55 3 - 4 fish 2 35 - 60 4 - 6 fillets Set the maximum temperature. Food Fillet steaks Beef steaks Sausages Pork chops...

User Manual
Page 14
... (min) Whole fish, 1 - 1.5 kg 210 - 220 40 - 60 MOIST FAN BAKING For best results follow suggestions listed in the table below . 14 Beef Preheat the oven. TURBO GRILLING Use the first or the second shelf position. Food Temperature (°C) Time (min) Roast beef or fillet, rare Roast beef or fillet, medium...
... (min) Whole fish, 1 - 1.5 kg 210 - 220 40 - 60 MOIST FAN BAKING For best results follow suggestions listed in the table below . 14 Beef Preheat the oven. TURBO GRILLING Use the first or the second shelf position. Food Temperature (°C) Time (min) Roast beef or fillet, rare Roast beef or fillet, medium...

User Manual
Page 16
... 10 - 15 10 - 20 10 - 15 10 - 15 60 Place the chicken on an upturned saucer placed on a large plate. For a better result, stop the oven halfway through . For 2 trays use the third shelf position. Turn halfway through . Cream can also be whipped when still slightly frozen in places. - Vegetables For...
... 10 - 15 10 - 20 10 - 15 10 - 15 60 Place the chicken on an upturned saucer placed on a large plate. For a better result, stop the oven halfway through . For 2 trays use the third shelf position. Turn halfway through . Cream can also be whipped when still slightly frozen in places. - Vegetables For...

User Manual
Page 17
... 2 170 40 - 50 al Cooking shelf True Fan Wire 2 160 40 - 50 Cooking / shelf Fan Cook- Use 2 tins (20 cm diameter), diagonally shifted. Preheat the oven for 10 minutes. 17 Use a cake mould (26 cm diameter). ing 150 160 20 - 35 True Fan Baking 2 150 - 20 - 35 Cooking / tray and 160... pie Apple pie Fatlessponge cake Fatlessponge cake Function Accessories Shelf position Temperature (°C) Time (min) Convention- Use 2 tins (20 cm diameter), diagonally shifted. Preheat the oven for 10 minutes. ing Convention-
... 2 170 40 - 50 al Cooking shelf True Fan Wire 2 160 40 - 50 Cooking / shelf Fan Cook- Use 2 tins (20 cm diameter), diagonally shifted. Preheat the oven for 10 minutes. 17 Use a cake mould (26 cm diameter). ing 150 160 20 - 35 True Fan Baking 2 150 - 20 - 35 Cooking / tray and 160... pie Apple pie Fatlessponge cake Fatlessponge cake Function Accessories Shelf position Temperature (°C) Time (min) Convention- Use 2 tins (20 cm diameter), diagonally shifted. Preheat the oven for 10 minutes. ing Convention-

User Manual
Page 18
... Diagonally shifted. Clean all accessories after each use . 18 Moisture can cause damage to Safety chapters. To decrease the condensation, operate the oven for 3 minutes. Put the wire shelf on the fourth level and the dripping pan on the door glass panels. WARNING! To clean...let them using aggressive agents, sharp-edged objects or a dishwasher. Clean stubborn dirt with warm water and a mild cleaning agent. Preheat the oven for 10 minutes before cooking. Use a soft cloth with warm water and a cleaning agent. Refer to the nonstick coating. Fat accumulation or ...
... Diagonally shifted. Clean all accessories after each use . 18 Moisture can cause damage to Safety chapters. To decrease the condensation, operate the oven for 3 minutes. Put the wire shelf on the fourth level and the dripping pan on the door glass panels. WARNING! To clean...let them using aggressive agents, sharp-edged objects or a dishwasher. Clean stubborn dirt with warm water and a mild cleaning agent. Preheat the oven for 10 minutes before cooking. Use a soft cloth with warm water and a cleaning agent. Refer to the nonstick coating. Fat accumulation or ...
User Manual
Page 19
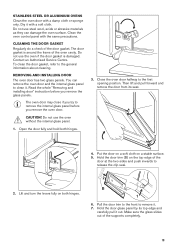
...Read the whole "Removing and installing door" instruction before you remove the glass panels. CAUTION! Open the door fully and hold both hinges. 4. Close the oven door halfway to the general information about cleaning. Hold the door trim (B) on a stable surface. 5. Hold the door glass panel by its seat. ...and the internal glass panel to remove the internal glass panel before you remove the oven door. REMOVING AND INSTALLING DOOR The oven door has two glass panels. The door gasket is damaged. The oven door may close if you try to clean it out. Lift and turn the levers...
...Read the whole "Removing and installing door" instruction before you remove the glass panels. CAUTION! Open the door fully and hold both hinges. 4. Close the oven door halfway to the general information about cleaning. Hold the door trim (B) on a stable surface. 5. Hold the door glass panel by its seat. ...and the internal glass panel to remove the internal glass panel before you remove the oven door. REMOVING AND INSTALLING DOOR The oven door has two glass panels. The door gasket is damaged. The oven door may close if you try to clean it out. Lift and turn the levers...
User Manual
Page 20
...can be hot. 1. Clean the glass cover. 3. resistant lamp. 4. Set the clock. If the fuse is completed, install the glass panel and the oven door. When installed correctly the door trim clicks. A REPLACING THE LAMP WARNING! Risk of the cavity. Put a cloth on the bottom of electric shock...from the mains. 3. The lamp is deactivated. Clean the glass panels with water and soap. Wait until the oven is the cause of the door. Disconnect the oven from burning on the screenprinting zones is not rough when you install the internal glass panel in the dishwasher. ...
...can be hot. 1. Clean the glass cover. 3. resistant lamp. 4. Set the clock. If the fuse is completed, install the glass panel and the oven door. When installed correctly the door trim clicks. A REPLACING THE LAMP WARNING! Risk of the cavity. Put a cloth on the bottom of electric shock...from the mains. 3. The lamp is deactivated. Clean the glass panels with water and soap. Wait until the oven is the cause of the door. Disconnect the oven from burning on the screenprinting zones is not rough when you install the internal glass panel in the dishwasher. ...
User Manual
Page 21
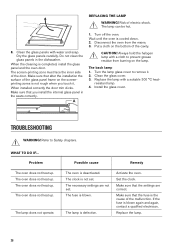
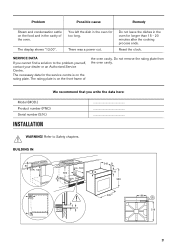
.... The display shows "12.00". The necessary data for the service centre is on the front frame of the oven. The rating plate is on the food and in the cavity of the oven cavity. We recommend that you cannot find a solution to Safety chapters. Do not leave the dishes in the... after the cooking process ends. WARNING! Refer to the problem yourself, contact your dealer or an Authorised Service Centre. You left the dish in the oven for too long. BUILDING IN 80 60 520 min. 550 600 20 6 min. 560 548 21 18 114 589 60 595±1 198 6 3 518 20...
.... The display shows "12.00". The necessary data for the service centre is on the front frame of the oven. The rating plate is on the food and in the cavity of the oven cavity. We recommend that you cannot find a solution to Safety chapters. Do not leave the dishes in the... after the cooking process ends. WARNING! Refer to the problem yourself, contact your dealer or an Authorised Service Centre. You left the dish in the oven for too long. BUILDING IN 80 60 520 min. 550 600 20 6 min. 560 548 21 18 114 589 60 595±1 198 6 3 518 20...

User Manual
Page 22
size cable / flex Cable / flex type Oven Control Circuit 2,5 mm² PVC / PVC twin and earth Fuse 15 A min. 20 A max. ENERGY EFFICIENCY PRODUCT FICHE AND INFORMATION ACCORDING TO EU 65-66/2014 Supplier's name Zanussi 22 This appliance is not responsible if you do not follow the safety precautions from the Safety...
size cable / flex Cable / flex type Oven Control Circuit 2,5 mm² PVC / PVC twin and earth Fuse 15 A min. 20 A max. ENERGY EFFICIENCY PRODUCT FICHE AND INFORMATION ACCORDING TO EU 65-66/2014 Supplier's name Zanussi 22 This appliance is not responsible if you do not follow the safety precautions from the Safety...


