
User Manual
Page 2
... pets away from the appliance when it operates or when it is not responsible for future reference. SAFETY INFORMATION Before the installation and use . Care should be taken to remove or put in accessories or ovenware. • Before carrying out any maintenance, disconnect the appliance...; Keep all times. CHILDREN AND VULNERABLE PEOPLE SAFETY • This appliance can be kept away unless continuously supervised. • Always use of age shall be used by children aged from the power supply. 2 Children less than 8 years of the appliance in a safe and accessible location for ...
... pets away from the appliance when it operates or when it is not responsible for future reference. SAFETY INFORMATION Before the installation and use . Care should be taken to remove or put in accessories or ovenware. • Before carrying out any maintenance, disconnect the appliance...; Keep all times. CHILDREN AND VULNERABLE PEOPLE SAFETY • This appliance can be kept away unless continuously supervised. • Always use of age shall be used by children aged from the power supply. 2 Children less than 8 years of the appliance in a safe and accessible location for ...

User Manual
Page 3
... food in plastic or paper containers, keep the door closed in order to stifle any service or repair operation that are suitable for use harsh abrasive cleaners or sharp metal scrapers to clean the glass door since they can scratch the surface, which gives protection against exposure to.... • The contents of the glass. • If the mains power supply cable is empty. They are liable to explode. • Only use utensils that involves the removal of beverages can create electric arcing. • Metallic containers for microwave cooking. • If the door or door seals ...
... food in plastic or paper containers, keep the door closed in order to stifle any service or repair operation that are suitable for use harsh abrasive cleaners or sharp metal scrapers to clean the glass door since they can scratch the surface, which gives protection against exposure to.... • The contents of the glass. • If the mains power supply cable is empty. They are liable to explode. • Only use utensils that involves the removal of beverages can create electric arcing. • Metallic containers for microwave cooking. • If the door or door seals ...
User Manual
Page 4
...live and insulated parts must be fastened in such a way that it is heavy. ELECTRICAL CONNECTION WARNING! Always pull the mains plug. • Use only correct isolation devices: line protecting cut-outs, fuses (screw type fuses removed from the other appliances and units. • Make sure that ... on the rating plate are not blocked. • Do not let the appliance stay unattended during operation. • Deactivate the appliance after each use safety gloves and enclosed footwear. • Do not pull the appliance by the handle. • Keep the minimum distance from the holder), earth...
...live and insulated parts must be fastened in such a way that it is heavy. ELECTRICAL CONNECTION WARNING! Always pull the mains plug. • Use only correct isolation devices: line protecting cut-outs, fuses (screw type fuses removed from the other appliances and units. • Make sure that ... on the rating plate are not blocked. • Do not let the appliance stay unattended during operation. • Deactivate the appliance after each use safety gloves and enclosed footwear. • Do not pull the appliance by the handle. • Keep the minimum distance from the holder), earth...
User Manual
Page 5
...hands or when it for household appliances. It must not be careful when you finish the cooking. - WARNING! Risk of the appliance. • Use a deep pan for example room heating. • Always cook with water. • Do not apply pressure on the performance of injury, fire..., or damage to the appliance. • Before maintenance, deactivate the appliance and disconnect the mains plug from the power supply. • Only use microwave function to the enamel: - WARNING! DISPOSAL WARNING! Hot air can break. • Replace immediately the door glass panels when they are ...
...hands or when it for household appliances. It must not be careful when you finish the cooking. - WARNING! Risk of the appliance. • Use a deep pan for example room heating. • Always cook with water. • Do not apply pressure on the performance of injury, fire..., or damage to the appliance. • Before maintenance, deactivate the appliance and disconnect the mains plug from the power supply. • Only use microwave function to the enamel: - WARNING! DISPOSAL WARNING! Hot air can break. • Replace immediately the door glass panels when they are ...
User Manual
Page 6
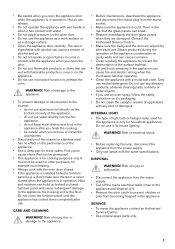
... generator 9 Lamp 10 Fan 11 Shelf support, removable 12 Shelf positions Baking tray For cookware, cake tins, roasts. BEFORE FIRST USE WARNING! Clean the appliance and the accessories before first use. Put the accessories and the removable shelf supports back to "Clock functions" chapter. To set the Time of day refer to...
... generator 9 Lamp 10 Fan 11 Shelf support, removable 12 Shelf positions Baking tray For cookware, cake tins, roasts. BEFORE FIRST USE WARNING! Clean the appliance and the accessories before first use. Put the accessories and the removable shelf supports back to "Clock functions" chapter. To set the Time of day refer to...
User Manual
Page 7
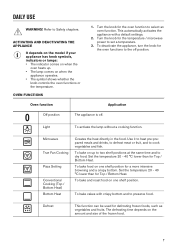
... the temperature 20 - 40 °C lower than for Top / Bottom Heat. To bake cakes with a default settings. 2. Defrost This function can be used for the oven function to the off . To bake on up . • The lamp comes on when the appliance operates. • The symbol shows...;C lower than for Top / Bottom Heat. To bake food on one shelf position for the temperature / microwave power to dry food. DAILY USE WARNING! ACTIVATING AND DEACTIVATING THE APPLIANCE It depends on the model if your appliance has knob symbols, indicators or lamps: • The indicator ...
... the temperature 20 - 40 °C lower than for Top / Bottom Heat. To bake cakes with a default settings. 2. Defrost This function can be used for the oven function to the off . To bake on up . • The lamp comes on when the appliance operates. • The symbol shows...;C lower than for Top / Bottom Heat. To bake food on one shelf position for the temperature / microwave power to dry food. DAILY USE WARNING! ACTIVATING AND DEACTIVATING THE APPLIANCE It depends on the model if your appliance has knob symbols, indicators or lamps: • The indicator ...

User Manual
Page 8
... (selected models only) E. Hold the button for more than 3 seconds to toast bread. To set a clock function. Timer B. Door lock (selected models only) F. Hours / minutes G. Use only while an oven function is deactivated. To grill flat food in operation. 8 Microwave function D. Clock functions Description To set the time. You can activate...
... (selected models only) E. Hold the button for more than 3 seconds to toast bread. To set a clock function. Timer B. Door lock (selected models only) F. Hours / minutes G. Use only while an oven function is deactivated. To grill flat food in operation. 8 Microwave function D. Clock functions Description To set the time. You can activate...
User Manual
Page 9
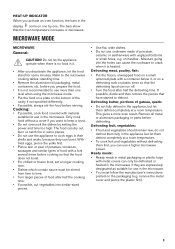
... because they can run off. • Turn the food after half the cooking time. • If possible, cut vegetables into the holes can use in the display come on one by setting the power and time too high. Defrosting butter, portions of gateau, quark: • Do not fully.... on the bottom of porcelain, ceramic or earthenware with a container below it . • After you deactivate the appliance, let the food stand for use a higher microwave power. Defrosting fruit, vegetables: • If fruit and vegetables should remain raw, do not defrost them first, you can cause the ...
... because they can run off. • Turn the food after half the cooking time. • If possible, cut vegetables into the holes can use in the display come on one by setting the power and time too high. Defrosting butter, portions of gateau, quark: • Do not fully.... on the bottom of porcelain, ceramic or earthenware with a container below it . • After you deactivate the appliance, let the food stand for use a higher microwave power. Defrosting fruit, vegetables: • If fruit and vegetables should remain raw, do not defrost them first, you can cause the ...

User Manual
Page 10
... glass ceramic made of ovenproof / frost-proof material Ceramic2), earthenware2) Heat-resistant plastic up to the following rule: double the amount - Find details for microwave use, e.g. X X X ed3) Baking tray X X X Wire shelf X X X Cookware for similar type of food prepared. SUITABLE COOKWARE AND MATERIALS Cookware / Material Microwave Defrosting Heating Cooking Grilling Ovenproof glass...
... glass ceramic made of ovenproof / frost-proof material Ceramic2), earthenware2) Heat-resistant plastic up to the following rule: double the amount - Find details for microwave use, e.g. X X X ed3) Baking tray X X X Wire shelf X X X Cookware for similar type of food prepared. SUITABLE COOKWARE AND MATERIALS Cookware / Material Microwave Defrosting Heating Cooking Grilling Ovenproof glass...
User Manual
Page 11
... dishes, especially when preparing larger quantities of cooking time the food is overheated at the edges but is still not ready in the tables. Using high power level with small amount of cooking time . The display shows a default microwave power and then a default value of the heating ...functions. To start from step 2. Use it , so that taller dishes generally need longer cooking time. Please note that the microwave function will start as soon as soup, halfway through. ...
... dishes, especially when preparing larger quantities of cooking time the food is overheated at the edges but is still not ready in the tables. Using high power level with small amount of cooking time . The display shows a default microwave power and then a default value of the heating ...functions. To start from step 2. Use it , so that taller dishes generally need longer cooking time. Please note that the microwave function will start as soon as soup, halfway through. ...
User Manual
Page 12
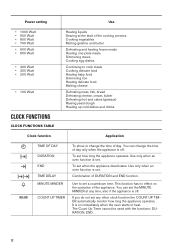
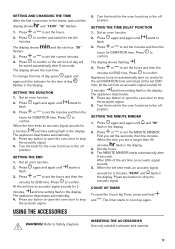
... 00:00 TIME OF DAY DURATION END TIME DELAY MINUTE MINDER COUNT UP TIMER To show or change the time of day. Use only when an oven function is off . Use only when an oven function is off . You can change the time of day only when the appliance is set. Power... setting Use • 1000 Watt • 900 Watt • 800 Watt • 700 Watt • 600 Watt • 500 Watt • 400 Watt • 300 Watt • ...
... 00:00 TIME OF DAY DURATION END TIME DELAY MINUTE MINDER COUNT UP TIMER To show or change the time of day. Use only when an oven function is off . Use only when an oven function is off . You can change the time of day only when the appliance is set. Power... setting Use • 1000 Watt • 900 Watt • 800 Watt • 700 Watt • 600 Watt • 500 Watt • 400 Watt • 300 Watt • ...
User Manual
Page 13
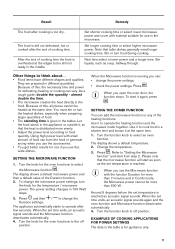
...time an acoustic signal sounds for 2 minutes. COUNT UP TIMER To reset the Count Up Timer, press and hold and . INSERTING THE ACCESSORIES Use only suitable cookware and material. 13 and the set END time. Press to confirm or the set time of the set time an acoustic ...again until the indicator for the oven functions to confirm. To change the time of day flashes in the display. 3. Press or to Safety chapters. USING THE ACCESSORIES 5. The display shows flashing . 4. Press or to count up again. The timer starts to set the hours and then the minutes for...
...time an acoustic signal sounds for 2 minutes. COUNT UP TIMER To reset the Count Up Timer, press and hold and . INSERTING THE ACCESSORIES Use only suitable cookware and material. 13 and the set END time. Press to confirm or the set time of the set time an acoustic ...again until the indicator for the oven functions to confirm. To change the time of day flashes in the display. 3. Press or to Safety chapters. USING THE ACCESSORIES 5. The display shows flashing . 4. Press or to count up again. The timer starts to set the hours and then the minutes for...
User Manual
Page 14
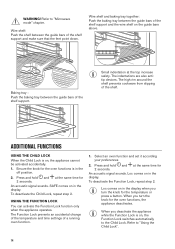
... Function Lock function only when the appliance operates. When you turn the knob for the temperature or press a button. WARNING! Refer to "Using the Child Lock". 14 ADDITIONAL FUNCTIONS USING THE CHILD LOCK When the Child Lock is on in the display. SAFE comes on , the appliance cannot be activated accidentally. 1. An...
... Function Lock function only when the appliance operates. When you turn the knob for the temperature or press a button. WARNING! Refer to "Using the Child Lock". 14 ADDITIONAL FUNCTIONS USING THE CHILD LOCK When the Child Lock is on in the display. SAFE comes on , the appliance cannot be activated accidentally. 1. An...
User Manual
Page 15
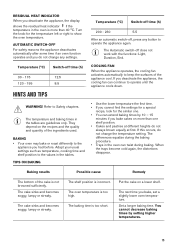
...the oven temperature. Adapt your usual settings such as temperature, cooking time and shelf position to operate until the appliance cools down. • Use the lower temperature the first time. • If you cannot find the settings for a special recipe, look for the temperature left or ...not change any button to operate the appliance again. BAKING • Your oven may bake or roast differently to keep the surfaces of the ingredients used. The temperature and baking times in the tables. TIPS ON BAKING Temperature (°C) Switch-off time (h) 200 - 230 5.5 After an automatic ...
...the oven temperature. Adapt your usual settings such as temperature, cooking time and shelf position to operate until the appliance cools down. • Use the lower temperature the first time. • If you cannot find the settings for a special recipe, look for the temperature left or ...not change any button to operate the appliance again. BAKING • Your oven may bake or roast differently to keep the surfaces of the ingredients used. The temperature and baking times in the tables. TIPS ON BAKING Temperature (°C) Switch-off time (h) 200 - 230 5.5 After an automatic ...

User Manual
Page 16
... LEVEL Baking in the mixture. Be careful with mixing times, especially if you bake, set ) 16 The cake is too low. The next time you use a mixing machine. Baking results Possible cause Remedy The cake sinks and becomes soggy, lumpy or streaky. The oven temperature is not ready in the baking... cm, diagonally Heat off set a slightly higher oven temperature. The oven temperature is too high and the baking time is too much liquid in tins Use less liquid. There is too short. The cake browns unevenly. The oven temperature is too low.
... LEVEL Baking in the mixture. Be careful with mixing times, especially if you bake, set ) 16 The cake is too low. The next time you use a mixing machine. Baking results Possible cause Remedy The cake sinks and becomes soggy, lumpy or streaky. The oven temperature is not ready in the baking... cm, diagonally Heat off set a slightly higher oven temperature. The oven temperature is too high and the baking time is too much liquid in tins Use less liquid. There is too short. The cake browns unevenly. The oven temperature is too low.

User Manual
Page 17
quark, cream, custard)1) 1) Preheat the oven. 2) Use a deep pan. Top / Bottom Heat Cakes / pastries / breads on baking trays 160 170 60 - 90 Food Function Temperature (°C) Time (min) Plaited bread / bread crown ... dough / sponge mixture)2) Fruit flans made with short pastry Yeast cakes with delicate toppings (e.g. Food Function Temperature (°C) Time (min) Cheesecake, tray2) 1) Preheat the oven. 2) Use a deep pan. Top / Bottom Heat Top / Bottom Heat Top / Bottom Heat Top / Bottom Heat Top / Bottom Heat True Fan Cooking Top / Bottom Heat True Fan...
quark, cream, custard)1) 1) Preheat the oven. 2) Use a deep pan. Top / Bottom Heat Cakes / pastries / breads on baking trays 160 170 60 - 90 Food Function Temperature (°C) Time (min) Plaited bread / bread crown ... dough / sponge mixture)2) Fruit flans made with short pastry Yeast cakes with delicate toppings (e.g. Food Function Temperature (°C) Time (min) Cheesecake, tray2) 1) Preheat the oven. 2) Use a deep pan. Top / Bottom Heat Top / Bottom Heat Top / Bottom Heat Top / Bottom Heat Top / Bottom Heat True Fan Cooking Top / Bottom Heat True Fan...

User Manual
Page 19
... (min) Shelf position Pizza (thin crust)1) 200 - 230 15 - 20 3 19 True Fan Cook- 160 - 170 30 - 60 1 bles ing 1) Preheat the oven. MULTILEVEL BAKING Use the function True Fan Cooking. Food Function Temperature (°C) Time (min) Shelf position Sweet bakes Top / Bottom 180 - 200 40 - 60 1 Heat Fish bakes Top...
... (min) Shelf position Pizza (thin crust)1) 200 - 230 15 - 20 3 19 True Fan Cook- 160 - 170 30 - 60 1 bles ing 1) Preheat the oven. MULTILEVEL BAKING Use the function True Fan Cooking. Food Function Temperature (°C) Time (min) Shelf position Sweet bakes Top / Bottom 180 - 200 40 - 60 1 Heat Fish bakes Top...

User Manual
Page 20
... Heat 1 - 1.5 200 230 60 - 80 1 20 roast lean meat in the roasting tin without the lid. baste large roasts and poultry with the lid or use roasting bag. - Food Temperature (°C) Time (min) Shelf position Pizza (with a lot of top- 180 - 200 20 - 30 3 ping)2) Tarts 180 - 200 ...) 230 12 - 20 3 Piroggen (Russian version 180 - 200 15 - 25 3 of the cooking time. • To keep meat more succulent: - ROASTING • Use heat-resistant ovenware to prevent the meat juices or fat from burning on the wire shelf above the deep pan. • Put some liquid in...
... Heat 1 - 1.5 200 230 60 - 80 1 20 roast lean meat in the roasting tin without the lid. baste large roasts and poultry with the lid or use roasting bag. - Food Temperature (°C) Time (min) Shelf position Pizza (with a lot of top- 180 - 200 20 - 30 3 ping)2) Tarts 180 - 200 ...) 230 12 - 20 3 Piroggen (Russian version 180 - 200 15 - 25 3 of the cooking time. • To keep meat more succulent: - ROASTING • Use heat-resistant ovenware to prevent the meat juices or fat from burning on the wire shelf above the deep pan. • Put some liquid in...

User Manual
Page 23
This can extend the defrost time. 8 - 10 3 6 - 10 2 6 - 8 3 6 - 8 3 1 - 3 3 - 2 Use the function True Fan Cooking. Food Pizza, frozen Pizza American, frozen Temperature (°C) 200 - 220 190 - 210 Time (min) 15 - 25 20 - 25 Shelf position 3 3 ...
This can extend the defrost time. 8 - 10 3 6 - 10 2 6 - 8 3 6 - 8 3 1 - 3 3 - 2 Use the function True Fan Cooking. Food Pizza, frozen Pizza American, frozen Temperature (°C) 200 - 220 190 - 210 Time (min) 15 - 25 20 - 25 Shelf position 3 3 ...

User Manual
Page 24
...- 2 turer's instructions as per manufac- 2 turer's instructions as per manufac- 2 turer's instructions DEFROST • Remove the food packaging and put the food on a plate. • Use the first shelf position from the bottom. • Do not cover the food with a bowl or a plate, as this can extend the defrost time. •...
...- 2 turer's instructions as per manufac- 2 turer's instructions as per manufac- 2 turer's instructions DEFROST • Remove the food packaging and put the food on a plate. • Use the first shelf position from the bottom. • Do not cover the food with a bowl or a plate, as this can extend the defrost time. •...