Specification Sheet
Page 1
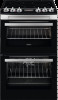
... temperatures. • Hot hob indicator • Thermaflow® fan oven • Top cavity features: • Main oven features: • Top heat • Cooker features: • Catalytic liners in both ovens • Interior light in main oven • Triple glazed doors • Top oven: A energy rating Get twice the cooking capacity with two oven cavities, you can cook quickly, clean even faster - getting your hob! Everything evenly cooked Get evenly-cooked meals every time...
... temperatures. • Hot hob indicator • Thermaflow® fan oven • Top cavity features: • Main oven features: • Top heat • Cooker features: • Catalytic liners in both ovens • Interior light in main oven • Triple glazed doors • Top oven: A energy rating Get twice the cooking capacity with two oven cavities, you can cook quickly, clean even faster - getting your hob! Everything evenly cooked Get evenly-cooked meals every time...
Specification Sheet
Page 2
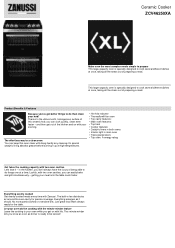
... No A A 0 0.83 0.75 0 1200W/145mm 1700W/180mm 1700W/180mm 1200W/145mm Ceramic Cooker ZCV46250XA Tray types included Type of Trays - Product Specification Dimensions Voltage Total electricity loading, W Required Fuse Cavity size Volume usable, l Largest Surface area Colour Self-Cleaning? Power/Diameter Dial Rear - Bottom Oven Runners Runners - Bottom Oven Grids Grids type - Bottom Oven Gas supply: natural gas Gas replacement Gas replacement 1 Dripping pan black enamel No 2 Flat shelf chromed wirework 1 Flat shelf chromed wirework, 1 Grill...
... No A A 0 0.83 0.75 0 1200W/145mm 1700W/180mm 1700W/180mm 1200W/145mm Ceramic Cooker ZCV46250XA Tray types included Type of Trays - Product Specification Dimensions Voltage Total electricity loading, W Required Fuse Cavity size Volume usable, l Largest Surface area Colour Self-Cleaning? Power/Diameter Dial Rear - Bottom Oven Runners Runners - Bottom Oven Grids Grids type - Bottom Oven Gas supply: natural gas Gas replacement Gas replacement 1 Dripping pan black enamel No 2 Flat shelf chromed wirework 1 Flat shelf chromed wirework, 1 Grill...

User Manual
Page 3
... install the appliance behind a decorative door in order to avoid overheating. • Do not install the appliance on a platform. • Do not operate the appliance by means of an external timer or separate remote-control system. • WARNING: Unattended cooking on the hob surface since they can get hot. • If the glass ceramic surface / glass surface is cracked, switch off the appliance and then cover flame...
... install the appliance behind a decorative door in order to avoid overheating. • Do not install the appliance on a platform. • Do not operate the appliance by means of an external timer or separate remote-control system. • WARNING: Unattended cooking on the hob surface since they can get hot. • If the glass ceramic surface / glass surface is cracked, switch off the appliance and then cover flame...
User Manual
Page 4
... shelf support and then the rear end away from the holder), earth leakage trips and contactors. • The electrical installation must install this appliance. • Remove all the packaging. • Do not install or use a damaged appliance. • Follow the installation instructions supplied with the electrical ratings of the mains power supply. • Always use a correctly installed shockproof socket. • Do not use of the cooking appliance or indicated by...
... shelf support and then the rear end away from the holder), earth leakage trips and contactors. • The electrical installation must install this appliance. • Remove all the packaging. • Do not install or use a damaged appliance. • Follow the installation instructions supplied with the electrical ratings of the mains power supply. • Always use a correctly installed shockproof socket. • Do not use of the cooking appliance or indicated by...

User Manual
Page 5
... the glass panels can release flammable vapours. There is for household use only. • Do not change the specification of injury, fire, or damage to the enamel: - Always lift these objects up when you have a contact opening width of alcohol and air. Only use of ingredients with alcohol can be used for 10 minutes before you connect the mains plug to...
... the glass panels can release flammable vapours. There is for household use only. • Do not change the specification of injury, fire, or damage to the enamel: - Always lift these objects up when you have a contact opening width of alcohol and air. Only use of ingredients with alcohol can be used for 10 minutes before you connect the mains plug to...
User Manual
Page 6
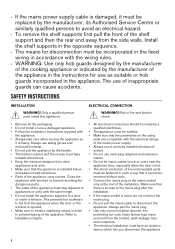
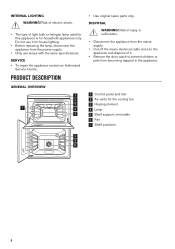
... cooling fan 3 Heating element 4 Lamp 5 Shelf support, removable 6 Fan 7 Shelf positions 5 4 4 3 5 2 6 1 6 Risk of injury or suffocation. • Disconnect the appliance from the mains supply. • Cut off the mains electrical cable close to prevent children or pets from the power supply. • Only use it for house lighting. • Before replacing the lamp, disconnect the appliance from becoming trapped in the appliance. 1 Control panel and hob 2 Air vents...
... cooling fan 3 Heating element 4 Lamp 5 Shelf support, removable 6 Fan 7 Shelf positions 5 4 4 3 5 2 6 1 6 Risk of injury or suffocation. • Disconnect the appliance from the mains supply. • Cut off the mains electrical cable close to prevent children or pets from the power supply. • Only use it for house lighting. • Before replacing the lamp, disconnect the appliance from becoming trapped in the appliance. 1 Control panel and hob 2 Air vents...
User Manual
Page 7
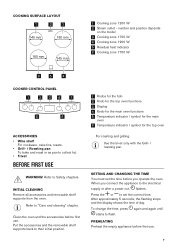
... electrical supply or after a power cut, flashes. SETTING AND CHANGING THE TIME You must set the correct time. After approximately 5 seconds, the flashing stops and the display shows the time of day. Put the accessories and the removable shelf supports back to flash. To change the time, press again and again until starts to their initial position. 1 Knobs for the hob 2 Knob for the top oven functions 3 Display 4 Knob for the main oven functions 5 Temperature indicator...
... electrical supply or after a power cut, flashes. SETTING AND CHANGING THE TIME You must set the correct time. After approximately 5 seconds, the flashing stops and the display shows the time of day. Put the accessories and the removable shelf supports back to flash. To change the time, press again and again until starts to their initial position. 1 Knobs for the hob 2 Knob for the top oven functions 3 Display 4 Knob for the main oven functions 5 Temperature indicator...

User Manual
Page 8
... / quick frying / deep-frying Set the maximum temperature. 2. Preheat the two ovens. Heat up one oven at a time. 1. Let the appliance operate for 15 minutes. Set the function . DAILY USE WARNING! HINTS AND TIPS WARNING! Refer to the off position. COOKWARE The bottom of enamelled steel and with aluminium or copper bottoms can cause a colour change on the glass-ceramic surface. This is completed. Make sure...
... / quick frying / deep-frying Set the maximum temperature. 2. Preheat the two ovens. Heat up one oven at a time. 1. Let the appliance operate for 15 minutes. Set the function . DAILY USE WARNING! HINTS AND TIPS WARNING! Refer to the off position. COOKWARE The bottom of enamelled steel and with aluminium or copper bottoms can cause a colour change on the glass-ceramic surface. This is completed. Make sure...

User Manual
Page 9
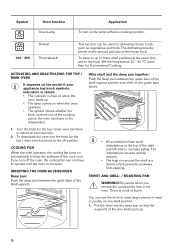
..., fat stains, shiny metallic discoloration. Application Oven Lamp To turn on the lamp without a cooking function. 100 - 250 Conventional Cooking Dual Circuit Grill Full Grill To bake and roast food on how the hob operates. • Use a special cleaner suitable for the surface of the shelf. MAIN OVEN FUNCTIONS Symbol Oven function Off position The oven is off . CARE AND CLEANING WARNING! Refer to avoid burns. Application...
..., fat stains, shiny metallic discoloration. Application Oven Lamp To turn on the lamp without a cooking function. 100 - 250 Conventional Cooking Dual Circuit Grill Full Grill To bake and roast food on how the hob operates. • Use a special cleaner suitable for the surface of the shelf. MAIN OVEN FUNCTIONS Symbol Oven function Off position The oven is off . CARE AND CLEANING WARNING! Refer to avoid burns. Application...
User Manual
Page 10
... depends on the model if your appliance has knob symbols, indicators or lamps: • The indicator comes on when the oven heats up. • The lamp comes on when the oven operates. • The symbol shows whether the knob controls one shelf position. 1. Wire shelf and the deep pan together: Push the deep pan between the guide bars of the shelf support. Be careful when you turn off position...
... depends on the model if your appliance has knob symbols, indicators or lamps: • The indicator comes on when the oven heats up. • The lamp comes on when the oven operates. • The symbol shows whether the knob controls one shelf position. 1. Wire shelf and the deep pan together: Push the deep pan between the guide bars of the shelf support. Be careful when you turn off position...

User Manual
Page 11
.... 11 When the set a clock function. Put the trivet into the deep pan so that the supports of day indicator BUTTONS Button Function Description MINUS CLOCK PLUS To set the time. To set time ends, an acoustic signal sounds. Press or to flash. 2. Turn the knob for the oven functions to stop the acoustic signal. 4. 2. Time display C. Press again and again until the necessary function indicator starts to set the time. Press any...
.... 11 When the set a clock function. Put the trivet into the deep pan so that the supports of day indicator BUTTONS Button Function Description MINUS CLOCK PLUS To set the time. To set time ends, an acoustic signal sounds. Press or to flash. 2. Turn the knob for the oven functions to stop the acoustic signal. 4. 2. Time display C. Press again and again until the necessary function indicator starts to set the time. Press any...

User Manual
Page 12
.... • Cakes and pastries at the temperature required for the food for cooking larger quantities of the ingredients used to change the temperature setting if an unequal browning occurs. The oven temperature is no need to cook fruitcakes, sweets and savoury flants or quiche. HINTS AND TIPS WARNING! BAKING • Use the lower temperature the first time. • You can twist during baking. The next time you start cooking. OVEN -
.... • Cakes and pastries at the temperature required for the food for cooking larger quantities of the ingredients used to change the temperature setting if an unequal browning occurs. The oven temperature is no need to cook fruitcakes, sweets and savoury flants or quiche. HINTS AND TIPS WARNING! BAKING • Use the lower temperature the first time. • You can twist during baking. The next time you start cooking. OVEN -

User Manual
Page 17
... use a dedicated cleaning agent. Top oven Food Function Temperature (°C) Time (min) Accessories Shelf position Small cakes (20 small Conventional 150 cakes per tray) Cooking Apple pie, 2 tins (ø 20 Conventional 170 cm) on the catalytic surfaces. Use a soft cloth with warm water and a cleaning agent. Beef burger Dual Circuit Grill - CAUTION! The oven surface becomes very hot and there is higher for the grill pan. Cooking...
... use a dedicated cleaning agent. Top oven Food Function Temperature (°C) Time (min) Accessories Shelf position Small cakes (20 small Conventional 150 cakes per tray) Cooking Apple pie, 2 tins (ø 20 Conventional 170 cm) on the catalytic surfaces. Use a soft cloth with warm water and a cleaning agent. Beef burger Dual Circuit Grill - CAUTION! The oven surface becomes very hot and there is higher for the grill pan. Cooking...
User Manual
Page 18
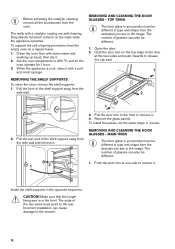
... support the self-cleaning procedure, heat the empty oven on the top edge of the shelf support away from the oven. Set the oven temperature to the rear. Pull the front of the door at one side to remove it with a soft and moist sponge. TOP OVEN The door glass in your product can also be different. 1. Remove the glass panels. REMOVING AND CLEANING THE DOOR GLASSES - Pull the door trim to the front to remove...
... support the self-cleaning procedure, heat the empty oven on the top edge of the shelf support away from the oven. Set the oven temperature to the rear. Pull the front of the door at one side to remove it with a soft and moist sponge. TOP OVEN The door glass in your product can also be different. 1. Remove the glass panels. REMOVING AND CLEANING THE DOOR GLASSES - Pull the door trim to the front to remove...
User Manual
Page 19
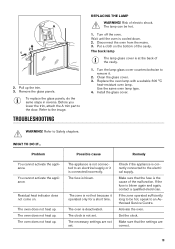
... reverse. Disconnect the oven from the mains. 3. Clean the glass cover. 3. Use the same oven lamp type. 4. The fuse is blown again and again, contact a qualified electrician. The clock is deactivated. Turn the lamp glass cover counterclockwise to an Authorised Service Centre. Install the glass cover. The oven does not heat up . The oven is not set . Make sure that the settings are not set . A 2 1 2. Pull up . Remove the glass panels. TROUBLESHOOTING REPLACING THE LAMP WARNING...
... reverse. Disconnect the oven from the mains. 3. Clean the glass cover. 3. Use the same oven lamp type. 4. The fuse is blown again and again, contact a qualified electrician. The clock is deactivated. Turn the lamp glass cover counterclockwise to an Authorised Service Centre. Install the glass cover. The oven does not heat up . The oven is not set . Make sure that the settings are not set . A 2 1 2. Pull up . Remove the glass panels. TROUBLESHOOTING REPLACING THE LAMP WARNING...
User Manual
Page 20
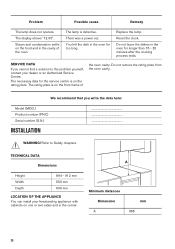
.... There was a power cut. You left the dish in the cavity of the oven cavity. The rating plate is defective. Refer to the problem yourself, contact your freestanding appliance with cabinets on one or two sides and in the oven for longer than 15 - 20 minutes after the cooking process ends. Reset the clock. Replace the lamp. A Minimum distances Dimension A mm 685...
.... There was a power cut. You left the dish in the cavity of the oven cavity. The rating plate is defective. Refer to the problem yourself, contact your freestanding appliance with cabinets on one or two sides and in the oven for longer than 15 - 20 minutes after the cooking process ends. Reset the clock. Replace the lamp. A Minimum distances Dimension A mm 685...
User Manual
Page 22
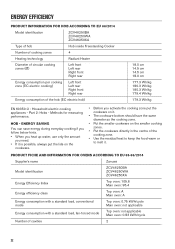
...'s name Zanussi Model identification ZCV46250BA ZCV46250WA ZCV46250XA Energy Efficiency Index Top oven: 105.6 Main oven: 95.4 Energy efficiency class Top oven: A Main oven: A Energy consumption with a standard load, conventional mode Top oven: 0.75 kWh/cycle Main oven: not applicable Energy consumption with a standard load, fan-forced mode Top oven: not applicable Main oven: 0.83 kWh/cycle Number of the cooking zone. • Use the residual heat to keep...
...'s name Zanussi Model identification ZCV46250BA ZCV46250WA ZCV46250XA Energy Efficiency Index Top oven: 105.6 Main oven: 95.4 Energy efficiency class Top oven: A Main oven: A Energy consumption with a standard load, conventional mode Top oven: 0.75 kWh/cycle Main oven: not applicable Energy consumption with a standard load, fan-forced mode Top oven: not applicable Main oven: 0.83 kWh/cycle Number of the cooking zone. • Use the residual heat to keep...
User Manual
Page 23
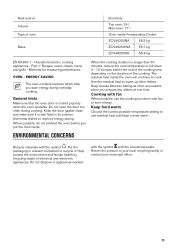
... warm Choose the lowest possible temperature setting to cook. ENERGY SAVING The oven contains features which help you prepare few dishes at one time. Heat source Volume Type of electrical and electronic appliances. Use metal dishes to your local recycling facility or contact your municipal office. 23 * Cooking with fan When possible, use residual heat and keep a meal warm. Do not open the door too often during everyday cooking...
... warm Choose the lowest possible temperature setting to cook. ENERGY SAVING The oven contains features which help you prepare few dishes at one time. Heat source Volume Type of electrical and electronic appliances. Use metal dishes to your local recycling facility or contact your municipal office. 23 * Cooking with fan When possible, use residual heat and keep a meal warm. Do not open the door too often during everyday cooking...
Product information sheet
Page 2
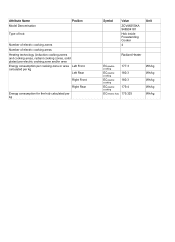
... hob Position Number of electric cooking zones Number of electric cooking areas Heating technology (induction cooking zones and cooking areas, radiant cooking zones, solid plates) per electric cooking zone and/or area Energy consumption per cooking zone or area Left Front calculated per kg Left Rear Right Front Right Rear Energy consumption for the hob calculated per kg Symbol Value Unit ZCV46250XA 948904181 Hob inside Freestanding Cooker...
... hob Position Number of electric cooking zones Number of electric cooking areas Heating technology (induction cooking zones and cooking areas, radiant cooking zones, solid plates) per electric cooking zone and/or area Energy consumption per cooking zone or area Left Front calculated per kg Left Rear Right Front Right Rear Energy consumption for the hob calculated per kg Symbol Value Unit ZCV46250XA 948904181 Hob inside Freestanding Cooker...
Product information sheet
Page 3
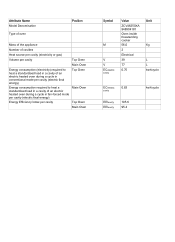
... Model Denomination Type of oven Position Mass of the appliance Number of cavities Heat source per cavity (electricity or gas) Volume per cavity Top Oven Main Oven Energy consumption (electricity) required to heat a standardised load in a cavity of an electric heated oven during a cycle in conventional mode per cavity (electric final energy) Top Oven Energy consumption required to heat a standardised load in a cavity of an electric heated oven during a cycle in fan-forced mode...
... Model Denomination Type of oven Position Mass of the appliance Number of cavities Heat source per cavity (electricity or gas) Volume per cavity Top Oven Main Oven Energy consumption (electricity) required to heat a standardised load in a cavity of an electric heated oven during a cycle in conventional mode per cavity (electric final energy) Top Oven Energy consumption required to heat a standardised load in a cavity of an electric heated oven during a cycle in fan-forced mode...