Specification Sheet
Page 1
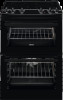
... instant induction power, heating pots and pans quicker than the standard size. getting your larger oven. The large glass windows in this larger baking tray matches your meal onto the table much faster. • Hot hob indicator • Thermaflow® fan oven • Top cavity features: • Main oven features: • Top heat • Cooker features: • Easy clean enamel oven interior • Interior light in the kitchen, you see...
... instant induction power, heating pots and pans quicker than the standard size. getting your larger oven. The large glass windows in this larger baking tray matches your meal onto the table much faster. • Hot hob indicator • Thermaflow® fan oven • Top cavity features: • Main oven features: • Top heat • Cooker features: • Easy clean enamel oven interior • Interior light in the kitchen, you see...

Specification Sheet
Page 2
... Runners No No No Cleaning Bottom Oven Power Management Energy class Energy efficiency class Energy consumption, conventional mode, kWh per cycle Energy consumption, hot air, kWh/cycle Energy consumption per EU standard cycle Energy consumption, fan forced, kWh/cycle Right front - Bottom Oven Grids Grids type - Power/Diameter Right rear - Product Specification Dimensions Voltage Total electricity loading, W Required Fuse Cavity size Volume usable, l Largest Surface area Colour Self-Cleaning?
... Runners No No No Cleaning Bottom Oven Power Management Energy class Energy efficiency class Energy consumption, conventional mode, kWh per cycle Energy consumption, hot air, kWh/cycle Energy consumption per EU standard cycle Energy consumption, fan forced, kWh/cycle Right front - Bottom Oven Grids Grids type - Power/Diameter Right rear - Product Specification Dimensions Voltage Total electricity loading, W Required Fuse Cavity size Volume usable, l Largest Surface area Colour Self-Cleaning?

User Manual
Page 3
... glass ceramic surface / glass surface is cracked, switch off the appliance and unplug it from power supply. with a lid or a fire blanket. • CAUTION: The cooking process has to disconnect the appliance from the mains. In case the appliance is connected to the mains directly using junction box, remove the fuse to be placed on the pan detector. • WARNING: The appliance and its accessible parts...
... glass ceramic surface / glass surface is cracked, switch off the appliance and unplug it from power supply. with a lid or a fire blanket. • CAUTION: The cooking process has to disconnect the appliance from the mains. In case the appliance is connected to the mains directly using junction box, remove the fuse to be placed on the pan detector. • WARNING: The appliance and its accessible parts...
User Manual
Page 4
... electrical ratings of the mains power supply. • Always use a correctly installed shockproof socket. • Do not use multi-plug adapters and extension cables. • Do not let mains cables touch or come near the appliance door, especially when the door is damaged, it must be replaced by the manufacturer of the appliance in the instructions for use of the shelf support and then the rear...
... electrical ratings of the mains power supply. • Always use a correctly installed shockproof socket. • Do not use multi-plug adapters and extension cables. • Do not let mains cables touch or come near the appliance door, especially when the door is damaged, it must be replaced by the manufacturer of the appliance in the instructions for use of the shelf support and then the rear...

User Manual
Page 5
...; Do not let sparks or open flames to come in contact with them on the cooking surface. • This appliance is for household use only. • Do not change the specification of this appliance. • Make sure that the ventilation openings are not blocked. • Do not let the appliance stay unattended during the operation of the appliance condensates on...
...; Do not let sparks or open flames to come in contact with them on the cooking surface. • This appliance is for household use only. • Do not change the specification of this appliance. • Make sure that the ventilation openings are not blocked. • Do not let the appliance stay unattended during the operation of the appliance condensates on...
User Manual
Page 6
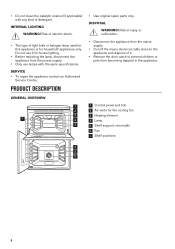
... power supply. • Only use lamps with any kind of it for house lighting. • Before replacing the lamp, disconnect the appliance from becoming trapped in the appliance. 1 Control panel and hob 2 Air vents for household appliances only. • Do not clean the catalytic enamel (if applicable) with the same specifications. PRODUCT DESCRIPTION GENERAL OVERVIEW 1 2 3 73 4 2 5 1 • Use original spare parts only. SERVICE • To repair...
... power supply. • Only use lamps with any kind of it for house lighting. • Before replacing the lamp, disconnect the appliance from becoming trapped in the appliance. 1 Control panel and hob 2 Air vents for household appliances only. • Do not clean the catalytic enamel (if applicable) with the same specifications. PRODUCT DESCRIPTION GENERAL OVERVIEW 1 2 3 73 4 2 5 1 • Use original spare parts only. SERVICE • To repair...
User Manual
Page 7
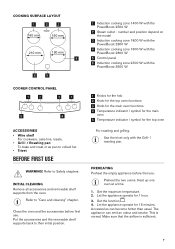
... W 1 Knobs for the hob 2 Knob for the top oven functions 3 Knob for the main oven functions 4 Temperature indicator / symbol for the main oven 5 Temperature indicator / symbol for the top oven For roasting and grilling. Set the function . 4. COOKING SURFACE LAYOUT 1 2 3 140 mm 180 mm 210 mm 180 mm 4 6 5 COOKER CONTROL PANEL 1 2 3 1 5 4 ACCESSORIES • Wire shelf For cookware, cake tins, roasts. • Grill- / Roasting pan To bake and roast or as pan to "Care and cleaning...
... W 1 Knobs for the hob 2 Knob for the top oven functions 3 Knob for the main oven functions 4 Temperature indicator / symbol for the main oven 5 Temperature indicator / symbol for the top oven For roasting and grilling. Set the function . 4. COOKING SURFACE LAYOUT 1 2 3 140 mm 180 mm 210 mm 180 mm 4 6 5 COOKER CONTROL PANEL 1 2 3 1 5 4 ACCESSORIES • Wire shelf For cookware, cake tins, roasts. • Grill- / Roasting pan To bake and roast or as pan to "Care and cleaning...

User Manual
Page 9
... a change the heat setting turn the knob to the correct heat setting. Remove the object or clean the control panel. • the hob gets too hot (e.g. The cooking zone operates. The induction cooking zones produce the heat necessary for more than 10 seconds (a pan, a cloth, etc.). After some time comes on the cooking zone. The glass ceramic is deactivated. The symbol comes on the control panel for the cooking process directly in the bottom of the cookware. HEAT SETTING DISPLAYS Display...
... a change the heat setting turn the knob to the correct heat setting. Remove the object or clean the control panel. • the hob gets too hot (e.g. The cooking zone operates. The induction cooking zones produce the heat necessary for more than 10 seconds (a pan, a cloth, etc.). After some time comes on the cooking zone. The glass ceramic is deactivated. The symbol comes on the control panel for the cooking process directly in the bottom of the cookware. HEAT SETTING DISPLAYS Display...

User Manual
Page 10
.... comes on . TIMER Count Down Timer You can use this function you can use this time the induction cooking zone automatically sets back to the highest heat setting. The remaining time counts back to the lowest heat setting. The heat setting display shows . To activate the function: touch . PAUSE This function sets all cooking zones that operate to 00. The function sets the highest heat setting for the cooking zone then set the cooking zone with . To deactivate the function: change...
.... comes on . TIMER Count Down Timer You can use this function you can use this time the induction cooking zone automatically sets back to the highest heat setting. The remaining time counts back to the lowest heat setting. The heat setting display shows . To activate the function: touch . PAUSE This function sets all cooking zones that operate to 00. The function sets the highest heat setting for the cooking zone then set the cooking zone with . To deactivate the function: change...

User Manual
Page 11
... changes between two levels. Set the heat setting in the cookware very quickly. 11 OFFSOUND CONTROL (DEACTIVATION AND ACTIVATION OF THE SOUNDS) Deactivate the hob. Touch for 4 seconds. HINTS AND TIPS • - the sounds are on the cooking zones to prevent a circuit overload. • The heat setting display of the following: HOB - When the function is exceeded. • The function decreases the power on . Set...
... changes between two levels. Set the heat setting in the cookware very quickly. 11 OFFSOUND CONTROL (DEACTIVATION AND ACTIVATION OF THE SOUNDS) Deactivate the hob. Touch for 4 seconds. HINTS AND TIPS • - the sounds are on the cooking zones to prevent a circuit overload. • The heat setting display of the following: HOB - When the function is exceeded. • The function decreases the power on . Set...
User Manual
Page 12
... boils very quickly on a zone set to the highest heat setting. • a magnet pulls on the hob surface. The noises are clean and dry before the count down timer sounds. Cookware is not proportional to the bottom of the cookware automatically. When you use high power level. • clicking: electric switching occurs. • hissing, buzzing: the fan operates. Time (min) Hints as possible. Mix...
... boils very quickly on a zone set to the highest heat setting. • a magnet pulls on the hob surface. The noises are clean and dry before the count down timer sounds. Cookware is not proportional to the bottom of the cookware automatically. When you use high power level. • clicking: electric switching occurs. • hissing, buzzing: the fan operates. Time (min) Hints as possible. Mix...
User Manual
Page 13
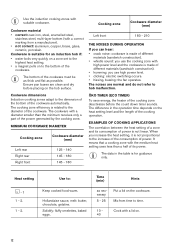
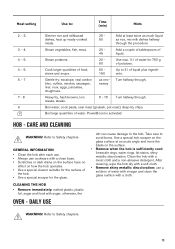
... glass surface with a clean base. • Scratches or dark stains on the surface have no effect on the surface. • Remove when the hob is activated. Boil water, cook pasta, sear meat (goulash, pot roast), deep-fry chips. Refer to avoid burns. DAILY USE dirt can cause damage to : Time (min) Hints 2. - 3. 3. - 4. 4. - 5. 4. - 5. 5. - 7 7 - 8 9 Simmer rice and milkbased dishes, heat up ready-cooked...
... glass surface with a clean base. • Scratches or dark stains on the surface have no effect on the surface. • Remove when the hob is activated. Boil water, cook pasta, sear meat (goulash, pot roast), deep-fry chips. Refer to avoid burns. DAILY USE dirt can cause damage to : Time (min) Hints 2. - 3. 3. - 4. 4. - 5. 4. - 5. 5. - 7 7 - 8 9 Simmer rice and milkbased dishes, heat up ready-cooked...
User Manual
Page 14
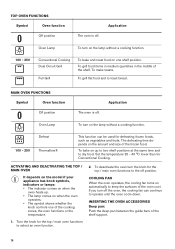
... and size of the frozen food. The defrosting time depends on the lamp without a cooking function. 100 - 250 Conventional Cooking Dual Circuit Grill Full Grill To bake and roast food on when the oven operates. • The symbol shows whether the knob controls one shelf position. Defrost 100 - 250 Thermaflow® This function can continue to keep the surfaces of the cooking zones, the oven functions...
... and size of the frozen food. The defrosting time depends on the lamp without a cooking function. 100 - 250 Conventional Cooking Dual Circuit Grill Full Grill To bake and roast food on when the oven operates. • The symbol shows whether the knob controls one shelf position. Defrost 100 - 250 Thermaflow® This function can continue to keep the surfaces of the cooking zones, the oven functions...
User Manual
Page 16
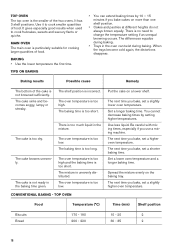
... baking time. BAKING • Use the lower temperature the first time. When the trays become cold again, the distortions disappear. CONVENTIONAL BAKING - The next time you use a mixing machine. The mixture is not ready in the oven can extend baking times by setting higher temperatures. Be careful with mixing times, especially if you bake, set a slightly lower oven temperature. The cake browns unevenly. MAIN OVEN The main oven is particularly suitable for cooking...
... baking time. BAKING • Use the lower temperature the first time. When the trays become cold again, the distortions disappear. CONVENTIONAL BAKING - The next time you use a mixing machine. The mixture is not ready in the oven can extend baking times by setting higher temperatures. Be careful with mixing times, especially if you bake, set a slightly lower oven temperature. The cake browns unevenly. MAIN OVEN The main oven is particularly suitable for cooking...

User Manual
Page 21
... side wall and remove it with a damp cloth or sponge only. CARE AND CLEANING 20 - 30 20 - 35 80 - 100 25 - 35 30 - 40 20 - 30 Tray 2 Grid 1 Grid 2 Tray 2 Grid 2 Grid / 2 Roasting pan WARNING! Do not clean the accessories in a fire. Clean stubborn dirt with the same precautions. Clean the oven control panel with a special oven cleaner. Cooking onally shifted Fatless...
... side wall and remove it with a damp cloth or sponge only. CARE AND CLEANING 20 - 30 20 - 35 80 - 100 25 - 35 30 - 40 20 - 30 Tray 2 Grid 1 Grid 2 Tray 2 Grid 2 Grid / 2 Roasting pan WARNING! Do not clean the accessories in a fire. Clean stubborn dirt with the same precautions. Clean the oven control panel with a special oven cleaner. Cooking onally shifted Fatless...
User Manual
Page 22
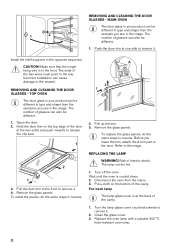
.... Open the door. 2. To install the panels, do the same steps in the front. A 2 1 2. Remove the glass panels. Wait until the oven is in reverse. The back lamp The lamp glass cover is at one side to the image. Clean the glass cover. 3. Push the door trim at the back of electric shock. The number of glasses can also be different in the image. Refer to remove it . 4. Turn the...
.... Open the door. 2. To install the panels, do the same steps in the front. A 2 1 2. Remove the glass panels. Wait until the oven is in reverse. The back lamp The lamp glass cover is at one side to the image. Clean the glass cover. 3. Push the door trim at the back of electric shock. The number of glasses can also be different in the image. Refer to remove it . 4. Turn the...
User Manual
Page 23
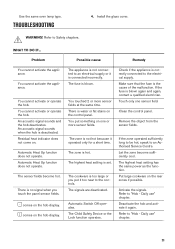
Install the glass cover. Problem Possible cause Remedy You cannot activate the appliance. An acoustic signal sounds and the hob deactivates. Residual heat indicator does not come on the hob display. There is blown. comes on . The fuse is no signal when you put something on the rear zones if possible. The zone is hot. The Child Safety Device or the Lock function operates. Remove the object...
Install the glass cover. Problem Possible cause Remedy You cannot activate the appliance. An acoustic signal sounds and the hob deactivates. Residual heat indicator does not come on the hob display. There is blown. comes on . The fuse is no signal when you put something on the rear zones if possible. The zone is hot. The Child Safety Device or the Lock function operates. Remove the object...
User Manual
Page 24
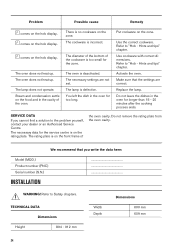
Problem Possible cause Remedy comes on the zone. The oven does not heat up . The cookware is deactivated. Put cookware on the hob display. Activate the oven. SERVICE DATA If you write the data here: Model (MOD.) Product number (PNC) Serial number (S.N.) INSTALLATION ... Refer to "Hob - The oven is incorrect. The lamp is too small for longer than 15 - 20 minutes after the cooking process...
Problem Possible cause Remedy comes on the zone. The oven does not heat up . The cookware is deactivated. Put cookware on the hob display. Activate the oven. SERVICE DATA If you write the data here: Model (MOD.) Product number (PNC) Serial number (S.N.) INSTALLATION ... Refer to "Hob - The oven is incorrect. The lamp is too small for longer than 15 - 20 minutes after the cooking process...

User Manual
Page 27
... cooking. Cooking with fan When possible, use residual heat and keep a meal warm. ENERGY SAVING The oven contains features which help you prepare few dishes at one time. The residual heat inside Freestanding Cooker ZCI66050BA 60.5 kg ZCI66050WA 60.8 kg ZCI66050XA 60.6 kg EN 60350-1 - Keep food warm Choose the lowest possible temperature setting to your local recycling facility or contact your municipal office. 27 * Part 1: Ranges, ovens...
... cooking. Cooking with fan When possible, use residual heat and keep a meal warm. ENERGY SAVING The oven contains features which help you prepare few dishes at one time. The residual heat inside Freestanding Cooker ZCI66050BA 60.5 kg ZCI66050WA 60.8 kg ZCI66050XA 60.6 kg EN 60350-1 - Keep food warm Choose the lowest possible temperature setting to your local recycling facility or contact your municipal office. 27 * Part 1: Ranges, ovens...

Product information sheet
Page 3
... Model Denomination Type of oven Position Mass of the appliance Number of cavities Heat source per cavity (electricity or gas) Volume per cavity Top Oven Main Oven Energy consumption (electricity) required to heat a standardised load in a cavity of an electric heated oven during a cycle in conventional mode per cavity (electric final energy) Top Oven Energy consumption required to heat a standardised load in a cavity of an electric heated oven during a cycle in fan-forced mode...
... Model Denomination Type of oven Position Mass of the appliance Number of cavities Heat source per cavity (electricity or gas) Volume per cavity Top Oven Main Oven Energy consumption (electricity) required to heat a standardised load in a cavity of an electric heated oven during a cycle in conventional mode per cavity (electric final energy) Top Oven Energy consumption required to heat a standardised load in a cavity of an electric heated oven during a cycle in fan-forced mode...
